Bei der Arbeit an Docker-Projekten entsprechen die vorhandenen Docker-Images meist nicht Ihren Anforderungen. Deshalb ist es nützlich zu wissen, was Dockerfile ist und wie man ein Docker-Image erstellt.
Mit Dockerfile können Sie eigene Docker-Images erstellen. Daher ist es wichtig, etwas über Dockerfile zu wissen.
Was ist eine Dockerdatei?
Es handelt sich um eine einfache Textdatei mit einer Reihe von Befehlen oder Anweisungen. Diese Befehle/Anweisungen werden nacheinander ausgeführt, um Aktionen am Basis-Image durchzuführen und ein neues Docker-Image zu erstellen.
kommentare und Befehlsargumente sind zwei Arten von Hauptzeilenblöcken in der Dockerfile-Syntax
Kommentare Syntax
#Zeilenblöcke, die für Kommentare verwendet werden

befehl argument argument1 .....
Befehle Argumente Beispiel
#Zeilenblöcke, die zum Kommentieren verwendet werden

befehl argument argument1 .....
Nachfolgend sehen Sie, wie Ihr Arbeitsablauf aussehen wird.
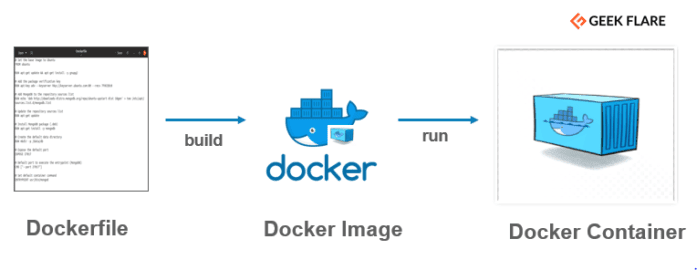
- Erstellen Sie eine Dockerdatei und erwähnen Sie die Anweisungen zur Erstellung Ihres Docker-Images
- Führen Sie den Befehl docker build aus, um ein Docker-Image zu erstellen
- Jetzt ist das Docker-Image einsatzbereit. Verwenden Sie den Befehl docker run, um Container zu erstellen
Schauen wir uns nun die grundlegenden Befehle an.
Grundlegende Befehle
Bei der Verwendung von Dockerfile habe ich diese grundlegenden Befehle als nützlich empfunden:
- FROM – Legt das zu verwendende Basis-Image fest und startet den Erstellungsprozess.
- RUN – Nimmt den Befehl und seine Argumente entgegen, um ihn aus dem Image auszuführen.
- CMD – Ähnliche Funktion wie der RUN-Befehl, aber er wird erst ausgeführt, nachdem der Container instanziiert wurde.
- ENTRYPOINT – Er zielt auf Ihre Standardanwendung im Image, wenn der Container erstellt wird.
- ADD – Kopiert die Dateien von der Quelle zum Ziel (innerhalb des Containers).
- ENV – Legt Umgebungsvariablen fest.
Kopieren Sie diese in eine Datei, damit Sie sie bei Bedarf nachschlagen können, oder besser noch, setzen Sie ein Lesezeichen für meinen Beitrag!
Wie erstellt man ein Docker-Image mit einer Dockerdatei?
Lassen Sie uns zunächst eine Dockerdatei erstellen.
geekflare@geekflare:~$ gedit DockerfileGeben Sie die folgenden Befehle/Anweisungen ein und speichern Sie sie.
# Setzen Sie das Basis-Image auf Ubuntu
FROM ubuntu

# Aktualisieren Sie die Liste der Repository-Quellen und installieren Sie gnupg2
RUN apt-get update && apt-get install -y gnupg2

# Fügen Sie den Paketprüfungsschlüssel hinzu
RUN apt-key adv --keyserver hkp://keyserver.ubuntu.com:80 --recv 7F0CEB10

# Fügen Sie MongoDB zur Liste der Repository-Quellen hinzu
RUN echo 'deb http://downloads-distro.mongodb.org/repo/ubuntu-upstart dist 10gen' > tee /etc/apt/sources.list.d/mongodb.list

# Aktualisieren Sie die Liste der Repository-Quellen
RUN apt-get update

# Installieren Sie das MongoDB-Paket (.deb)
RUN apt-get install -y mongodb

# Erstellen Sie das Standard-Datenverzeichnis
RUN mkdir -p /data/db

# Geben Sie den Standardport frei
EXPOSE 27017

# Standardport für die Ausführung des Einstiegspunkts (MongoDB)
CMD ["--port 27017"]

# Standard-Container-Befehl festlegen
ENTRYPOINT usr/bin/mongodb
In dieser Dockerdatei wird ubuntu als Basis-Image festgelegt. Dann werden die notwendigen Befehle und Argumente für die Installation von MongoDB angegeben. Port 27017 wird für MongoDB mit dem Standard-Container-Befehl usr/bin/mongodb freigegeben
Als nächstes werde ich es ausführen, um ein Docker-Image zu erstellen.
Ausführen einer Dockerdatei
Der folgende Befehl erstellt nach erfolgreicher Ausführung ein Docker-Image namens geekflare_mongodb.
geekflare@geekflare:~$ docker build -t geekflare_mongodb .

Senden des Build-Kontextes an den Docker-Daemon 667.2MB

Schritt 1/9 : VON ubuntu

aktuell: Ziehen aus library/ubuntu

7413c47ba209: Pull abgeschlossen

0fe7e7cbb2e8: Pull abgeschlossen

1d425c982345: Abruf abgeschlossen

344da5c95cec: Pull komplett

Digest: sha256:c303f19cfe9ee92badbbbd7567bc1ca47789f79303ddcef56f77687d4744cd7a

Status: Heruntergeladenes neueres Image für ubuntu:latest

--->
 3556258649b2

Schritt 2/10 : Führen Sie apt-get update aus && apt-get install -y gnupg2

--->
 Läuft in de3706328761

Get:1 http://security.ubuntu.com/ubuntu bionic-security InRelease [88.7 kB]

Hole:2 http://archive.ubuntu.com/ubuntu bionic InRelease [242 kB]

Abgerufen 16.9 MB in 38s (445 kB/s)

Paketlisten lesen...

Lesen von Paketlisten...

Abhängigkeitsbaum erstellen...

Lesen von Statusinformationen...

Ich brauche 5187 kB an Archiven.

Nach diesem Vorgang werden 15,8 MB zusätzlicher Speicherplatz benötigt.

Get:1 http://archive.ubuntu.com/ubuntu bionic/main amd64 readline-common all 7.0-3 [52.9 kB]

Hole:2 http://archive.ubuntu.com/ubuntu bionic/main amd64 libreadline7 amd64 7.0-3 [124 kB]

Hole:3 http://archive.ubuntu.com/ubuntu bionic-updates/main amd64 libsqlite3-0 amd64 3.22.0-1ubuntu0.1 [497 kB]

Get:4 http://archive.ubuntu.com/ubuntu bionic-updates/main amd64 libssl1.1 amd64 1.1.1-1ubuntu2.1~18.04.4 [1300 kB]

debconf: Verzögerung der Paketkonfiguration, da apt-utils nicht installiert ist

Holte 5187 kB in 12s (416 kB/s)

Auswahl des zuvor nicht ausgewählten Pakets readline-common.

(Lesen der Datenbank ... 4040 Dateien und Verzeichnisse sind derzeit installiert.)

Vorbereiten des Entpackens von .../00-readline-common_7.0-3_all.deb ...

Entpacken von readline-common (7.0-3) ...

Auswählen des zuvor nicht ausgewählten Pakets libreadline7:amd64.

Vorbereiten zum Entpacken von .../01-libreadline7_7.0-3_amd64.deb ...

Zuvor nicht ausgewähltes Paket dirmngr auswählen.

Einrichten von libnpth0:amd64 (1.5-3) ...

Einrichten von libksba8:amd64 (1.3.5-2) ...

Einrichten von gnupg-l10n (2.2.4-1ubuntu1.2) ...

Verarbeiten der Auslöser für libc-bin (2.27-3ubuntu1) ...

Entfernen des Zwischencontainers de3706328761

--->
 a32533894ed1

Schritt 3/10 : RUN apt-key adv --keyserver hkp://keyserver.ubuntu.com:80 --recv 7F0CEB10

--->
 Läuft in 69c4dba38983

Warnung: Die Ausgabe von apt-key sollte nicht geparst werden (stdout ist kein Terminal)

Wird ausgeführt: /tmp/apt-key-gpghome.MuT5BDWwKZ/gpg.1.sh --keyserver hkp://keyserver.ubuntu.com:80 --recv 7F0CEB10

gpg: Schlüssel 5F8F93707F0CEB10: öffentlicher Schlüssel "Totally Legit Signing Key <[email protected]>" importiert

gpg: Schlüssel 9ECBEC467F0CEB10: 1 Signatur nicht geprüft, da Schlüssel fehlt

gpg: Schlüssel 9ECBEC467F0CEB10: öffentlicher Schlüssel "Richard Kreuter <[email protected]>" importiert

gpg: Gesamtzahl verarbeitet: 2

gpg: importiert: 2

Entfernen des Zwischencontainers 69c4dba38983

--->
 cffbe06c1b50

Schritt 4/10 : RUN echo 'deb http://downloads-distro.mongodb.org/repo/ubuntu-upstart dist 10gen' > tee /etc/apt/sources.list.d/mongodb.list

--->
 Läuft in 40630fd7b0a9

Entfernen des Zwischencontainers 40630fd7b0a9

--->
 a1bd9d8d7e51

Schritt 5/10 : Führen Sie apt-get update aus

--->
 Wird ausgeführt in 750717d9c0ea

Treffer:1 http://archive.ubuntu.com/ubuntu bionic InRelease

Treffer:2 http://archive.ubuntu.com/ubuntu bionic-updates InRelease

Treffer:3 http://security.ubuntu.com/ubuntu bionic-security InRelease

Treffer:4 http://archive.ubuntu.com/ubuntu bionic-backports InRelease

Paketlisten lesen...

Entfernen des Zwischencontainers 750717d9c0ea

--->
 397d6501db58

Schritt 6/10 : Führen Sie apt-get install -y mongodb aus

--->
 Läuft in 88609c005e73

Paketlisten lesen...

Erstellen des Abhängigkeitsbaums...

Lesen von Statusinformationen...

Die folgenden NEUEN Pakete werden installiert:

libboost-filesystem1.65.1 libboost-iostreams1.65.1

libboost-program-options1.65.1 libboost-system1.65.1 libgoogle-perftools4

libpcap0.8 libpcrecpp0v5 libsnappy1v5 libstemmer0d libtcmalloc-minimal4

libunwind8 libyaml-cpp0.5v5 mongo-tools mongodb mongodb-clients

mongodb-server mongodb-server-core

0 upgegradet, 17 neu installiert, 0 zu entfernen und 0 nicht upgegradet.

Sie benötigen 53,7 MB an Archiven.

Nach diesem Vorgang werden 218 MB zusätzlicher Speicherplatz benötigt.

Get:1 http://archive.ubuntu.com/ubuntu bionic-updates/universe amd64 mongodb-clients amd64 1:3.6.3-0ubuntu1.1 [20.2 MB]

Get:2 http://archive.ubuntu.com/ubuntu bionic-updates/universe amd64 mongodb-server-core amd64 1:3.6.3-0ubuntu1.1 [20.3 MB]

Hole:3 http://archive.ubuntu.com/ubuntu bionic-updates/universe amd64 mongodb-server all 1:3.6.3-0ubuntu1.1 [12.6 kB]

Get:4 http://archive.ubuntu.com/ubuntu bionic-updates/universe amd64 mongodb amd64 1:3.6.3-0ubuntu1.1 [9968 B]

Holte 53,7 MB in 10s (5485 kB/s)

Auswahl des zuvor nicht ausgewählten Pakets libpcap0.8:amd64.

(Lesen der Datenbank ... 4390 Dateien und Verzeichnisse sind derzeit installiert.)

Auswahl des zuvor nicht ausgewählten Pakets mongodb-clients.

Vorbereiten des Entpackens von .../13-mongodb-clients_1:3.6.3-0ubuntu1.1_amd64.deb ...

Entpacken von mongodb-clients (1:3.6.3-0ubuntu1.1) ...

Auswählen des zuvor nicht ausgewählten Pakets mongodb-server-core.

Vorbereiten des Entpackens von .../14-mongodb-server-core_1:3.6.3-0ubuntu1.1_amd64.deb ...

Entpacken von mongodb-server-core (1:3.6.3-0ubuntu1.1) ...

Auswählen des zuvor nicht ausgewählten Pakets mongodb-server.

Vorbereiten des Entpackens von .../15-mongodb-server_1:3.6.3-0ubuntu1.1_all.deb ...

Entpacken von mongodb-server (1:3.6.3-0ubuntu1.1) ...

Auswählen des zuvor nicht ausgewählten Pakets mongodb.

Vorbereiten zum Entpacken von .../16-mongodb_1:3.6.3-0ubuntu1.1_amd64.deb ...

Entpacken von mongodb (1:3.6.3-0ubuntu1.1) ...

Einrichten von mongodb-server-core (1:3.6.3-0ubuntu1.1) ...

Einrichten von mongo-tools (3.6.3-0ubuntu1) ...

Einrichten von mongodb-clients (1:3.6.3-0ubuntu1.1) ...

Einrichten von mongodb-server (1:3.6.3-0ubuntu1.1) ...

invoke-rc.d: konnte den aktuellen Runlevel nicht ermitteln

invoke-rc.d: policy-rc.d verweigert die Ausführung von start.

Einrichten von mongodb (1:3.6.3-0ubuntu1.1) ...

Verarbeitung von Triggern für libc-bin (2.27-3ubuntu1) ...

Entfernen des Zwischencontainers 88609c005e73

--->
 d9c072cb1f84

Schritt 7/10 : RUN mkdir -p /data/db

--->
 Läuft in f817778f69ab

Entfernen des Zwischencontainers f817778f69ab

--->
 a3fbdb3def5c

Schritt 8/10 : EXPOSE 27017

--->
 Läuft in 8d070e2a1e07

Entfernen des Zwischencontainers 8d070e2a1e07

--->
 f770776a538c

Schritt 9/10 : CMD ["--port 27017"]

--->
 Läuft in ab612410df77

Entfernen des Zwischencontainers ab612410df77

--->
 e5830b80934f

Schritt 10/10 : ENTRYPOINT usr/bin/mongod

--->
 Läuft in 95f574727aab

Entfernen des Zwischencontainers 95f574727aab

--->
 095d17727ca0

Erfolgreich gebaut 095d17727ca0

Erfolgreich getaggt geekflare_mongodb:latest
Lassen Sie uns überprüfen, ob das Docker-Image mit dem Namen geekflare_mongodb erstellt wurde.
geekflare@geekflare:~$ docker images

REPOSITORY TAG IMAGE ID CREATED SIZE

geekflare_mongodb latest 095d17727ca0 vor 3 Minuten 325MB

ubuntu aktuell 3556258649b2 vor 4 Tagen 64.2MB

mean_express aktuell 35dcb3df9806 vor 6 Tagen 923MB

mean_angular aktuell 9f8d61db600c vor 6 Tagen 1.29GB
Führen Sie das Docker-Image geekflare_mongodb in einem Container mongo_container aus.
geekflare@geekflare:~$ docker run --name mongo_container -i -t geekflare_mongodb

2019-07-27T19:38:23.734 0000 I CONTROL [initandlisten] MongoDB startet : pid=6 port=27017 dbpath=/data/db 64-bit host=b0095c1e5536

2019-07-27T19:38:23.735 0000 I CONTROL [initandlisten] db version v3.6.3

2019-07-27T19:38:23.735 0000 I CONTROL [initandlisten] git version: 9586e557d54ef70f9ca4b43c26892cd55257e1a5

2019-07-27T19:38:23.736 0000 I CONTROL [initandlisten] OpenSSL Version: OpenSSL 1.1.1 11 Sep 2018

2019-07-27T19:38:23.739 0000 I CONTROL [initandlisten] Zuweiser: tcmalloc

2019-07-27T19:38:23.739 0000 I CONTROL [initandlisten] Module: keine

2019-07-27T19:38:23.739 0000 I CONTROL [initandlisten] Build-Umgebung:

2019-07-27T19:38:23.739 0000 I CONTROL [initandlisten] distarch: x86_64

2019-07-27T19:38:23.739 0000 I CONTROL [initandlisten] target_arch: x86_64

2019-07-27T19:38:23.739 0000 I CONTROL [initandlisten] Optionen: {}

2019-07-27T19:38:23.745 0000 I STORAGE [initandlisten] wiredtiger_open config: create,cache_size=2038M,session_max=20000,eviction=(threads_min=4,threads_max=4),config_base=false,statistics=(fast),log=(enabled=true,archive=true,path=journal,compressor=snappy),file_manager=(close_idle_time=100000),statistics_log=(wait=0),verbose=(recovery_progress),

2019-07-27T19:38:24.733 0000 I CONTROL [initandlisten]

2019-07-27T19:38:24.734 0000 I CONTROL [initandlisten] ** WARNING: Die Zugriffskontrolle ist für die Datenbank nicht aktiviert.

2019-07-27T19:38:24.735 0000 I CONTROL [initandlisten] ** Der Lese- und Schreibzugriff auf Daten und Konfiguration ist uneingeschränkt möglich.

2019-07-27T19:38:24.736 0000 I CONTROL [initandlisten] ** WARNUNG: Sie führen diesen Prozess als Root-Benutzer aus, was nicht empfohlen wird.

2019-07-27T19:38:24.736 0000 I CONTROL [initandlisten]

2019-07-27T19:38:24.736 0000 I CONTROL [initandlisten] ** WARNUNG: Dieser Server ist an localhost gebunden.

2019-07-27T19:38:24.737 0000 I CONTROL [initandlisten] ** Entfernte Systeme können keine Verbindung zu diesem Server herstellen.

2019-07-27T19:38:24.737 0000 I CONTROL [initandlisten] ** Starten Sie den Server mit --bind_ip <address>, um anzugeben, welche IP

2019-07-27T19:38:24.737 0000 I CONTROL [initandlisten] ** Adressen, von denen er Antworten liefern soll, oder mit --bind_ip_all, um

2019-07-27T19:38:24.737 0000 I CONTROL [initandlisten] ** an alle Schnittstellen binden. Wenn dieses Verhalten erwünscht ist, starten Sie die

2019-07-27T19:38:24.738 0000 I CONTROL [initandlisten] ** Server mit --bind_ip 127.0.0.1, um diese Warnung zu deaktivieren.

2019-07-27T19:38:24.738 0000 I CONTROL [initandlisten]

2019-07-27T19:38:24.739 0000 I STORAGE [initandlisten] createCollection: admin.system.version mit angegebener UUID: 4b8b509d-633a-46c1-a302-cb8c82b0d5d3

2019-07-27T19:38:24.788 0000 I COMMAND [initandlisten] setze featureCompatibilityVersion auf 3.6

2019-07-27T19:38:24.818 0000 I STORAGE [initandlisten] createCollection: local.startup_log mit generierter UUID: 6c1c0366-4b1b-4b92-9fcd-d18acc126072

2019-07-27T19:38:24.862 0000 I FTDC [initandlisten] Initialisierung der Vollzeit-Diagnosedatenerfassung mit Verzeichnis '/data/db/diagnostic.data'

2019-07-27T19:38:24.866 0000 I NETWORK [initandlisten] wartet auf Verbindungen auf Port 27017
Öffnen Sie ein neues Terminal und überprüfen Sie, ob mongo_container läuft.
geekflare@geekflare:~$ docker ps

CONTAINER ID IMAGE COMMAND CREATED STATUS PORTS NAMES

b0095c1e5536 geekflare_mongodb "/bin/sh -c usr/bin/..." vor 35 Sekunden Up 33 Sekunden 27017/tcp mongo_container
Wie Sie sehen können, ist der aus dem geekflare_mongodb-Image erstellte Container betriebsbereit.
Ich hoffe, Sie haben jetzt eine Vorstellung von Dockerfile und seinen Vorteilen. Sie können sich auch diese Dokumentation über die besten Praktiken von Dockerfile ansehen, um mehr zu erfahren.