Aprenda a instalar Tomcat y algunas de las opciones de alojamiento en la nube para desplegar sus aplicaciones Tomcat.
Hay dos partes en este blogpost – la primera parte habla de cómo instalar Apache Tomcat en Ubuntu por sí mismo, y la segunda parte habla de las mejores plataformas de alojamiento disponibles para alojar aplicaciones Tomcat.
¿Qué es Apache Tomcat?
ApacheTomcat es un servidor web/aplicación de código abierto de la fundación Apache. Anteriormente se llamaba Jakarta. Es un servidor HTTP y un contenedor de servlets. Por defecto, se ejecuta en el puerto 8080.
Tomcat implementa los servlets java y las especificaciones de las páginas de servidor Java. Proporciona un entorno de servidor web Java para que el código Java se ejecute en él. Apache Tomcat incluye herramientas de configuración y gestión. También se puede configurar directamente editando el archivo de configuración XML.
He aquí una guía paso a paso para instalar Tomcat 9 en Ubuntu 18.04.
Requisitos previos
Para instalar Tomcat, necesita tener instalado java en su sistema.
Actualice el repositorio e instale Java 8.
sudo apt-get update
sudo apt-get install openjdk-8-jdk -y
Elija Java 8 que acaba de instalar como la versión actual de Java.
sudo update-alternatives --config javaCompruebe la versión de Java.
geekflare@geekflare:~$ java -version
openjdk versión "1.8.0_212"
Entorno de ejecución OpenJDK (build 1.8.0_212-8u212-b03-0ubuntu1.18.10.1-b03)
OpenJDK 64-Bit Server VM (build 25.212-b03, modo mixto)
Instale Tomcat 9
Descargue el último paquete de la versión 9 de Tomcat, actualmente es tomcat-9.0.27. Siempre puede consultar el enlace de descarga oficial para obtener la última versión.
https://tomcat.apache.org/download-90.cgiEl ejemplo siguiente es para la versión 9.0.27.
- Descargue el paquete Tomcat
geekflare@geekflare:~$ wget http://www-eu.apache.org/dist/tomcat/tomcat-9/v9.0.27/bin/apache-tomcat-9.0.27.tar.gz
--2019-11-18 14:29:04-- http://www-eu.apache.org/dist/tomcat/tomcat-9/v9.0.27/bin/apache-tomcat-9.0.27.tar.gz
Resolviendo www-eu.apache.org (www-eu.apache.org)... 95.216.24.32, 2a01:4f9:2a:185f::2
Conectando con www-eu.apache.org (www-eu.apache.org)|95.216.24.32|:80... conectado.
Solicitud HTTP enviada, esperando respuesta... 200 OK
Longitud: 10982406 (10M) [application/x-gzip]
Guardando en: 'apache-tomcat-9.0.27.tar.gz'

apache-tomcat-9.0.27.tar.gz 100%[=================================================================>] 10.47M 3.87MB/s en 2.7s

2019-11-18 14:29:38 (3.87 MB/s) - 'apache-tomcat-9.0.27.tar.gz' guardado [10982406/10982406]- Extraer el paquete Tomcat 9
geekflare@geekflare:~$ tar -xzf apache-tomcat-9.0.27.tar.gz- Por motivos de seguridad, crearemos un usuario de sistema independiente para Tomcat.
geekflare@geekflare:~$ sudo useradd -r -m -U -d /home/geekflare/apache-tomcat-9.0.27 -s /bin/false tomcat
[sudo] contraseña para geekflare:- El usuario tomcat debe tener acceso completo al directorio de instalación de Tomcat. Este comando cambia la propiedad del directorio de instalación al usuario tomcat.
geekflare@geekflare:~$ sudo chown -RH tomcat: apache-tomcat-9.0.27- Todos los scripts dentro del directorio bin de tomcat deben ser ejecutables, así que añada el permiso de ejecutable.
geekflare@geekflare:~$ sudo sh -c 'chmod x apache-tomcat-9.0.27/bin/*.sh'- Cree un archivo
tomcat.servicedentro de/etc/systemd/system/para ejecutar tomcat como un servicio.
¿Se pregunta por qué? Bueno, esto es para asegurar que Tomcat se inicie automáticamente cuando se reinicie el servidor.
geekflare@geekflare:~$ sudo gedit /etc/systemd/system/tomcat.service- Copie y pegue el contenido de abajo en el archivo. Cambie la ruta
JAVA_HOMEde acuerdo con su ruta de instalación de java.
[Unidad]

Descripción=Contenedor de servlets Tomcat 9

Después=network.target

[Servicio]

Tipo=forking

Usuario=tomcat

Grupo=tomcat

Entorno="JAVA_HOME=/usr/lib/jvm/java-1.8.0-openjdk-amd64"

Environment="JAVA_OPTS=-Djava.security.egd=file:///dev/urandom -Djava.awt.headless=true"

Environment="CATALINA_BASE=/home/geekflare/apache-tomcat-9.0.27"

Entorno="CATALINA_HOME=/home/geekflare/apache-tomcat-9.0.27"

Entorno="CATALINA_PID=/home/geekflare/apache-tomcat-9.0.27"

Environment="CATALINA_OPTS=-Xms512M -Xmx1024M -servidor -XX: UseParallelGC"

ExecStart=/home/geekflare/apache-tomcat-9.0.27/bin/startup.sh

ExecStop=/home/geekflare/apache-tomcat-9.0.27/bin/shutdown.sh

[Instalar]

WantedBy=multi-user.target- Ejecute el siguiente comando para informar al sistema sobre el nuevo archivo de servicio que acaba de crear.
geekflare@geekflare:~$ sudo systemctl daemon-reload- Inicie el servicio tomcat.
geekflare@geekflare:~$ sudo systemctl start tomcat- Compruebe si el servicio tomcat está en modo de ejecución o no.
geekflare@geekflare:~$ systemctl status tomcat.service
● tomcat.service - Contenedor de servlets Tomcat 9
Cargado: cargado (/etc/systemd/system/tomcat.service; desactivado; preconfiguración del proveedor: activado)
Activo: activo (en ejecución) desde lun 2019-11-18 14:41:12 EST; hace 4s
Proceso: 22939 ExecStart=/home/geekflare/apache-tomcat-9.0.27/bin/startup.sh (code=exited, status=0/SUCCESS)
PID principal: 22947 (java)
Tareas: 14 (límite: 4680)
Memoria: 63.0M
Grupo C /system.slice/tomcat.service
└─22947 /usr/lib/jvm/java-1.8.0-openjdk-amd64/bin/java -Djava.util.logging.config.file=/home/geekflare/apache-tomcat-9.0.27/conf/logg

Nov 18 14:41:12 geekflare systemd[1]: Iniciando el contenedor de servlets Tomcat 9...
Nov 18 14:41:12 geekflare systemd[1]: Iniciado el contenedor de servlets Tomcat 9.- Puede pedir al sistema que inicie automáticamente tomcat en el momento del arranque ejecutando el siguiente comando.
geekflare@geekflare:~$ sudo systemctl enable tomcat
Creado el enlace simbólico /etc/systemd/system/multi-user.target.wants/tomcat.service → /etc/systemd/system/tomcat.service.- Asegúrese de que su cortafuegos no impide la ejecución de Tomcat. Abra el puerto 8080 en el que se ejecuta tomcat.
geekflare@geekflare:~$ sudo ufw allow 8080/tcp
Reglas actualizadas
Reglas actualizadas (v6)- Edite el archivo
tomcat-users.xmldonde se definen todos los usuarios y roles para la interfaz de gestión web de tomcat.
geekflare@geekflare:~$ sudo gedit apache-tomcat-9.0.27/conf/tomcat-users.xml- También estoy dando a un usuario tomcat el rol manager-gui, que le permite acceder a la interfaz de gestión web con una credencial diferente.
<!--?xml version="1.0" encoding="UTF-8"?-->

<!--

Con licencia de la Apache Software Foundation (ASF) bajo uno o más

acuerdos de licencia de colaborador. Consulte el archivo NOTICE distribuido con

esta obra para obtener información adicional sobre la propiedad de los derechos de autor.

La ASF le concede la licencia de este archivo bajo la Licencia Apache, Versión 2.0

(la "Licencia"); no puede utilizar este archivo salvo en cumplimiento de

la Licencia. Puede obtener una copia de la Licencia en

http://www.apache.org/licenses/LICENSE-2.0

A menos que lo exija la legislación aplicable o se acuerde por escrito, el software

distribuido bajo la Licencia se distribuye "TAL CUAL",

SIN GARANTÍAS NI CONDICIONES DE NINGÚN TIPO, ni expresas ni implícitas.

Consulte la Licencia para conocer el lenguaje específico que rige los permisos y

limitaciones bajo la Licencia.

-->


<tomcat-usuarios xmlns="http://tomcat.apache.org/xml" xmlns:xsi="http://www.w3.org/2001/XMLSchema-instance" xsi:schemalocation="http://tomcat.apache.org/xml tomcat-users.xsd" version="1.0">

<!--

NOTA: Por defecto, no se incluye ningún usuario en el rol "manager-gui" requerido

para operar la aplicación web "/manager/html". Si desea utilizar esta aplicación,

Debe definir dicho usuario - el nombre de usuario y la contraseña son arbitrarios. Es

recomienda encarecidamente que NO utilice uno de los usuarios de los comentados

la sección de abajo ya que están pensados para su uso con los ejemplos web

de ejemplo.

-->


<!--

NOTA: Las entradas de usuario y rol de ejemplo que se muestran a continuación están pensadas para su uso con la aplicación

aplicación web de ejemplo. Están envueltos en un comentario y por lo tanto se ignoran

al leer este archivo. Si desea configurar estos usuarios para utilizarlos con la aplicación

aplicación web de ejemplos, no olvide eliminar el <!.. ..> que rodea a

los rodea. También tendrá que configurar las contraseñas con algo apropiado.

-->


<!--

-->


<role rolename="tomcat">

<role rolename="gestor-gui">

<user nombreusuario="tomcat" contraseña="tomcat" roles="tomcat">

<user nombre_usuario="tomcat" contraseña="admin" roles="manager-gui">
</user></user></role></role></tomcat-usuarios>- Abra su navegador favorito y acceda a
http://localhost:8080.
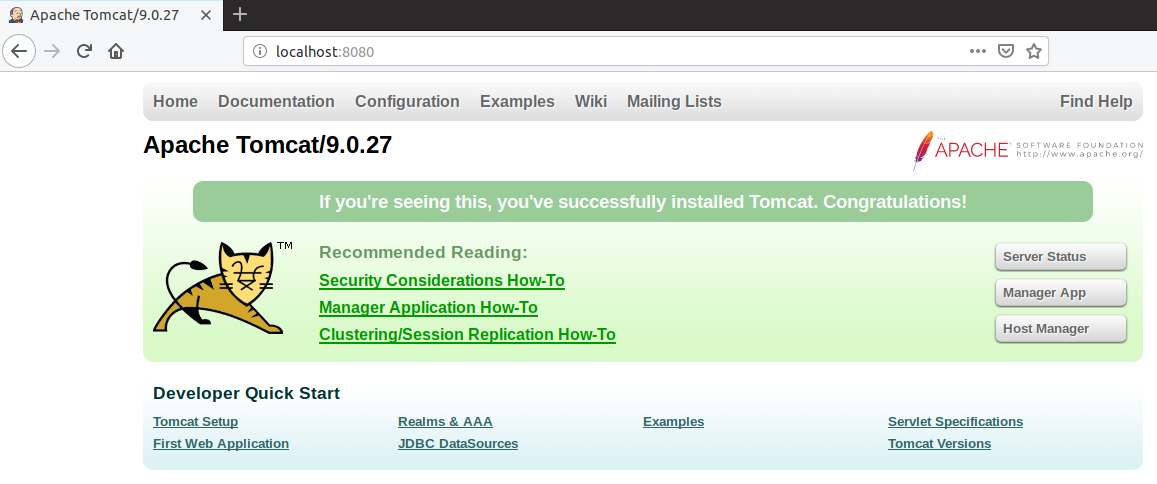
- Ahora vaya a
http://localhost:8080/manager/html,donde se encuentra el panel de control web de tomcat. Se le pedirá que inicie sesión, utilice el nombre de usuario tomcat y la contraseña admin para iniciar sesión. Utilizando esta interfaz, podrá iniciar, detener, recargar, desplegar una aplicación con sólo pulsar un botón.

¡Enhorabuena! Ha instalado con éxito Tomcat 9 en Ubuntu 18.04.
Ahora la segunda parte sobre las plataformas de alojamiento y sus características.
hosting.com
Laplataforma de alojamiento hosting.com afirma que su alojamiento Tomcat es el más rápido, sencillo y fiable. En hosting.com, usted puede correr 20X más rápido usando el VPS Turbo boost de.
Ofrecen soporte 24×7 con cualquier problema de alojamiento que encuentre en su plataforma con una garantía de tiempo de actividad del 99,9%. Eso hace de hosting.com una plataforma de alojamiento muy fiable.
Le da suficientes opciones para personalizar los recursos que necesita en la plataforma. hosting.com es amigable con los desarrolladores y le da el acceso raíz a todos los archivos del servidor, que usted es libre de editar según su necesidad. Existe una garantía de devolución del dinero en cualquier momento y sin riesgos en caso de que no le guste la plataforma de alojamiento y quiera dejar de utilizarla.
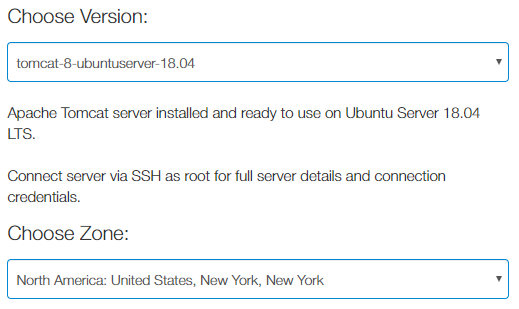
Kamatera
Kamatera es una popular plataforma de alojamiento en la nube. Le ayuda a instalar, configurar y poner en marcha tomcat en cuestión de segundos. Puede elegir la versión de tomcat que desea alojar y también la zona (región) en la que desea alojar desde una sencilla interfaz de usuario.
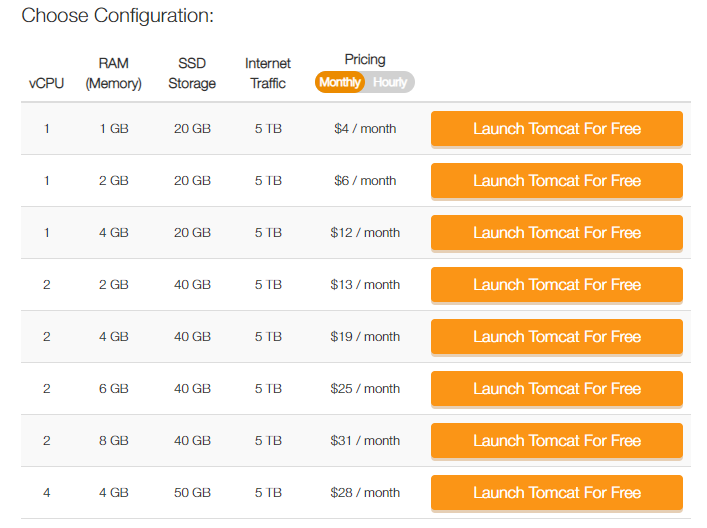
El precio es muy atractivo.
Puede empezar desde tan sólo 4 dólares al mes.
Dependiendo de la configuración que elija, existe una amplia gama de opciones de precios ofrecidas por Kamatera. Puede elegir entre una opción de precios mensuales o incluso por horas. Lo mejor es que los primeros 30 días son totalmente gratuitos.
Virtuozzo
Virtuozzo ofrece una configuración multi-nube en la que puede alojar aplicaciones en diferentes nubes para una disponibilidad extra alta. Aquí puede obtener una combinación de los modelos PaaS (Plataforma como servicio) y CaaS (Contenedor como servicio).
Con su sencilla interfaz de usuario, puede seleccionar fácilmente la aplicación Tomcat y su versión. A continuación, el lanzamiento sólo le llevará unos segundos.
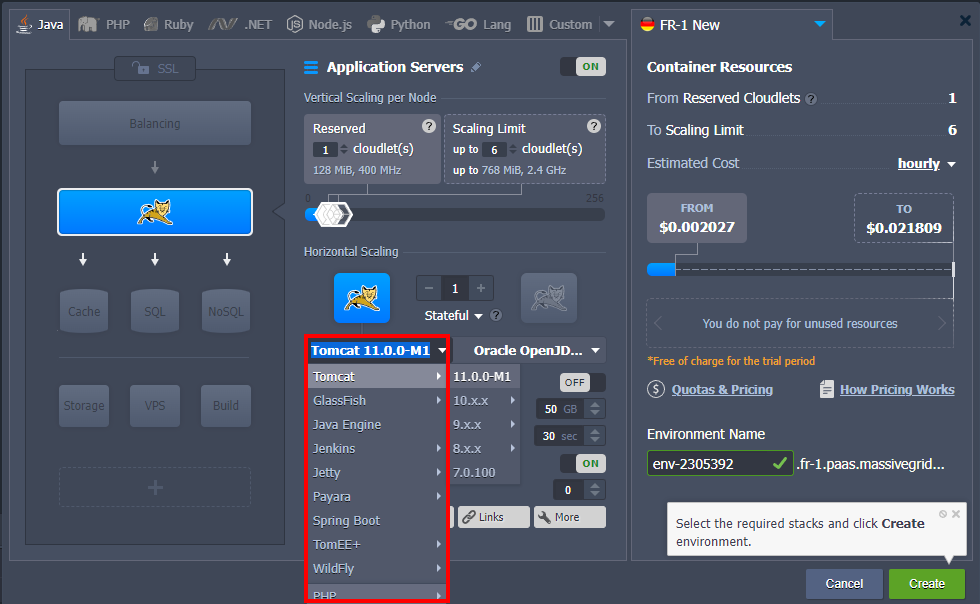
La agrupación automática de Tomcat en Virtuozzo ofrece una función de alta disponibilidad. Así, si alguna instancia tomcat falla, otra instancia se inicia automáticamente. Su cluster tomcat puede escalarse automáticamente de forma vertical y horizontal en Virtuozzo. Sin embargo, también puede escalar su clúster horizontalmente de forma manual.
Algunas otras características que ofrece Virtuozzo son:
- Soporte para microservicios y aplicaciones heredadas
- Herramientas CI y CD integradas para la automatización
- Configuración rápida de aplicaciones en clúster
- Sistema de monitorización integrado con notificación de alertas
- Plugins IDE integrados: IntelliJ IDEA, Eclipse, NetBeans
- Distribución automatizada del tráfico para el despliegue sin tiempo de inactividad
- Entorno compartido y colaboración de cuentas con distintos niveles de acceso
- Marketplace con un rico conjunto de aplicaciones preconfiguradas para su instalación con un solo clic
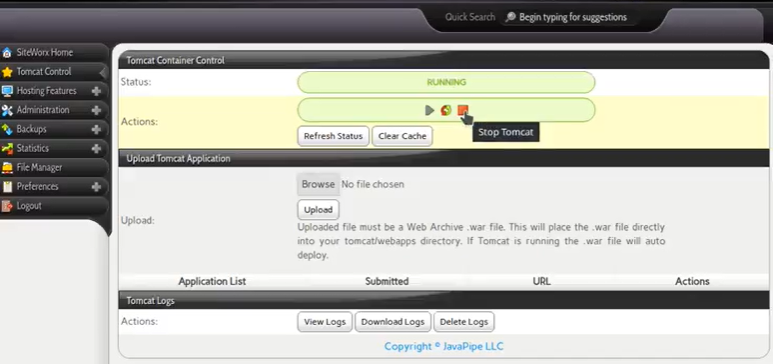
JavaPipe
Otra plataforma de alojamiento es Java Hosting Service para Tomcat. Contiene plugins integrados para hibernate, Spring MVC, Servlets y JSP, Grails, Play y muchos más.
Con JavaPipe, puede empezar con tan sólo 5,40 $ al mes, lo que le proporciona una instancia dedicada de Tomcat de las versiones 7, 8 o 9 con compatibilidad con JDK 7, 8, 10 u 11. Le da de 128 MB a 2 GB de RAM dedicada y acceso ilimitado a MariaDB. También obtiene 200 GB de tráfico mensual y 5 GB de almacenamiento SSD. Hay otras opciones de precios también con la plataforma Java Hosting que ofrece más tráfico mensual y almacenamiento SSD.
Además, obtendrá un 40% de descuento si paga durante tres años. Así que, si puede pensar en un plan de alojamiento a largo plazo, esto podría ser beneficioso.
Conclusion
Eso ha sido todo sobre la instalación de Tomcat y las plataformas de alojamiento. Si está interesado en alojar Tomcat usted mismo pero en la nube, entonces eche un vistazo a estas plataformas de alojamiento en la nube.