I will show you several operations which an administrator can perform on a remote windows system using ansible-playbook.
Ansible is one of the most used DevOps tools in the market today. It provides a bunch of windows modules that are used to configure and manage the Windows server. I assume you already have Ansible installed on Windows from where you want to manage the Windows servers.
The following are some of the commonly used tasks performed by Windows administrators on a daily basis. You will be amazed to see how easy it is administered Windows using Ansible.
My Ansible Windows controller machine’s IP address is 192.168.0.106, and my remote Windows system’s IP address is 192.168.0.102. Before you get started, make sure you run a win_ping module to check whether you are able to connect to windows remote server or not.
Geekflare@MSEDGEWIN10 ~
$ ansible win -m win_ping
192.168.0.102 | SUCCESS => {
    "changed": false,
    "ping": "pong"
}
My connection to a remote host is successful.
So, let’s get started with Ansible Playbooks…
Copying Files
win_copy is an ansible module that copies a file from the local server to a remote Windows host. I will use this module to copy a single PDF.
Use the below YAML code, give the source and destination paths.
Geekflare@MSEDGEWIN10 ~
$ vi copy.yml
---

- hosts: win

  tasks:

  - name: Copy File

    win_copy:

      src: C:\output.pdf

      dest: C:\ansible_examples\

      remote_src: yes
Run the ansible-playbook for win_copy.
Geekflare@MSEDGEWIN10 ~
$ ansible-playbook copy.yml

PLAY <x><x><x><x><x><x><x><x>[win]</x></x></x></x></x></x></x></x> ***********************************************************************************************************************************

TASK [Gathering Facts] ***********************************************************************************************************************
ok: [192.168.0.102]

TASK [Copy File] *****************************************************************************************************************************
changed: [192.168.0.102]

PLAY RECAP ***********************************************************************************************************************************
192.168.0.102
: ok=2 changed=1 unreachable=0 failed=0
skipped=0 rescued=0 ignored=0
The file has been copied successfully at the destination location on a remote windows system.

Install/UnInstall MSI
To install an application using the MSI file, you need to use win_get_url to mention the path of the MSI file to download and then use the win_package module to install it. The state present means the MSI will be installed on the machine, and the application is in the present state.
Here, I am installing Apache.
YAML code to be used:
Geekflare@MSEDGEWIN10 ~
$ vi msi.yml
---
- name: Installing Apache MSI
  hosts: win

  tasks:
    - name: Download the Apache installer
      win_get_url:
        url: https://archive.apache.org/dist/httpd/binaries/win32/httpd-2.2.25-win32-x86-no_ssl.msi
        dest: C:\ansible_examples\httpd-2.2.25-win32-x86-no_ssl.msi

    - name: Install MSI
      win_package:
        path: C:\ansible_examples\httpd-2.2.25-win32-x86-no_ssl.msi
        state: present
Run the ansible-playbook to install using MSI.
Geekflare@MSEDGEWIN10 ~
$ ansible-playbook msi.yml

PLAY [Installing Apache MSI] *****************************************************************************************************************

TASK [Gathering Facts] ***********************************************************************************************************************
ok: [192.168.0.102]

TASK [Download the Apache installer] *********************************************************************************************************
changed: [192.168.0.102]

TASK [Install MSI] ***************************************************************************************************************************
changed: [192.168.0.102]

PLAY RECAP ***********************************************************************************************************************************
192.168.0.102
: ok=3 changed=2 unreachable=0 failed=0
skipped=0 rescued=0 ignored=0
Now, go to the windows system and check if the apache application got installed successfully.
C:\Users\geekflare>cd C:\Program Files (x86)\Apache Software Foundation\Apache2.2\bin
C:\Program Files (x86)\Apache Software Foundation\Apache2.2\bin>httpd -v
Server version: Apache/2.2.25 (Win32)
Server built: Jul 10 2013 01:52:12
You can also install applications using MSI with arguments. Below is the same example as above, but instead of a state, we are using an install argument to install apache.
YAML code to be used:
---

- name: Installing Apache MSI

  hosts: win

  tasks:

    - name: Download the Apache installer

      win_get_url:

        url: https://archive.apache.org/dist/httpd/binaries/win32/httpd-2.2.25-win32-x86-no_ssl.msi

        dest: C:\ansible_examples\httpd-2.2.25-win32-x86-no_ssl.msi


    - name: Install MSI

      win_package:

        path: C:\ansible_examples\httpd-2.2.25-win32-x86-no_ssl.msi

        arguments:

          - /install

          - /passive

          - /norestart
To uninstall an application using the MSI file, you need to use the win_package module. The state absent means the application will be uninstalled using the MSI file.
Here, I am uninstalling Apache.
Geekflare@MSEDGEWIN10 ~
$ vi uninstall_msi.yml

---

- name: UnInstalling Apache MSI

  hosts: win

  tasks:

    - name: UnInstall MSI

      win_package:

        path: C:\ansible_examples\httpd-2.2.25-win32-x86-no_ssl.msi

        state: absent
Run the ansible-playbook to uninstall using MSI.
Geekflare@MSEDGEWIN10 ~
$ ansible-playbook uninstall_msi.yml

PLAY [UnInstalling Apache MSI] *****************************************************************************************************************

TASK [Gathering Facts] ***********************************************************************************************************************
ok: [192.168.0.102]

TASK [UnInstall MSI] *************************************************************************************************************************
changed: [192.168.0.102]

PLAY RECAP ***********************************************************************************************************************************
192.168.0.102
: ok=2 changed=1 unreachable=0 failed=0
skipped=0 rescued=0 ignored=0
Now, if I check the apache version, I will get the below output as the application got uninstalled.
C:\Program Files (x86)\Apache Software Foundation\Apache2.2\bin>httpd -v 'httpd' is not recognized as an internal or external command,
operable program or batch file.
Uninstall Software (.EXE)
You can also uninstall software with .exe file using the product id of that software.
Geekflare@MSEDGEWIN10 ~
$ vi uninstall.yml
---

- hosts: win

  tasks:

   - name: Uninstall 7-Zip from the exe

     win_package:

       path: C:\Program Files\7-Zip\Uninstall.exe

       product_id: 7-Zip

       arguments: /S

       state: absent
Run the ansible-playbook to uninstall 7-Zip.
Geekflare@MSEDGEWIN10 ~
$ ansible-playbook uninstall.yml

PLAY <x><x><x><x><x><x><x><x>[win]</x></x></x></x></x></x></x></x> *************************************************************************************************************************************************************************************

TASK [Gathering Facts] *************************************************************************************************************************************************************************
ok: [192.168.0.102]

TASK [Uninstall 7-Zip from the exe] ***********************************************************************************************************************************************************
changed: [192.168.0.102]

PLAY RECAP *************************************************************************************************************************************************************************************
192.168.0.102              : ok=2    changed=1    unreachable=0    failed=0    skipped=0    rescued=0    ignored=0
Stop/Start/Restart Windows Services
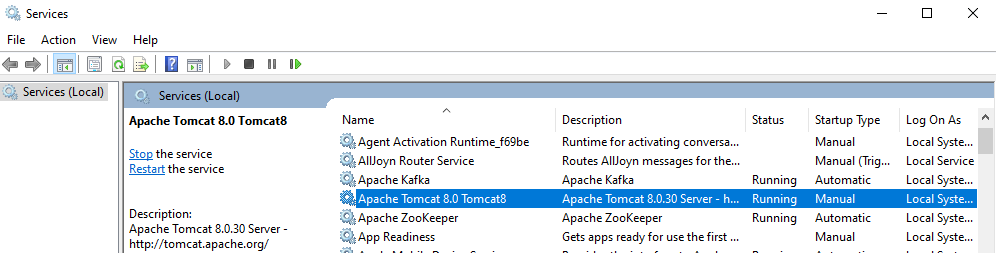
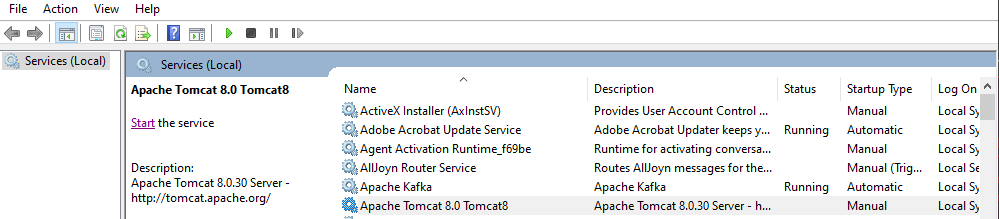
win_service ansible module is used to start, stop, or restart a service. Here, I will show you how to stop the tomcat service.
You need to mention the service name in the YAML file and set the state to stop.
Geekflare@MSEDGEWIN10 ~
$ vi service.yml
---
- hosts: win

  tasks:

   - name: Stop service Tomcat

     win_service:

       name: Tomcat8

       state: stopped
Run the ansible-playbook to stop the tomcat service.
Geekflare@MSEDGEWIN10 ~
$ ansible-playbook service.yml

PLAY <x><x><x><x><x><x><x><x>[win]</x></x></x></x></x></x></x></x> ***********************************************************************************************************************************

TASK [Gathering Facts] ***********************************************************************************************************************
ok: [192.168.0.102]

TASK [Stop service Tomcat] ****************************************************************************************************************
changed: [192.168.0.102]

PLAY RECAP ***********************************************************************************************************************************
192.168.0.102
: ok=2 changed=1 unreachable=0 failed=0
skipped=0 rescued=0 ignored=0
If you check the tomcat service on the windows system, it is now in stopped status.
You can define state to started or restarted or paused to change the status of the service.
Gathering Facts
Using win_disk_facts ansible module, you can retrieve all the disk information of the target host.
Geekflare@MSEDGEWIN10 ~
$ vi disk.yml
---
- hosts: win
  tasks:
  - name: Get disk facts
    win_disk_facts:

  - name: Output first disk size
    debug:
      var: ansible_facts.disks<x>[0]</x>.size

  - name: Convert first system disk into various formats
    debug:
      msg: '{{ disksize_gib }} vs {{ disksize_gib_human }}'
    vars:
      # Get first system disk
      disk: '{{ ansible_facts.disks|selectattr("system_disk")|first }}'

      # Show disk size in Gibibytes
      disksize_gib_human: '{{ disk.size|filesizeformat(true) }}'
      disksize_gib: '{{ (disk.size/1024|pow(3))|round|int }} GiB'
Run the ansible-playbook to get the disk information.
Geekflare@MSEDGEWIN10 ~
$ ansible-playbook disk.yml

PLAY <x><x><x><x><x><x><x><x>[win]</x></x></x></x></x></x></x></x> ***********************************************************************************************************************************

TASK [Gathering Facts] ***********************************************************************************************************************
ok: [192.168.0.102]

TASK [Get disk facts] ************************************************************************************************************************
ok: [192.168.0.102]

TASK [Output first disk size] ****************************************************************************************************************
ok: [192.168.0.102] => {

"ansible_facts.disks<x>[0]</x>.size": "1000204886016"
}

TASK [Convert first system disk into various formats] ****************************************************************************************
ok: [192.168.0.102] => {
"msg": "932 GiB vs 931.5 GiB"
}

PLAY RECAP ***********************************************************************************************************************************
192.168.0.102
: ok=4 changed=0 unreachable=0 failed=0
skipped=0 rescued=0 ignored=0
Using win_command ansible module, you can execute commands on the remote host and get CPU information, device details, and much more.
Geekflare@MSEDGEWIN10 ~
$ vi check.yml
---
- hosts: win
  tasks:
   - name: Get disk facts
     win_command: wmic cpu get caption, deviceid, name, numberofcores, maxclockspeed, status
     register: usage

   - debug: msg="{{ usage.stdout }}"
Run the ansible-playbook to get remote system information.
Geekflare@MSEDGEWIN10 ~
$ ansible-playbook check.yml

PLAY <x><x><x><x><x><x><x><x>[win]</x></x></x></x></x></x></x></x> ***********************************************************************************************************************************

TASK [Gathering Facts] ***********************************************************************************************************************
ok: [192.168.0.102]

TASK [Get facts] ************************************************************************************************************************
changed: [192.168.0.102]

TASK [debug] *********************************************************************************************************************************
ok: [192.168.0.102] => {
"msg": "Caption DeviceID MaxClockSpeed
Name
NumberOfCores Status \r\r\nIntel64 Family 6 Model 142 Stepping 9 CPU0 2712 Intel(R) Core(TM) i5-7200U CPU @ 2.50GHz 2 OK \r\r\n\r\r\n"
}

PLAY RECAP ***********************************************************************************************************************************
192.168.0.102
: ok=3 changed=1 unreachable=0 failed=0
skipped=0 rescued=0
ignored=0
Running Commands
Whatever commands you run on a window, they can be run through the ansible win_command module. You just need to specify the command in your YAML file. Here, I am just creating a directory.
Geekflare@MSEDGEWIN10 ~
$ vi commands.yml
---

- hosts: win

  tasks:

   - name: run an executable using win_command

     win_command: whoami.exe


   - name: run a cmd command

      win_command: cmd.exe /c mkdir C:\test
Run the ansible-playbook to perform win_command operation.
Geekflare@MSEDGEWIN10 ~
$ ansible-playbook commands.yml

PLAY <x><x><x><x><x><x><x><x>[win]</x></x></x></x></x></x></x></x> ***********************************************************************************************************************************

TASK [Gathering Facts] ***********************************************************************************************************************
ok: [192.168.0.102]

TASK [run an executable using win_command] ***************************************************************************************************
changed: [192.168.0.102]

TASK [run a cmd command] *********************************************************************************************************************
changed: [192.168.0.102]

PLAY RECAP ***********************************************************************************************************************************
192.168.0.102
: ok=3 changed=2 unreachable=0 failed=0
skipped=0 rescued=0 ignored=0
Environment Variables
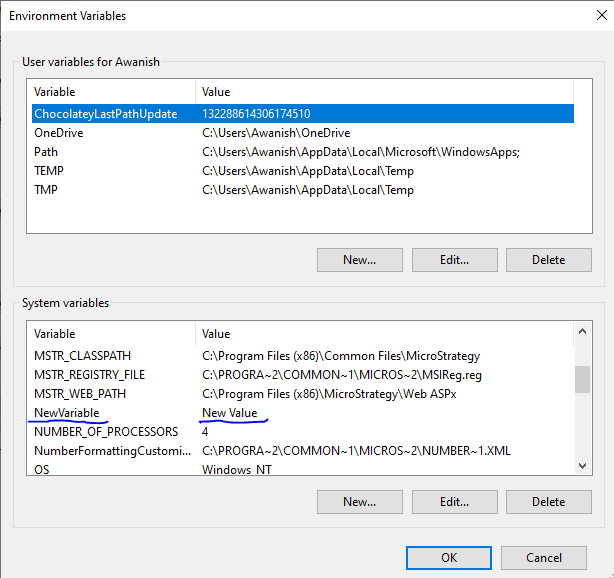
A windows system has multiple environment variables, for example, JAVA_HOME. Using the win_environment ansible module, you can add or modify environment variables on a windows system. In this example, I am adding a new variable to the windows environment variables list.
Geekflare@MSEDGEWIN10 ~
$ vi env.yml
---
- hosts: win
  tasks:
   - name: Set an environment variable for all users
     win_environment:
       state: present
       name: NewVariable
       value: New Value
       level: machine
Run the ansible-playbook to add the environment variable on a remote windows machine.
Geekflare@MSEDGEWIN10 ~
$ ansible-playbook env.yml

PLAY <x><x><x><x><x><x><x><x>[win]</x></x></x></x></x></x></x></x> ***********************************************************************************************************************************

TASK [Gathering Facts] ***********************************************************************************************************************
ok: [192.168.0.102]

TASK [Set an environment variable for all users] *********************************************************************************************
changed: [192.168.0.102]

PLAY RECAP ***********************************************************************************************************************************
192.168.0.102
: ok=2 changed=1 unreachable=0 failed=0
skipped=0 rescued=0 ignored=0
Go to the environment variables window; you will see the new variable you just added is present here.
Add/Edit Registry
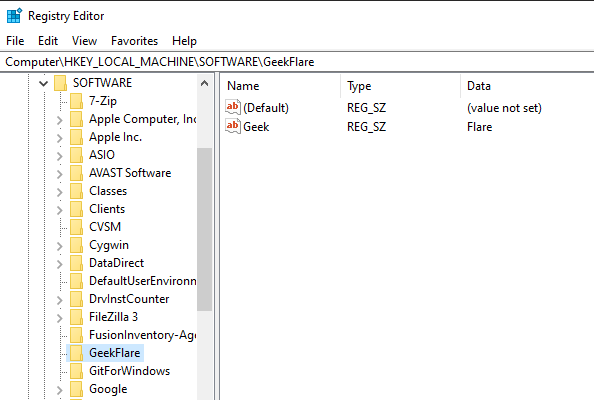
win_regedit ansible module is used to add or edit registry details on a remote windows machine. You need to give the path of the registry and content to be added/updated. Here I am creating a new registry entry GeekFlare inside HKLM:\SOFTWARE path and then adding name and data to this registry.
Geekflare@MSEDGEWIN10 ~
$ vi registry.yml
---

- hosts: win

  tasks:

   - name: Creating a registry

     win_regedit:

      path: HKLM:\SOFTWARE\GeekFlare

   - name: Modifying a registry, adding name and data

     win_regedit:

      path: HKLM:\SOFTWARE\GeekFlare

      name: Geek

      data: Flare
Run the ansible-playbook to add the registry.
Geekflare@MSEDGEWIN10 ~
$ ansible-playbook registry.yml

PLAY <x><x><x><x><x><x><x><x>[win]</x></x></x></x></x></x></x></x> ***********************************************************************************************************************************

TASK [Gathering Facts] ***********************************************************************************************************************
ok: [192.168.0.102]

TASK [Creating a registry] *******************************************************************************************************************
changed: [192.168.0.102]

TASK [Modifying a registry, adding name and data] ********************************************************************************************
changed: [192.168.0.102]

PLAY RECAP ***********************************************************************************************************************************
192.168.0.102
: ok=3 changed=2 unreachable=0 failed=0
skipped=0 rescued=0 ignored=0
If you go to Registry Editor on the remote system, you can see this registry has been added successfully with Name and Data parameters.
Delete Log
win_eventlog ansible module is used to add, clear, or remove windows event logs from the windows system.
Go to Windows Powershell, and list the EventLogs present on the remote windows machine.
PS C:\Users\Geekflare> Get-EventLog -List
  Max(K) Retain OverflowAction        Entries Log
  ------ ------ --------------        ------- ---
  20,480      0 OverwriteAsNeeded      33,549 Application
  20,480      0 OverwriteAsNeeded           0 HardwareEvents
     512      7 OverwriteOlder             20 Internet Explorer
  20,480      0 OverwriteAsNeeded           0 Key Management Service
     128      0 OverwriteAsNeeded         190 OAlerts
                                              Security
  20,480      0 OverwriteAsNeeded      44,828 System
  15,360      0 OverwriteAsNeeded       3,662 Windows PowerShell
Now, I will show how to remove logs from all sources for Internet Explorer.
Geekflare@MSEDGEWIN10 ~
$ vi log.yml
---
- hosts: win
  tasks:
   - name: Remove Internet Explorer Logs
     win_eventlog:
      name: Internet Explorer
      state: absent
Run the ansible-playbook to remove the Internet Explorer form the remote windows machine.
Geekflare@MSEDGEWIN10 ~
$ ansible-playbook log.yml

PLAY <x><x><x><x><x><x><x><x>[win]</x></x></x></x></x></x></x></x> *************************************************************************************************************************************************************************************

TASK [Gathering Facts] *************************************************************************************************************************************************************************
ok: [192.168.0.102]

TASK [Remove Internet Explorer Logs] **********************************************************************************************************************************************
changed: [192.168.0.102]

PLAY RECAP *************************************************************************************************************************************************************************************
192.168.0.102              : ok=2    changed=1    unreachable=0    failed=0    skipped=0    rescued=0    ignored=0
Now, if you list the EventLogs again, you will see Internet Explorer logs have been removed.
PS C:\Users\Geekflare> Get-EventLog -List

  Max(K) Retain OverflowAction        Entries Log
  ------ ------ --------------        ------- ---
  20,480      0 OverwriteAsNeeded      33,549 Application
  20,480      0 OverwriteAsNeeded           0 HardwareEvents
  20,480      0 OverwriteAsNeeded           0 Key Management Service
     128      0 OverwriteAsNeeded         190 OAlerts
                                              Security
  20,480      0 OverwriteAsNeeded      44,835 System
  15,360      0 OverwriteAsNeeded          56 Windows PowerShell
So, that was all about Ansible playbooks, which can be used for remote windows administration. Go ahead and try out these playbooks. You can also try other Ansible Windows modules available.