Permítame mostrarle rápidamente cómo conectar el servidor Windows desde Ansible ejecutándose en Ubuntu.
Para seguir los pasos a continuación, necesita tener Python 3.x y Ansible instalados en ambos sistemas. Puede seguir los siguientes artículos si necesita ayuda.
¿Cómo instalar y configurar Ansible en Ubuntu?
¿Cómo instalar Ansible en Windows?
A continuación se muestran los detalles de los dos servidores que estoy utilizando:
- Controlador Ansible – 192.168.0.108
- Servidor Windows – 192.168.0.102
Paso 1: Crear usuario Ansible Windows
Cree un nuevo usuario para la configuración de la conexión Ansible windows.
- Abra Administración de equipos en su sistema Windows y vaya a Usuarios y grupos locales.
- Haga clic con el botón derecho en Usuarios y cree un nuevo usuario.
- Seleccione la casilla La contraseña nunca caduca y haga clic en crear.

- Ahora entre los grupos disponibles, haga clic con el botón derecho en el grupo Administradores y pulse en propiedades.
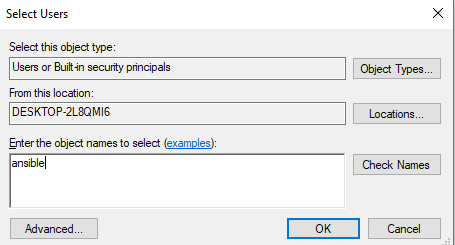
- Pulse en Añadir e introduzca ansible en nombres de objeto.
- Haga clic en la opción comprobar nombres y luego en Ok.
Ahora, un usuario ansible en una máquina windows está listo.
Paso 2: Configurar las bibliotecas y WinRM
Vaya a su máquina controladora de ansible, actualícela e instale las bibliotecas que se mencionan a continuación.
geekflare@geekflare:~$ sudo apt-get update
geekflare@geekflare:~$ sudo apt-get install gcc python-dev
geekflare@geekflare:~$ sudo apt install python3-pip
WinRM significa gestión remota de Windows. Le permite realizar tareas de gestión en sistemas Windows remotos. Instalaremos python3-winrm, un cliente python que se utiliza para establecer una conexión con el sistema windows.
geekflare@geekflare:~$ sudo apt-get install python3-winrm
Leyendo lista de paquetes... Hecho
Construyendo árbol de dependencias
Leyendo información de estado... Hecho
Los siguientes paquetes se instalaron automáticamente y ya no son necesarios:
gyp libc-ares2 libhttp-parser2.8 libjs-async libjs-inherits libjs-is-typedarray libjs-node-uuid libuv1 libuv1-dev node-abbrev node-ajv
node-ansi node-ansi-color-table node-ansi-regex node-ansi-styles node-ansistyles node-aproba node-archy node-are-we-there-yet node-async

node-validate-npm-package-license node-wcwidth.js node-which node-which-module node-wide-align node-wrap-ansi node-wrappy node-y18n
node-yallist node-yargs node-yargs-parser nodejs nodejs-doc
Utilice 'sudo apt autoremove' para eliminarlos.
Se instalarán los siguientes paquetes adicionales
python3-kerberos python3-ntlm-auth python3-requests-kerberos python3-requests-ntlm python3-xmltodict
Se instalarán los siguientes paquetes NUEVOS
python3-kerberos python3-ntlm-auth python3-requests-kerberos python3-requests-ntlm python3-winrm python3-xmltodict
0 actualizados, 6 recién instalados, 0 para eliminar y 231 no actualizados.
Se necesitan 84,8 kB de archivos.
Tras esta operación, se utilizarán 442 kB de espacio adicional en disco.
¿Desea continuar? [S/N
Obtener:1 http://old-releases.ubuntu.com/ubuntu cosmic/universe amd64 python3-kerberos amd64 1.1.14-1build1 [16,8 kB]
Get:2 http://old-releases.ubuntu.com/ubuntu cosmic/universe amd64 python3-ntlm-auth all 1.1.0-1 [19.6 kB]
Obtener:3 http://old-releases.ubuntu.com/ubuntu cosmic/universe amd64 python3-requests-kerberos all 0.11.0-2 [10.1 kB]
Get:4 http://old-releases.ubuntu.com/ubuntu cosmic/universe amd64 python3-requests-ntlm all 1.1.0-1 [6,004 B]
Get:5 http://old-releases.ubuntu.com/ubuntu cosmic/universe amd64 python3-xmltodict all 0.11.0-2 [10,6 kB]
Get:6 http://old-releases.ubuntu.com/ubuntu cosmic/universe amd64 python3-winrm all 0.3.0-2 [21.7 kB]
Obtenido 84,8 kB en 1s (70,3 kB/s)
Seleccionando paquete python3-kerberos previamente no seleccionado.
(Leyendo base de datos ... 244430 archivos y directorios instalados actualmente)
Preparándose para desempaquetar .../0-python3-kerberos_1.1.14-1build1_amd64.deb ...
Desempaquetando python3-kerberos (1.1.14-1build1) ...
Seleccionando el paquete python3-ntlm-auth previamente no seleccionado.
Seleccionando el paquete python3-xmltodict previamente no seleccionado.
Preparándose para desempaquetar .../4-python3-xmltodict_0.11.0-2_all.deb ...
Desempaquetando python3-xmltodict (0.11.0-2) ...
Seleccionando el paquete python3-winrm no seleccionado previamente.
Preparando para desempaquetar .../5-python3-winrm_0.3.0-2_all.deb ...
Desempaquetando python3-winrm (0.3.0-2) ...
Instalando python3-kerberos (1.1.14-1build1) ...
Instalando python3-winrm (0.3.0-2) ...
Paso 3: Actualizar el archivo de inventario de Ansible
Ahora, editaré el archivo hosts de ansible con la dirección IP del sistema windows. Así ahora ansible sabrá a que sistema windows necesita conectarse.
geekflare@geekflare:~$ sudo gedit /etc/ansible/hosts

[win]
192.168.0.102
Paso 4: Actualice las variables de grupo de Ansible
Cree un directorio para colocar las variables necesarias para conectarse al sistema windows.
geekflare@geekflare:~$ mkdir /etc/ansible/group_vars
geekflare@geekflare:~$ sudo chmod -R 777 /etc/ansible/
Cree un archivo win.yaml y ponga los detalles del usuario que creó en el 1er paso y algunas variables más necesarias para conectarse al sistema windows.
geekflare@geekflare:~$ gedit /etc/ansible/group_vars/win.yaml---
ansible_user: ansible
ansible_password: ansible
ansible_connection: winrm
ansible_winrm_server_cert_validation: ignorar
ansible_winrm_transport: básico
ansible_winrm_port: 5985
ansible_python_interpreter: C:\Users\geekflare\AppData\Local\Programs\Python\Python37\pythonPaso 5: Configurar los servidores Windows a administrar
Abra su windows power shell y actualícelo. Necesita tener Powershell 3.0 y .NET Framework 4.0 presentes en la máquina windows.
PS C:\WINDOWS\system32> $url = "https://raw.githubusercontent.com/jborean93/ansible-windows/master/scripts/Upgrade-PowerShell.ps1"
PS C:\WINDOWS\system32> $file = "$env:temp\Upgrade-PowerShell.ps1"
PS C:\WINDOWS\system32> $username = "ansible"
PS C:\WINDOWS\system32> $contraseña = "ansible"
PS C:³³WINDOWS\system32> (Nuevo-Objeto -TypeName System.Net.WebClient).DownloadFile($url, $file)
PS C:³³WINDOWS\system32> Set-ExecutionPolicy -ExecutionPolicy Unrestricted -Force
PS C:³³WINDOWS\system32> &$file -Versión 5.1 -Nombre de usuario $username -Contraseña $password -Verbose
Para configurar WinRM en un sistema Windows con ansible, ansible ha proporcionado un script de configuración remota. Ejecute el script en PowerShell.
PS C:\WINDOWS\system32> $url = "https://raw.githubusercontent.com/ansible/ansible/devel/examples/scripts/ConfigureRemotingForAnsible.ps1"
PS C:\WINDOWS\system32> $file = "$env:temp\ConfigureRemotingForAnsible.ps1"
PS C:³³WINDOWS\system32> (Nuevo-Objeto -TypeName System.Net.WebClient).DownloadFile($url, $file)
PS C:³³WINDOWS\system32> powershell.exe -ExecutionPolicy ByPass -File $file
PS C:\WINDOWS\system32> winrm enumerate winrm/config/Listener

Listener
Dirección = *
Transporte = HTTP
Puerto = 5985
Nombre de host
Activado = true
Refijo URL = wsman

CertificateThumbprint
ListeningOn = 127.0.0.1, 169.254.8.240, 169.254.36.9, 169.254.102.217, 169.254.215.170, 192.168.0.102, ::1, fe80::3131:c6d7:9ef5:8f0%7, fe80::51b7:9134:550d:d7aa", fe80::88f1:1229:e1dd:2409, fe80::99cf:5796:4f8e:f5c1, fe80::fd77:c19d:e0f2:66d9%9

Receptor
Dirección = *
Transporte = HTTPS
Puerto = 5986
Nombre de host = DESKTOP-2L8QMI6
Activado = true
URLPrefijo = wsman

CertificateThumbprint = C83B3FC8B274D0B650F0FD647DC7AC129BBE3FA0
ListeningOn = 127.0.0.1, 169.254.8.240, 169.254.36.9, 169.254.102.217, 169.254.215.170, 192.168.0.102, ::1, fe80::3131:c6d7:9ef5:8f0%7, fe80::51b7:9134:550d:d7aa", fe80::88f1:1229:e1dd:2409, fe80::99cf:5796:4f8e:f5c1, fe80::fd77:c19d:e0f2:66d9%9
Configure winrm para permitir el tráfico HTTP.
PS C:\WINDOWS\system32> winrm set winrm/config/service '@{AllowUnencrypted="true"}'
Servicio
RootSDDL = O:NSG:BAD:P(A;;GA;;;BA)(A;;GR;;;IU)S:P(AU;FA;GA;;;WD)(AU;SA;GXGW;;;WD)

OperacionesMaxConcurrentes = 4294967295

MaxConcurrentOperationsPerUser = 1500

EnumeraciónTemporada = 240000
MaxConexiones = 300

MaxPacketRetrievalTimeSeconds = 120
AllowUnencrypted = true
Auth
Básica = true
Kerberos = verdadero
Negociar = verdadero
Certificado = falso
CredSSP = falso

CbtHardeningLevel = Relajado
DefaultPorts
HTTP = 5985
HTTPS = 5986
IPv4Filter = *
IPv6Filter = *

EnableCompatibilityHttpListener = false

EnableCompatibilityHttpsListener = false

CertificateThumbprint
AllowRemoteAccess = true
Configure la autenticación como básica en winrm.
PS C:\WINDOWS\system32> winrm set winrm/config/service/auth '@{Basic="true"}'
Auth
Basic = true
Kerberos = true
Negociar = true
Certificado = falso
CredSSP = falso
CbtHardeningLevel = Relajado
Paso 6: Probar la conectividad con el servidor Windows
Ahora todos los pasos en la máquina están hechos. Vaya a la máquina del controlador ansible y haga ping a la máquina del servidor windows utilizando el módulo ansible win_ping.
geekflare@geekflare:~$ ansible win -m win_ping
192.168.0.102 | ÉXITO => {

"changed": false
"ping": "pong"
}
El mensaje de éxito muestra que se ha establecido la conexión. Ahora, el sistema Windows está listo para ser administrado remotamente desde el Ansible que se ejecuta en Ubuntu.