Lorsque vous travaillez sur des projets Docker, la plupart du temps, les images Docker existantes ne répondent pas à vos besoins, c’est pourquoi il est utile de savoir ce qu’est Dockerfile et comment créer une image Docker.
Avec Dockerfile, vous pouvez créer des images Docker personnalisées. Il est donc essentiel de connaître Dockerfile.
Qu’est-ce que Dockerfile ?
Il s’agit d’un simple fichier texte contenant un ensemble de commandes ou d’instructions. Ces commandes/instructions sont exécutées successivement pour effectuer des actions sur l’image de base afin de créer une nouvelle image Docker.
lescommentaires et les arguments des commandes sont deux types de blocs de lignes principales dans la syntaxe de Dockerfile
Syntaxe des commentaires
#Blocs de lignes utilisés pour les commentaires

commande argument argument1 .....
Arguments de commande Exemple
#Blocs de lignes utilisés pour les commentaires

command argument argument1 .....
Voici à quoi ressemblera votre flux de travail.
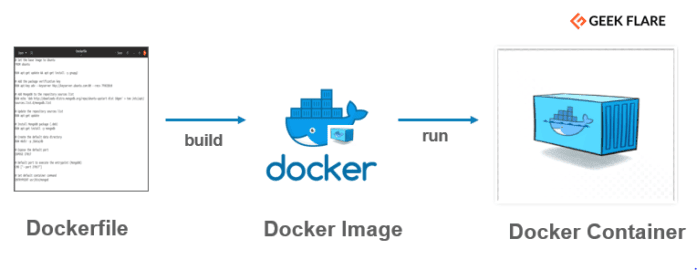
- Créez un fichier Docker et suivez les instructions pour créer votre image Docker
- Exécutez la commande docker build qui construira une image docker
- Maintenant que l’image Docker est prête à être utilisée, utilisez la commande docker run pour créer des conteneurs
Voyons maintenant les commandes de base.
Commandes de base
Lorsque j’ai utilisé Dockerfile, j’ai trouvé ces commandes de base utiles :
- FROM – Définit l’image de base à utiliser et démarre le processus de construction.
- RUN – Prend la commande et ses arguments pour l’exécuter à partir de l’image.
- CMD – Fonction similaire à la commande RUN, mais elle n’est exécutée qu’après l’instanciation du conteneur.
- ENTRYPOINT – Il cible votre application par défaut dans l’image lorsque le conteneur est créé.
- ADD – Copie les fichiers de la source à la destination (à l’intérieur du conteneur).
- ENV – Définit les variables d’environnement.
Copiez-collez ces informations dans un fichier afin de pouvoir les consulter à tout moment ou, mieux encore, ajoutez mon article à vos favoris !
Comment créer une image Docker avec un Dockerfile ?
Tout d’abord, créons un Dockerfile.
geekflare@geekflare:~$ gedit DockerfileMettez-y les commandes/instructions suivantes et sauvegardez-le.
# Définissez l'image de base à Ubuntu
FROM ubuntu

# Mettez à jour la liste des sources du dépôt et installez gnupg2
Exécutez apt-get update && apt-get install -y gnupg2

# Ajoutez la clé de vérification du paquet
RUN apt-key adv --keyserver hkp://keyserver.ubuntu.com:80 --recv 7F0CEB10

# Ajoutez MongoDB à la liste des sources du dépôt
RUN echo 'deb http://downloads-distro.mongodb.org/repo/ubuntu-upstart dist 10gen' > tee /etc/apt/sources.list.d/mongodb.list

# Mettez à jour la liste des sources du référentiel
Exécutez apt-get update

# Installez le paquet MongoDB (.deb)
Exécutez apt-get install -y mongodb

# Créez le répertoire de données par défaut
RUN mkdir -p /data/db

# Exposez le port par défaut
EXPOSE 27017

# Port par défaut pour exécuter le point d'entrée (MongoDB)
CMD ["--port 27017"]

# Définit la commande par défaut du conteneur
ENTRYPOINT usr/bin/mongodb
Dans ce fichier Docker, ubuntu est défini comme l’image de base. Ensuite, les commandes et arguments nécessaires sont mentionnés pour installer MongoDB. Le port 27017 est exposé à MongoDB avec la commande de conteneur par défaut usr/bin/mongodb
Ensuite, je vais l’exécuter pour créer une image Docker.
Exécution d’un fichier Docker
La commande suivante créera une image docker appelée geekflare_mongodb après une exécution réussie.
geekflare@geekflare:~$ docker build -t geekflare_mongodb .

Envoi du contexte de construction au démon Docker 667.2MB

Étape 1/9 : A partir d'ubuntu

dernier : Tiré de library/ubuntu

7413c47ba209 : Extraction terminée

0fe7e7cbb2e8 : Pull terminé

1d425c982345 : Pull terminé

344da5c95cec : Pull terminé

Digest: sha256:c303f19cfe9ee92badbbbd7567bc1ca47789f79303ddcef56f77687d4744cd7a

Statut : Téléchargement d'une image plus récente pour ubuntu:latest

--->
 3556258649b2

Etape 2/10 : Exécutez apt-get update && apt-get install -y gnupg2

--->
 Exécution dans de3706328761

Get:1 http://security.ubuntu.com/ubuntu bionic-security InRelease [88.7 kB]

Get:2 http://archive.ubuntu.com/ubuntu bionic InRelease [242 kB]

Récupéré 16.9 MB en 38s (445 kB/s)

Lecture des listes de paquets...

Lecture des listes de paquets...

Construction de l'arbre de dépendance...

Lecture des informations d'état...

Besoin de récupérer 5187 kB d'archives.

Après cette opération, 15,8 Mo d'espace disque supplémentaire seront utilisés.

Get:1 http://archive.ubuntu.com/ubuntu bionic/main amd64 readline-common all 7.0-3 [52.9 kB]

Get:2 http://archive.ubuntu.com/ubuntu bionic/main amd64 libreadline7 amd64 7.0-3 [124 kB]

Get:3 http://archive.ubuntu.com/ubuntu bionic-updates/main amd64 libsqlite3-0 amd64 3.22.0-1ubuntu0.1 [497 kB]

Get:4 http://archive.ubuntu.com/ubuntu bionic-updates/main amd64 libssl1.1 amd64 1.1.1-1ubuntu2.1~18.04.4 [1300 kB]

debconf : retard dans la configuration des paquets, car apt-utils n'est pas installé

Récupéré 5187 kB en 12s (416 kB/s)

Sélection du paquet readline-common précédemment non sélectionné.

(Lecture de la base de données ... 4040 fichiers et répertoires actuellement installés)

Préparation du déballage de .../00-readline-common_7.0-3_all.deb ...

Décompression de readline-common (7.0-3) ...

Sélection du paquetage non sélectionné précédemment libreadline7:amd64.

Préparation du déballage de .../01-libreadline7_7.0-3_amd64.deb ...

Sélection du paquet non sélectionné précédemment dirmngr.

Mise en place de libnpth0:amd64 (1.5-3) ...

Installation de libksba8:amd64 (1.3.5-2) ...

Installation de gnupg-l10n (2.2.4-1ubuntu1.2) ...

Traitement des déclencheurs pour libc-bin (2.27-3ubuntu1) ...

Suppression du conteneur intermédiaire de3706328761

--->
 a32533894ed1

Étape 3/10 : RUN apt-key adv --keyserver hkp://keyserver.ubuntu.com:80 --recv 7F0CEB10

--->
 Exécuté dans 69c4dba38983

Attention : la sortie de apt-key ne doit pas être analysée (stdout n'est pas un terminal)

Exécution : /tmp/apt-key-gpghome.MuT5BDWwKZ/gpg.1.sh --keyserver hkp://keyserver.ubuntu.com:80 --recv 7F0CEB10

gpg : clé 5F8F93707F0CEB10 : clé publique "Totally Legit Signing Key " importée

gpg : clé 9ECBEC467F0CEB10 : 1 signature non vérifiée à cause d'une clé manquante

gpg : clé 9ECBEC467F0CEB10 : clé publique "Richard Kreuter " importée

gpg : Nombre total traité : 2

gpg : importé : 2

Suppression du conteneur intermédiaire 69c4dba38983

--->
 cffbe06c1b50

Étape 4/10 : RUN echo 'deb http://downloads-distro.mongodb.org/repo/ubuntu-upstart dist 10gen' > tee /etc/apt/sources.list.d/mongodb.list

--->
 Exécuté en 40630fd7b0a9

Suppression du conteneur intermédiaire 40630fd7b0a9

--->
 a1bd9d8d7e51

Étape 5/10 : Exécutez apt-get update

--->
 Exécuté dans 750717d9c0ea

Hit:1 http://archive.ubuntu.com/ubuntu bionic InRelease

Hit:2 http://archive.ubuntu.com/ubuntu bionic-updates InRelease

Hit:3 http://security.ubuntu.com/ubuntu bionic-security InRelease

Hit:4 http://archive.ubuntu.com/ubuntu bionic-backports InRelease

Lecture des listes de paquets...

Suppression du conteneur intermédiaire 750717d9c0ea

--->
 397d6501db58

Étape 6/10 : Exécutez apt-get install -y mongodb

--->
 Exécuté dans 88609c005e73

Lecture des listes de paquets...

Construction de l'arbre des dépendances...

Lecture des informations d'état...

Les NOUVEAUX paquets suivants seront installés :

libboost-filesystem1.65.1 libboost-iostreams1.65.1

libboost-program-options1.65.1 libboost-system1.65.1 libgoogle-perftools4

libpcap0.8 libpcrecpp0v5 libsnappy1v5 libstemmer0d libtcmalloc-minimal4

libunwind8 libyaml-cpp0.5v5 mongo-tools mongodb mongodb-clients

mongodb-server mongodb-server-core

0 mis à jour, 17 nouvellement installés, 0 à supprimer et 0 non mis à jour.

Besoin de récupérer 53,7 Mo d'archives.

Après cette opération, 218 Mo d'espace disque supplémentaire seront utilisés.

Get:1 http://archive.ubuntu.com/ubuntu bionic-updates/universe amd64 mongodb-clients amd64 1:3.6.3-0ubuntu1.1 [20.2 MB]

Get:2 http://archive.ubuntu.com/ubuntu bionic-updates/universe amd64 mongodb-server-core amd64 1:3.6.3-0ubuntu1.1 [20.3 MB]

Get:3 http://archive.ubuntu.com/ubuntu bionic-updates/universe amd64 mongodb-server all 1:3.6.3-0ubuntu1.1 [12.6 kB]

Get:4 http://archive.ubuntu.com/ubuntu bionic-updates/universe amd64 mongodb amd64 1:3.6.3-0ubuntu1.1 [9968 B]

Récupéré 53.7 MB en 10s (5485 kB/s)

Sélection du paquet libpcap0.8:amd64 précédemment non sélectionné.

(Lecture de la base de données ... 4390 fichiers et répertoires actuellement installés)

Sélection du paquet mongodb-clients précédemment non sélectionné.

Préparation du déballage de .../13-mongodb-clients_1:3.6.3-0ubuntu1.1_amd64.deb ...

Décompression de mongodb-clients (1:3.6.3-0ubuntu1.1) ...

Sélection du paquet mongodb-server-core précédemment non sélectionné.

Préparation du déballage de .../14-mongodb-server-core_1:3.6.3-0ubuntu1.1_amd64.deb ...

Décompression de mongodb-server-core (1:3.6.3-0ubuntu1.1) ...

Sélection du paquet mongodb-server précédemment non sélectionné.

Préparation du déballage de .../15-mongodb-server_1:3.6.3-0ubuntu1.1_all.deb ...

Décompression de mongodb-server (1:3.6.3-0ubuntu1.1) ...

Sélection du paquet mongodb non sélectionné précédemment.

Préparation du déballage de .../16-mongodb_1:3.6.3-0ubuntu1.1_amd64.deb ...

Décompression de mongodb (1:3.6.3-0ubuntu1.1) ...

Mise en place de mongodb-server-core (1:3.6.3-0ubuntu1.1) ...

Installation de mongo-tools (3.6.3-0ubuntu1) ...

Installation de mongodb-clients (1:3.6.3-0ubuntu1.1) ...

Installation de mongodb-server (1:3.6.3-0ubuntu1.1) ...

invoke-rc.d : impossible de déterminer le niveau d'exécution actuel

invoke-rc.d : policy-rc.d a refusé l'exécution de start.

Mise en place de mongodb (1:3.6.3-0ubuntu1.1) ...

Traitement des déclencheurs pour libc-bin (2.27-3ubuntu1) ...

Suppression du conteneur intermédiaire 88609c005e73

--->
 d9c072cb1f84

Étape 7/10 : RUN mkdir -p /data/db

--->
 Exécuté dans f817778f69ab

Suppression du conteneur intermédiaire f817778f69ab

--->
 a3fbdb3def5c

Étape 8/10 : EXPOSER 27017

--->
 En cours d'exécution dans 8d070e2a1e07

Suppression du conteneur intermédiaire 8d070e2a1e07

--->
 f770776a538c

Étape 9/10 : CMD ["--port 27017"]

--->
 Exécuté dans ab612410df77

Suppression du conteneur intermédiaire ab612410df77

--->
 e5830b80934f

Étape 10/10 : ENTRYPOINT usr/bin/mongod

--->
 Exécuté dans 95f574727aab

Suppression du conteneur intermédiaire 95f574727aab

--->
 095d17727ca0

Construit avec succès 095d17727ca0

Marqué avec succès geekflare_mongodb:latest
Vérifions si l’image docker a été créée avec le nom geekflare_mongodb.
geekflare@geekflare:~$ docker images

DÉPÔT TAG IMAGE ID CRÉÉ TAILLE

geekflare_mongodb latest 095d17727ca0 il y a 3 minutes 325MB

ubuntu dernière 3556258649b2 il y a 4 jours 64.2MB

mean_express Dernière 35dcb3df9806 Il y a 6 jours 923MB

mean_angular dernier 9f8d61db600c il y a 6 jours 1.29GB
Exécutez l’image docker geekflare_mongodb à l’intérieur d’un conteneur mongo_container.
geekflare@geekflare:~$ docker run --name mongo_container -i -t geekflare_mongodb

2019-07-27T19:38:23.734 0000 I CONTROL [initandlisten] MongoDB démarre : pid=6 port=27017 dbpath=/data/db 64-bit host=b0095c1e5536

2019-07-27T19:38:23.735 0000 I CONTROL [initandlisten] db version v3.6.3

2019-07-27T19:38:23.735 0000 I CONTROLE [initandlisten] git version : 9586e557d54ef70f9ca4b43c26892cd55257e1a5

2019-07-27T19:38:23.736 0000 I CONTROLE [initandlisten] OpenSSL version : OpenSSL 1.1.1 11 Sep 2018

2019-07-27T19:38:23.739 0000 I CONTROL [initandlisten] allocator : tcmalloc

2019-07-27T19:38:23.739 0000 I CONTROL [initandlisten] modules : aucun

2019-07-27T19:38:23.739 0000 I CONTROL [initandlisten] build environment :

2019-07-27T19:38:23.739 0000 I CONTRÔLE [initandlisten] distarch : x86_64

2019-07-27T19:38:23.739 0000 I CONTRÔLE [initandlisten] target_arch : x86_64

2019-07-27T19:38:23.739 0000 I CONTRÔLE [initandlisten] options : {}

2019-07-27T19:38:23.745 0000 I STORAGE [initandlisten] wiredtiger_open config : create,cache_size=2038M,session_max=20000,eviction=(threads_min=4,threads_max=4),config_base=false,statistics=(fast),log=(enabled=true,archive=true,path=journal,compressor=snappy),file_manager=(close_idle_time=100000),statistics_log=(wait=0),verbose=(recovery_progress),

2019-07-27T19:38:24.733 0000 I CONTROL [initandlisten]

2019-07-27T19:38:24.734 0000 I CONTROL [initandlisten] ** WARNING : Access control is not enabled for the database.

2019-07-27T19:38:24.735 0000 I CONTROL [initandlisten] ** L'accès en lecture et en écriture aux données et à la configuration est illimité.

2019-07-27T19:38:24.736 0000 I CONTROL [initandlisten] ** WARNING : Vous exécutez ce processus en tant qu'utilisateur root, ce qui n'est pas recommandé.

2019-07-27T19:38:24.736 0000 I CONTROL [initandlisten]

2019-07-27T19:38:24.736 0000 I CONTROL [initandlisten] ** WARNING : Ce serveur est lié à localhost.

2019-07-27T19:38:24.737 0000 I CONTROL [initandlisten] ** Les systèmes distants ne pourront pas se connecter à ce serveur.

2019-07-27T19:38:24.737 0000 I CONTROLE [initandlisten] ** Démarrez le serveur avec --bind_ip  pour spécifier l'adresse IP à utiliser

2019-07-27T19:38:24.737 0000 I CONTROL [initandlisten] ** les adresses IP à partir desquelles il doit servir les réponses, ou avec --bind_ip_all pour

2019-07-27T19:38:24.737 0000 I CONTROL [initandlisten] ** lier à toutes les interfaces. Si vous souhaitez obtenir ce comportement, lancez le programme

2019-07-27T19:38:24.738 0000 I CONTROL [initandlisten] ** serveur avec --bind_ip 127.0.0.1 pour désactiver cet avertissement.

2019-07-27T19:38:24.738 0000 I CONTROL [initandlisten]

2019-07-27T19:38:24.739 0000 I STORAGE [initandlisten] createCollection : admin.system.version with provided UUID : 4b8b509d-633a-46c1-a302-cb8c82b0d5d3

2019-07-27T19:38:24.788 0000 I COMMAND [initandlisten] setting featureCompatibilityVersion to 3.6

2019-07-27T19:38:24.818 0000 I STORAGE [initandlisten] createCollection : local.startup_log with generated UUID : 6c1c0366-4b1b-4b92-9fcd-d18acc126072

2019-07-27T19:38:24.862 0000 I FTDC [initandlisten] Initialisation de la capture de données de diagnostic à temps plein avec le répertoire '/data/db/diagnostic.data'

2019-07-27T19:38:24.866 0000 I NETWORK [initandlisten] waiting for connections on port 27017
Ouvrez un nouveau terminal et vérifiez si mongo_container est en cours d’exécution.
geekflare@geekflare:~$ docker ps

CONTAINER ID IMAGE COMMAND CREATED STATUS PORTS NAMES

b0095c1e5536 geekflare_mongodb "/bin/sh -c usr/bin/..." il y a 35 secondes Up 33 secondes 27017/tcp mongo_container
Comme vous pouvez le voir, le conteneur créé à partir de l’image geekflare_mongodb est opérationnel.
J’espère que cela vous donne une idée de Dockerfile et de ses avantages. Vous pouvez également consulter cette documentation sur les meilleures pratiques de Dockerfile pour en savoir plus.