The struggle is real! No matter how many times you try to update the system, it won’t let you do so and show you the 0x80070643 Error.
It is annoying as no matter how hard you try or how many times you restart your computer, the error 0x80070643 persists. I encountered the same error this weekend, and I can feel your pain:

In simple terms, it won’t let the user update the system.
But don’t worry, there are solutions (yes, multiple).
Multiple solutions? Yes. Because multiple reasons will lead you to the 0x80070643 error in Windows computers. So first, let’s take a look at the reasons behind this error.
The reason behind the 0x80070643 error in Windows
There are several reasons why one would face the 0x80070643 error in Windows, and here are some of the most common ones:
- Incomplete or corrupted software updates
- .NET Framework issues
- Issues with the antivirus program
- Windows update service is not working as intended
- System files are corrupted
Sure, there might be other reasons as well, but these were the most common ones. Now, let’s have a look at some practical ways to solve the 0x80070643 error in Windows 10.
Ways to solve the 0x80070643 error in Windows
In this tutorial, I will walk you through 5 ways to solve the 0x80070643 error:
- Troubleshoot by using the Windows update troubleshooter
- Restart the updated services to resolve the issue
- Repair Windows system image
- Repair missing or corrupted system files
- Reset Windows update components using a bat script
So, let’s start with the first method.
Troubleshoot by Using Windows Update Troubleshooter
By far, this is the easiest method to work with to solve the 0x80070643 error.
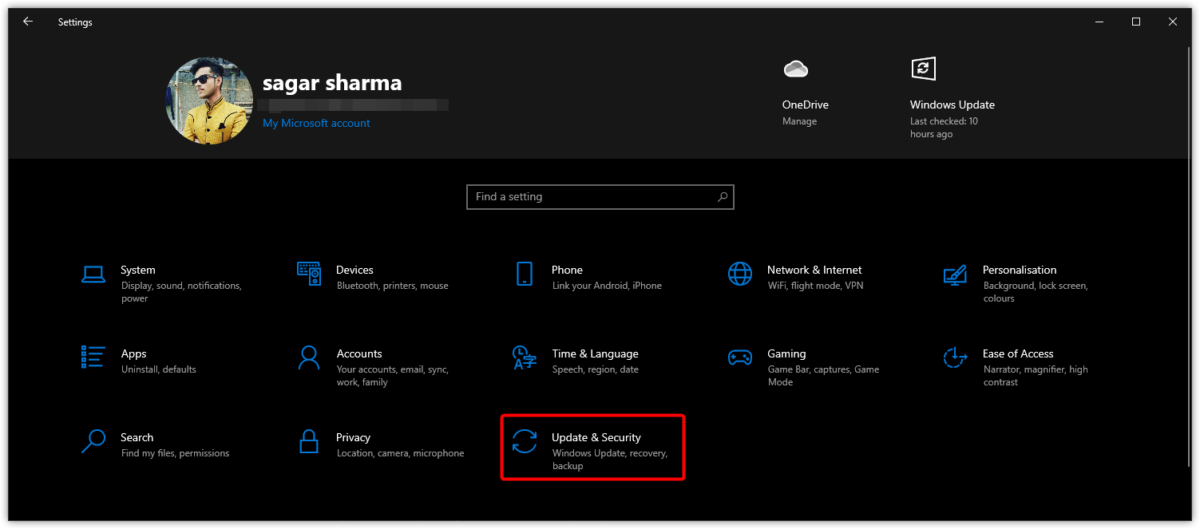
First, open settings and click on the last option Update & Security:
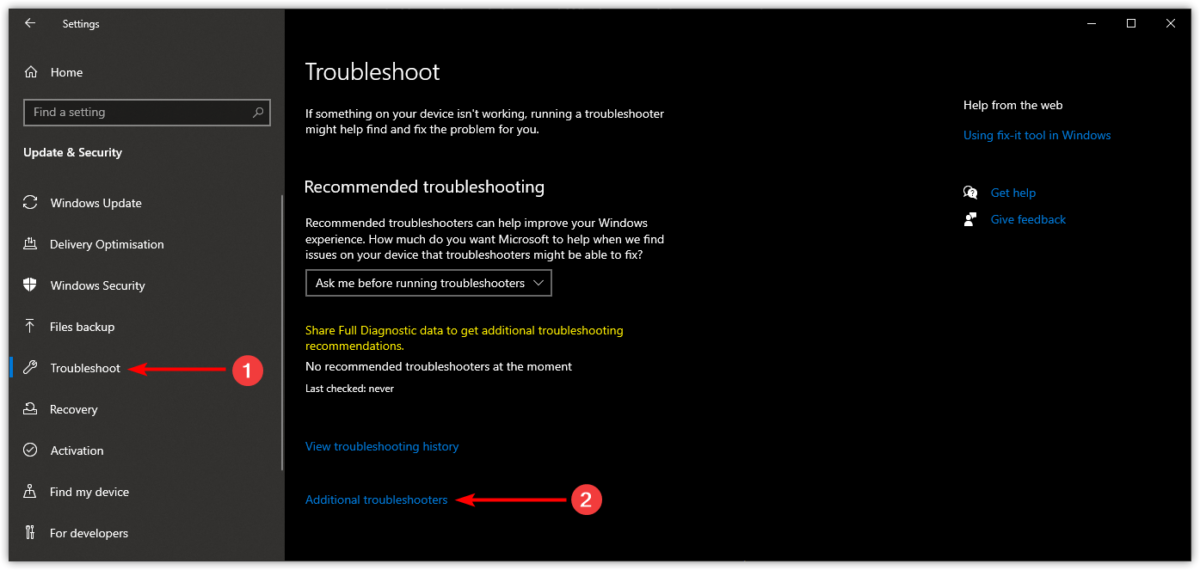
Once you open the Update & Security menu, select Troubleshoot option from the left menu bar and click on the Additional troubleshooters option:
Next, click on Windows Update and there you will find an option for troubleshooter labeled as Run the troubleshooter click on that option:
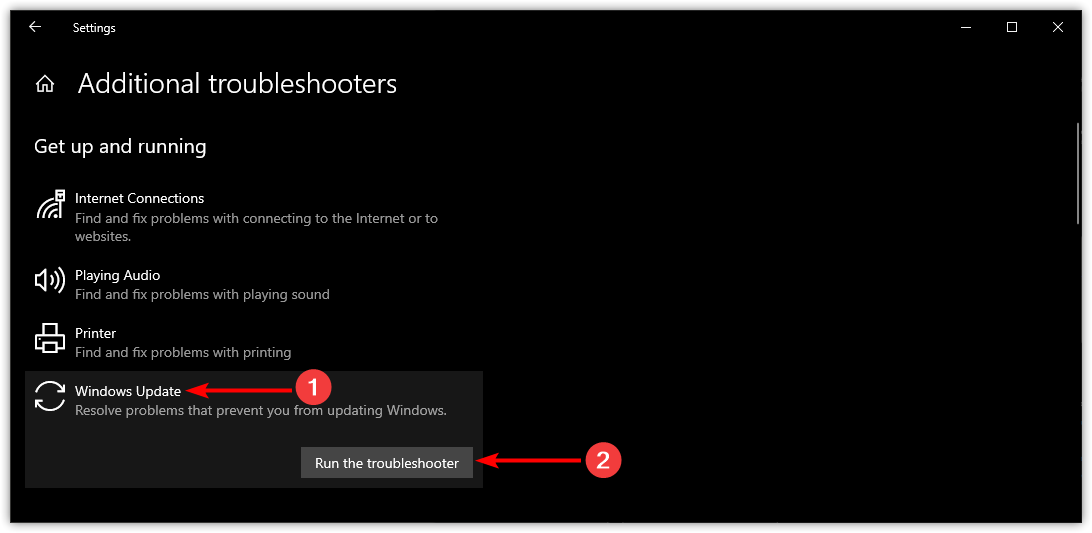
It will start the troubleshooter, identify the problem, and solve it.
Restart the Updated Services
In this method, I will show you how you can check Background Intelligent Transfer Service (BITS) and Windows Update Service. If either of them malfunctions, it can disrupt the update process and trigger the 0x80070643 error.
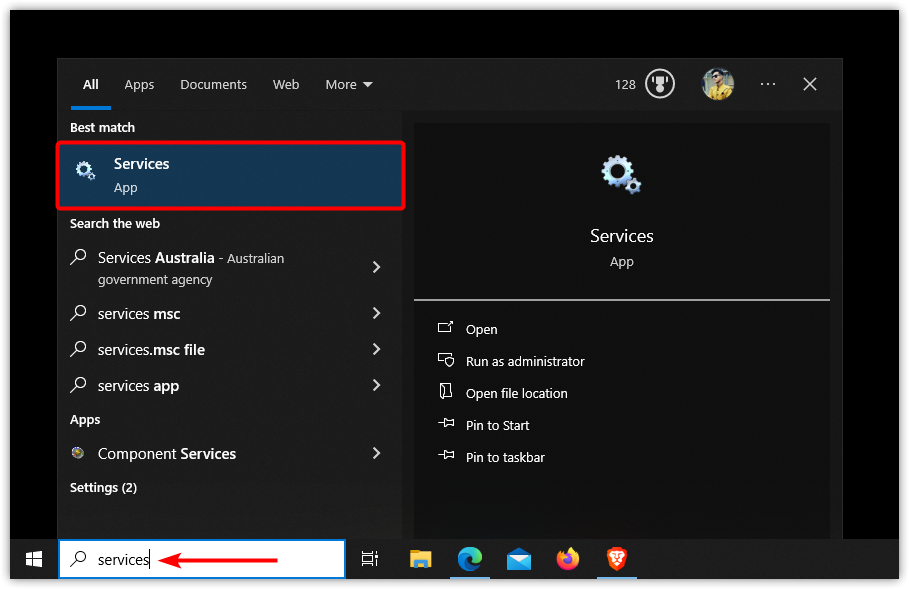
To restart those services, open the services utility from the start menu:
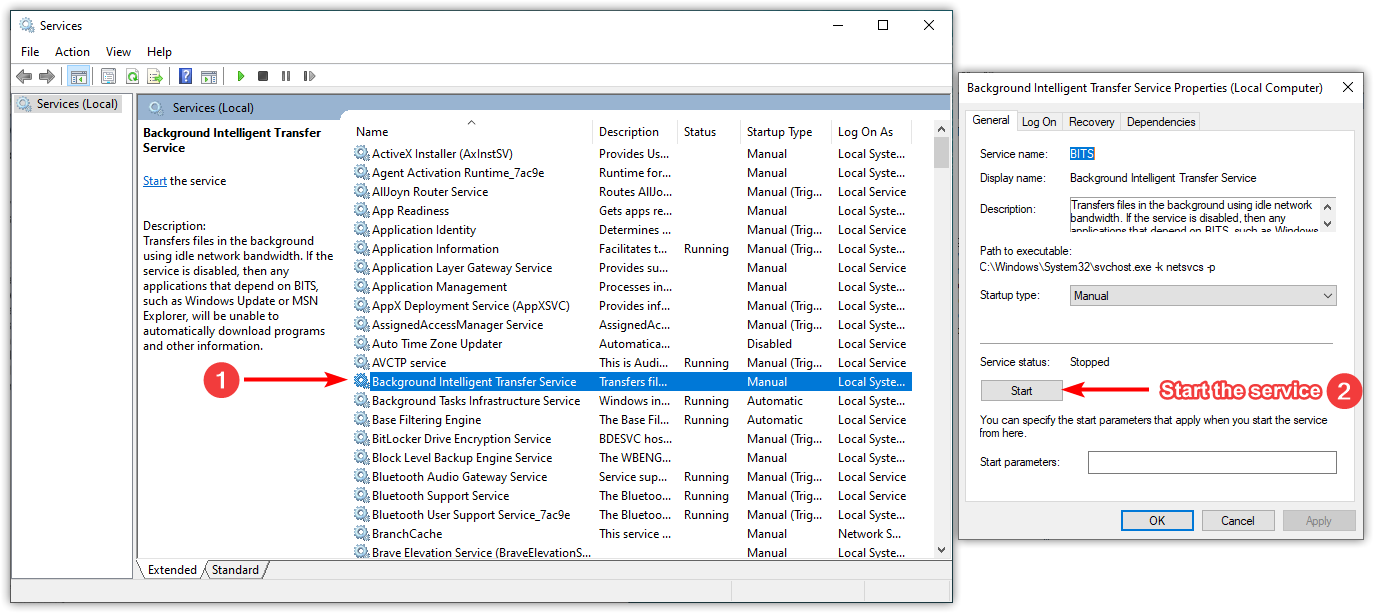
Now, look for the Background Intelligent Transfer Service. Once you find that option, double-click on it and if the service is stopped, click on the Start button to start the service:
Once done, look for another service from the services called Windows Update, double-click on that option, and if the service is already running, stop it once and start it again to restart the service:
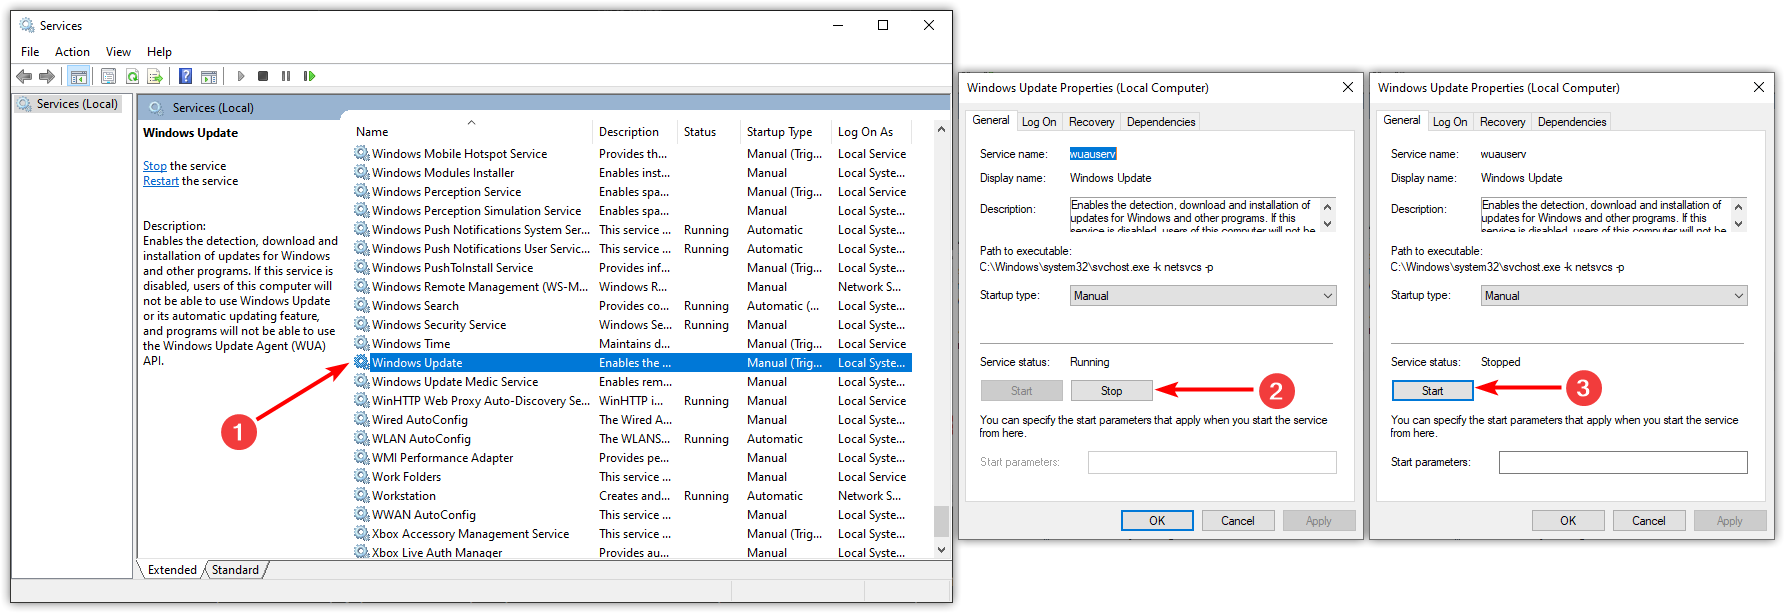
That’s it! It should restart the update service causing any malfunction.
Repair Windows Image
This method includes the usage of a terminal where you will be executing the commands that will scan your system and check for missing or corrupted files. If it finds any errors, it will download replacement files and also create a backup to deal with any trouble.
So first, search for the command prompt from your start menu and start it as an administrator:
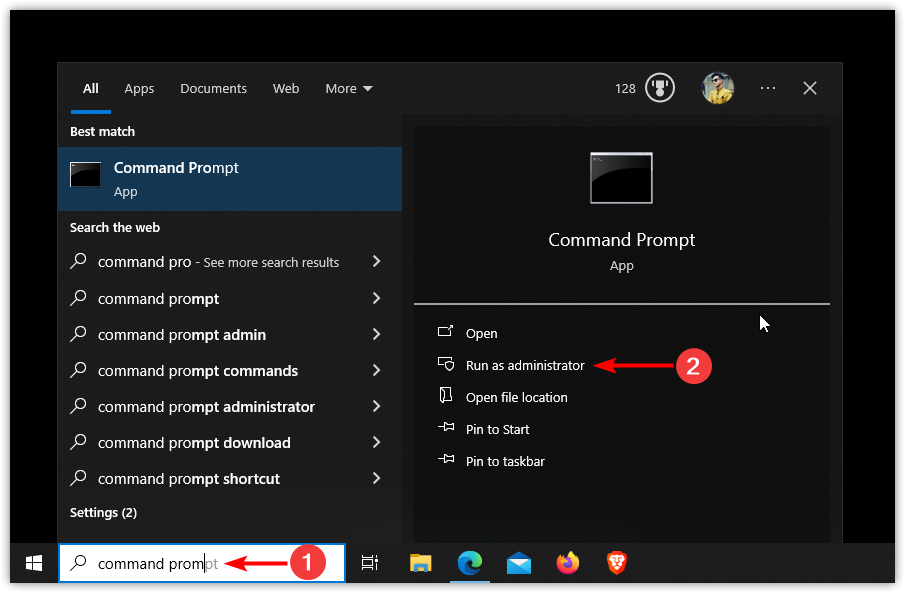
Once you see the command prompt screen, execute the following command:
DISM.exe /Online /Cleanup-image /Restorehealth
Now, let’s break the above command to learn what happens in the background while running:
DISM.exe: it starts the Deployment Image Servicing and Management (DISM) tool to repair the Windows image./Online: it will only focus on the live system as we intend to fix the error in our working Windows PC rather than the offline copy of it./Cleanup-image: it directs the system to look for corruption or damage within the Windows image./Restorehealth: it is an action part of the command where it repairs the found issues while scanning the system.
Repair Missing or Corrupted System Files
In this method, I will show you how you can use the sfc command to scan and fix the corrupted files, as the corrupted files are one of the leading causes of the 0x80070643 error in Windows.
The first step is to start the command prompt as an administrator by searching for Command prompt in the start menu, select Run as an administrator option:

Now, simply execute the sfc command in the following manner:
sfc/scannow
It will scan for any corrupted files and try to fix them.
In my case, it found corrupted files and also fixed them:

Reset Windows Update Components using a bat Script
Warning: This method involves executing a .bat script to reset the Windows update components.
In this method, I will be using a .bat script, which will reset and re-register Windows Update components and has solved this issue for hundreds of users over the internet.
The first step is to download the script from my GitHub by clicking on the download button:
Once you click on the above button, it will redirect you to my GitHub page where you can read every line to find any spooky line. Once you are satisfied with its file contents, click on the download button as shown here:
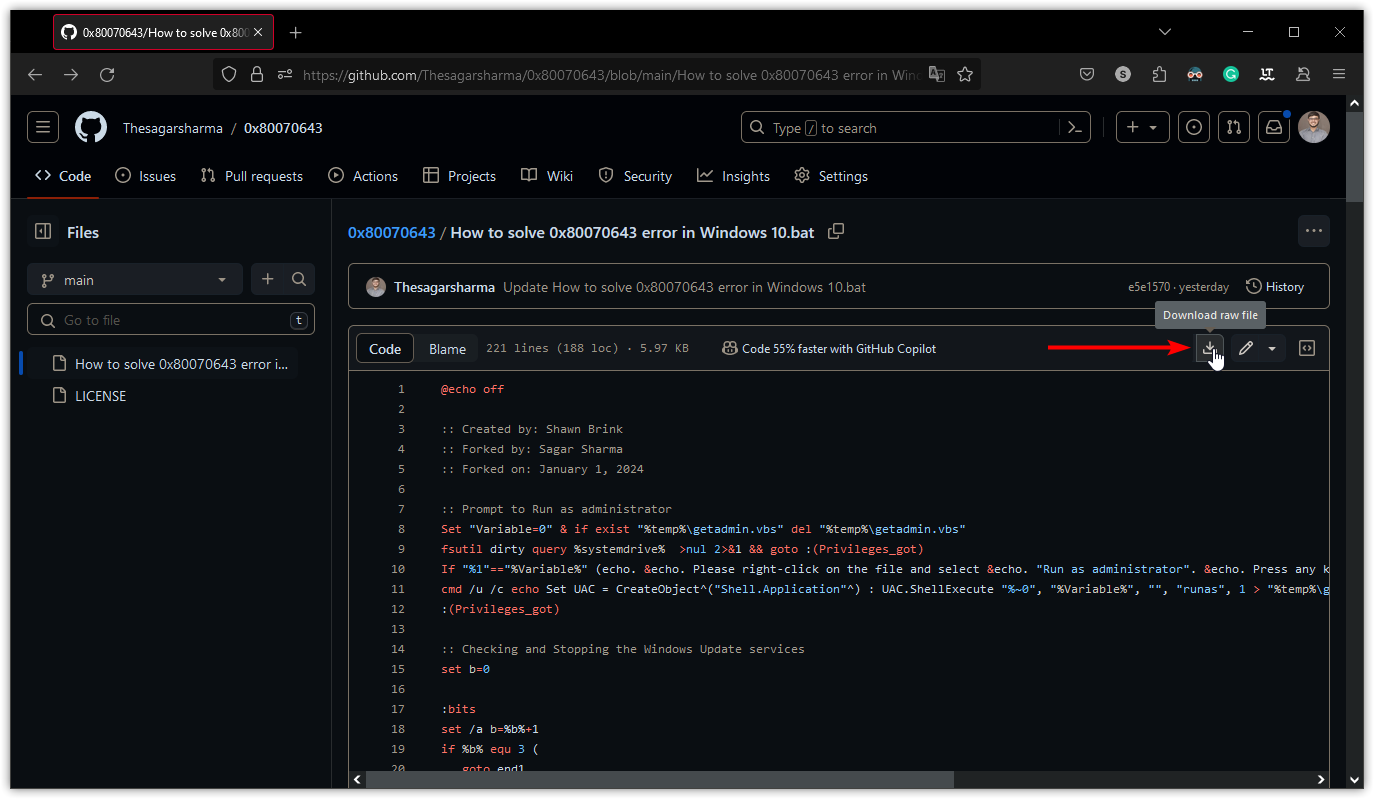
After downloading the file, double-click on it, and it will show you a warning prompt as you are about to execute a script that will modify some components of your system:

It will ask for your permission to start the command prompt as an administrator. Grant the permission, and it will start removing some unnecessary files (don’t worry):

You will see a line “ERROR: The system was unable to find the specified registry key or value,” which you can ignore without any worries:

Finally, it will ask you to save any pending tasks, as it will reboot your system soon. To confirm this, press any key, and finally, it will ask for your permission to reboot your system:

That should do it!
Wrapping Up
This was a take on how to Fix 0x80070643 Error on Windows in Just 5 Minutes, and if you ask me, the 5th method solved this problem from my end.
But the way I structured the entire article is from easy to hard so I would recommend you to follow the explained methods one by one so you may not have to go through some advanced methods as the first ones may solve the issue.
I’m curious to know which one you found the most helpful and solved the issue, and if you still have any doubts, let me know in the comments.

