Removing background from images is one of the most challenging tasks in image editing. And it is often overwhelming, especially if you’re just getting started with image editing.
The good news is you don’t have to be an expert or need any paid software to remove background from images, as there’s a pretty cool tool that does it all for free!
Yes, you read it right. There is a tool that lets you perform almost every image manipulation operation like you do with Photoshop, but for free.
You can use GIMP (reads for GNU Image Manipulation Program), which is a free and open-source software that lets you perform basic to advanced image operations, and it is one of the best free alternatives to Adobe Photoshop.
And in this tutorial, I will walk through step-by-step how you can remove background from images using GIMP.
But before that, let’s have a look at what is GIMP, its features, and the installation part.
What is GIMP? How to install GIMP in Windows 10
As mentioned earlier, GIMP is a free and open-source image manipulation software available for Linux, macOS and Windows.
And trust me, if you’re a beginner to the intermediate image editor, you don’t need Photoshop, as GIMP has all the basic features that most users will ever need.
Here are some exciting features that you get with the GIMP:
- Multiple layers to work with
- Plug-ins for extended features
- Variety of painting tools
- Channel mixer (for color correction)
- Support for multiple image formats
- Free and open-source
To install GIMP in Windows or any other supported platform, all you have to do is visit GIMP’s official download page.
For Windows users, there are two options: Download the executable file or install it through the Microsoft Store:
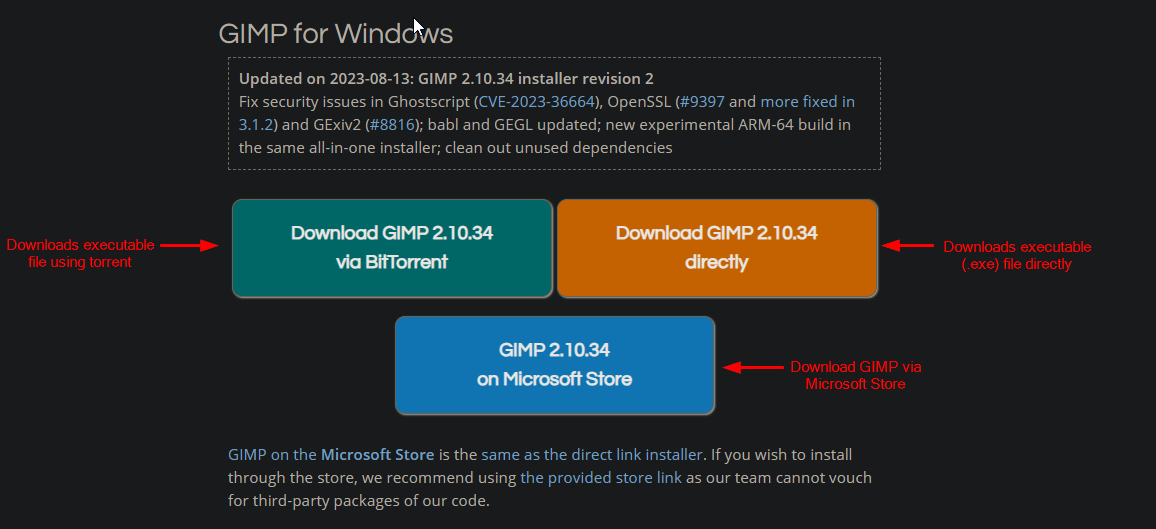
I would recommend using the last option (installation through Microsoft Store) for one-click installation:

Once you are done with the installation, you can follow the below guide to remove the background from the image using GIMP.
Removing the image background using GIMP
Before I jump to the how-to part, here’s the end result that you’d achieve after following this guide:

And if you want to follow along, you can download the sample image:
Step 1: Import image to GIMP
To import an image, click on the File and choose the Open option. Alternatively, you can also press Ctrl + O:
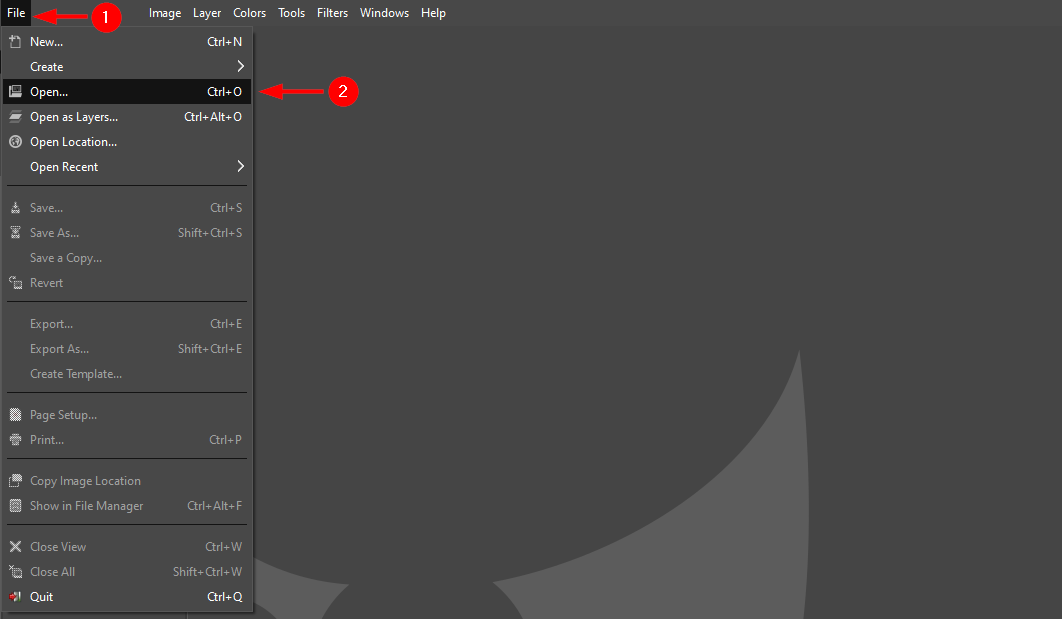
It will open a file manager where you have to choose the image from which you want to remove the background.
Once you choose the image, it will open a prompt asking you to convert the selected image to the built-in sRGB color prompt, and I will recommend you convert the image by hitting the Convert button:
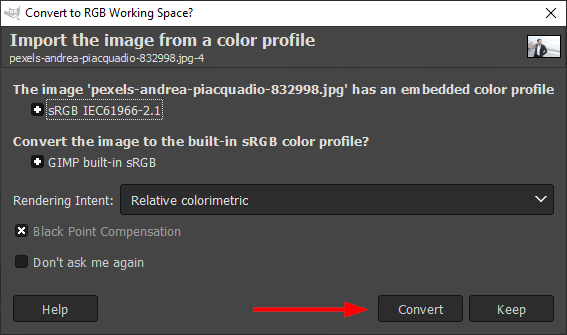
And soon, you will see the image loaded in the GIMP.
Step 2: Add Alpha Channel to have transparency
To remove the background, you have to add the alpha channel by which your image can have a transparent background.
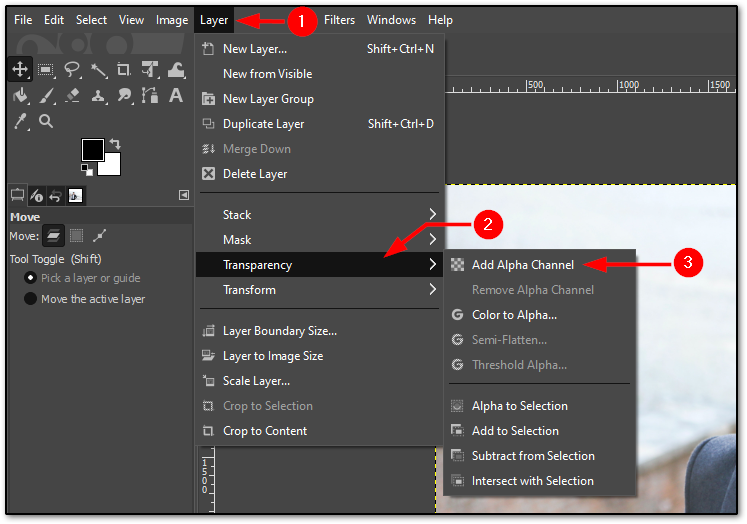
To add an alpha channel, first, click Layer from the top menu and choose the Transparency.
There, you will find an option to Add Alpha Channel:
Step 3: Start selection using the Scissors Selection Tool
While there are multiple ways to select subjects in GIMP, using the scissors selection tool is by far the most convenient way to do so.
In the scissors selection tool, all you have to do is choose two points on the border of the subject, and it will automatically take care of the curves and complex lines.
Sounds confusing? Here’s how you use the scissors tool:
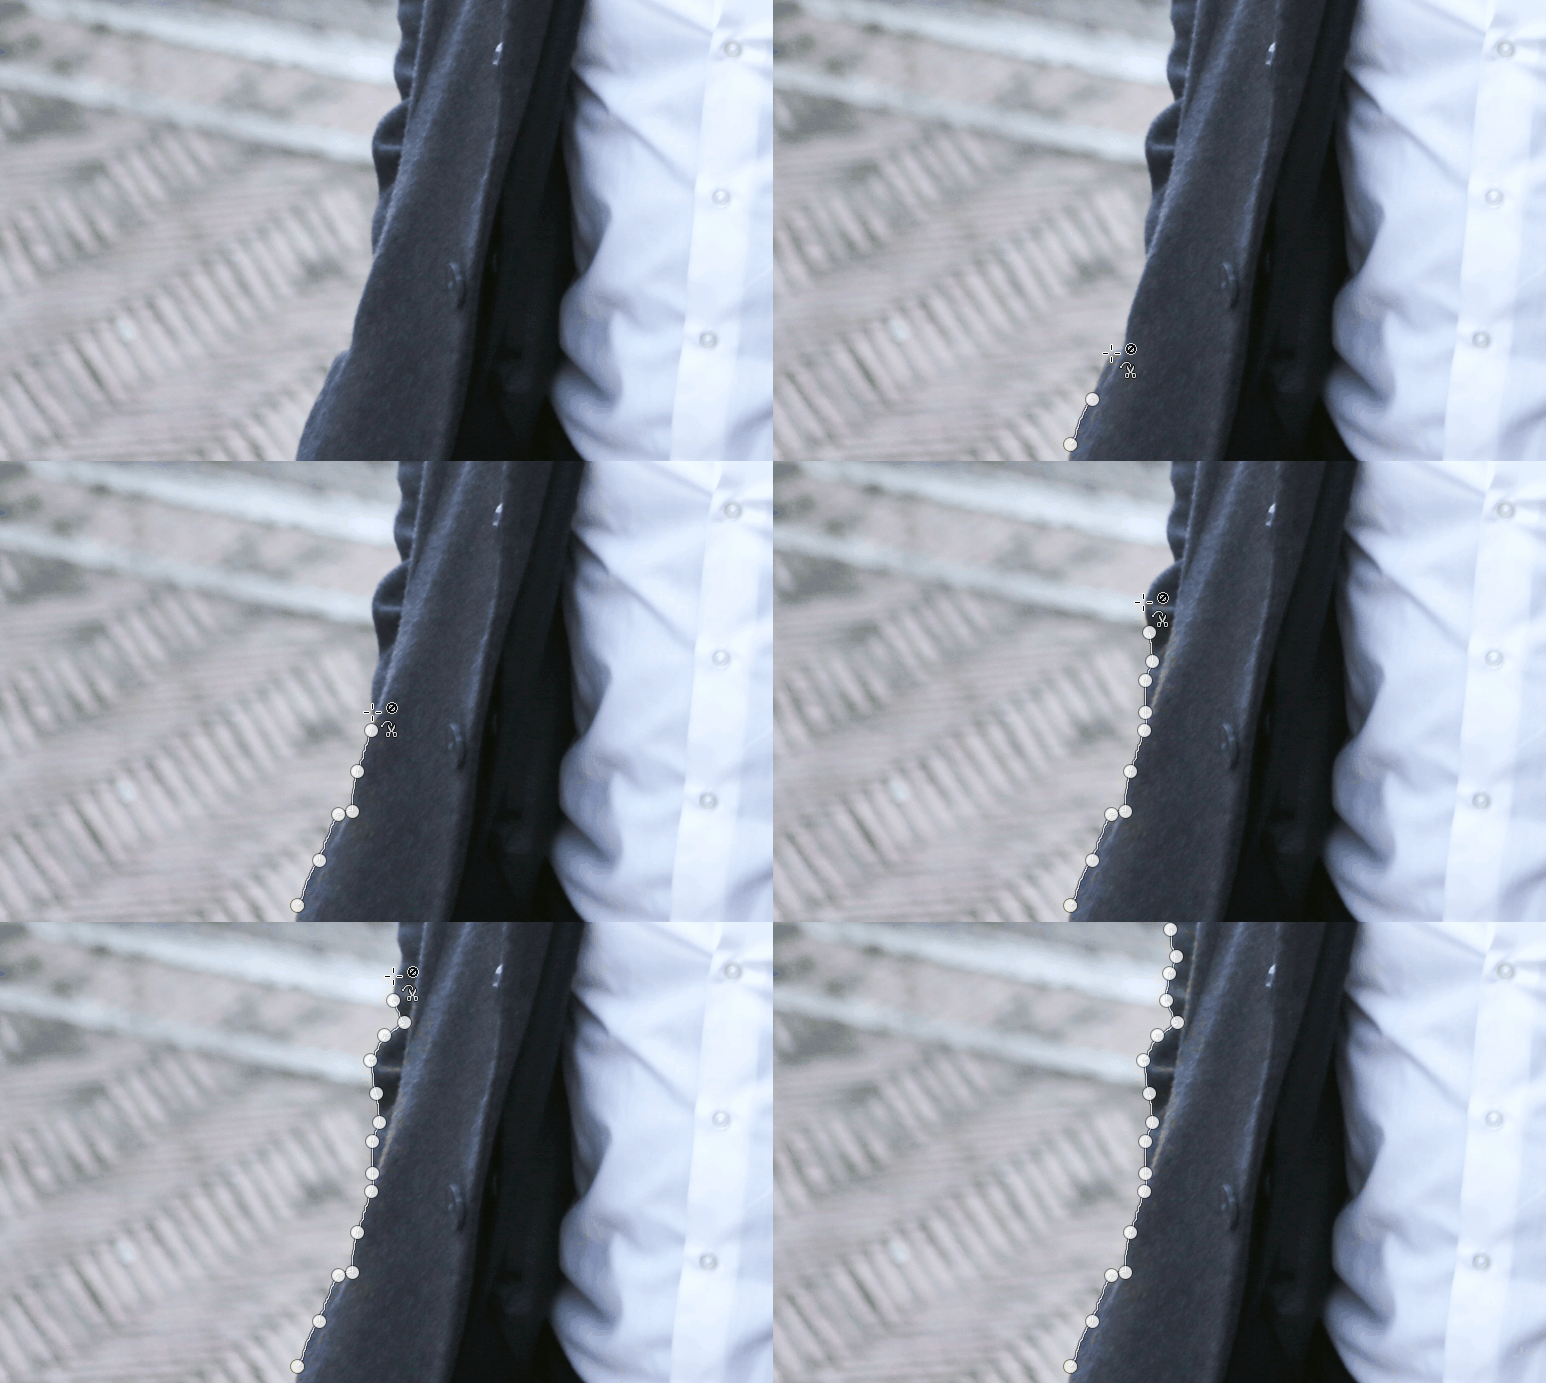
And as you can see, it took care of all the complex curves with a few clicks.
Keep repeating this until you reach where you started.
Once you reach the point from where you started, you will see a different icon than what appeared while selecting:
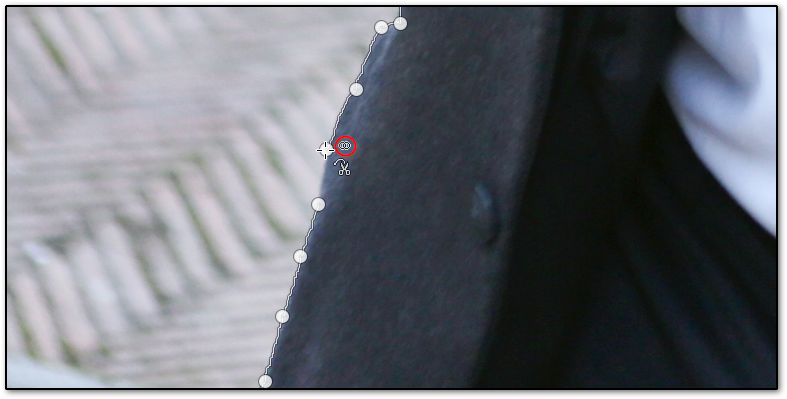
And once you connect those dots, you will see a selection around the object that you made:

So many dots. Right?
But that’s just an outline. We are yet to make a selection.
To convert this outline (done by the scissors tool), press the Enter key, and you’ll see your object is selected (indicated by dotted lines):

But that’s not the complete selection. If you notice carefully, there is a part of the hand that was not selected, so if you remove the background, the end result will be unfinished output.
So, let’s have a look at how you can select multiple parts.
Step 4: Select the inner parts of a subject
While selecting the outer body of the subject, the inner parts of the subject may not be selected, so in this section, I will teach you how to select the inner parts of the subject.
On the left side, you will find a section named Scissors Select, and inside that, you will find 4 different modes.
From which, you have to select the 3rd option called Subtract from the current selection that will allow you to make multiple selections from the same body:
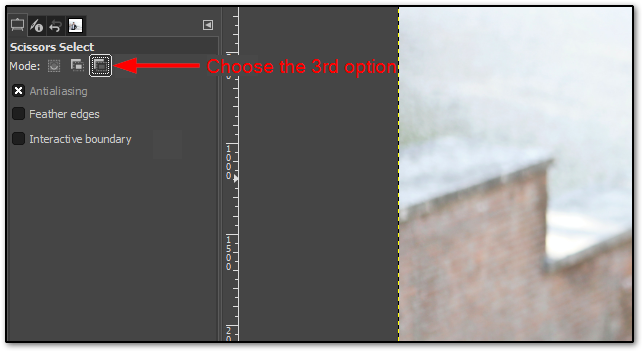
Once you do that, you can select the draw outline using the scissors select tools for the area yet to be selected.
In my case, it was a small area of the right hand, so I did the following:
- Select the scissors, select tool
- Use the scissors tool to select the area
- Press the Enter key to convert the outline into the selection
Here’s what it looks like after selecting the inside part of the subject:

As I mentioned earlier, you can have multiple parts, and in that case, you can use the scissors selection tool multiple times (you don’t have to select the Subtract from the current selection option every time).
Step 5: Delete background
Please don’t press the Delete key for the current selection.
The thing is, up until now, you selected the object that you want to keep and want to remove the unselected part (the background part).
But if you press the Delete key in the current situation, it will remove the selected area and keep the background as it is.
In simple terms, we have to invert the selection, which will invert the selection (will select the background itself and unselect the main body).
To invert the selection, go to the Select and choose the Invert option:
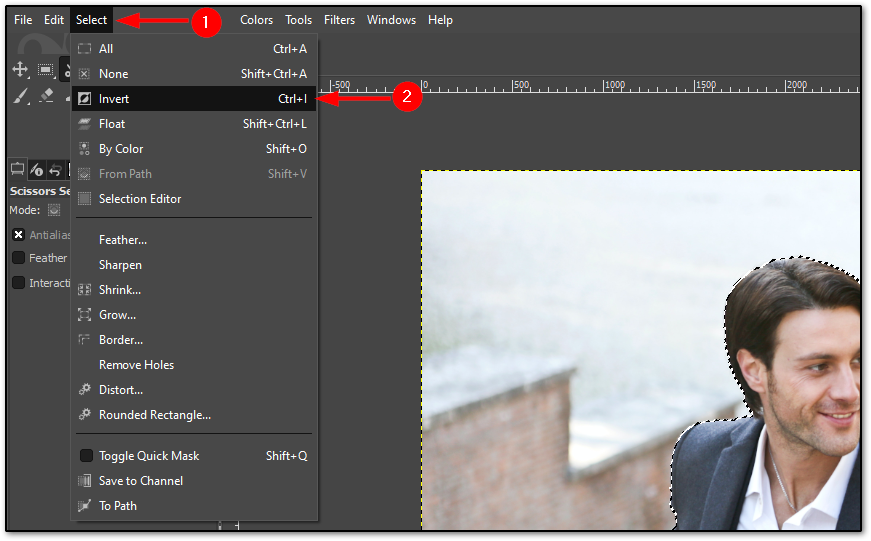
Once you select the Invert option, you will see the same dashed line around the canvas, which indicates the selection has been inverted:
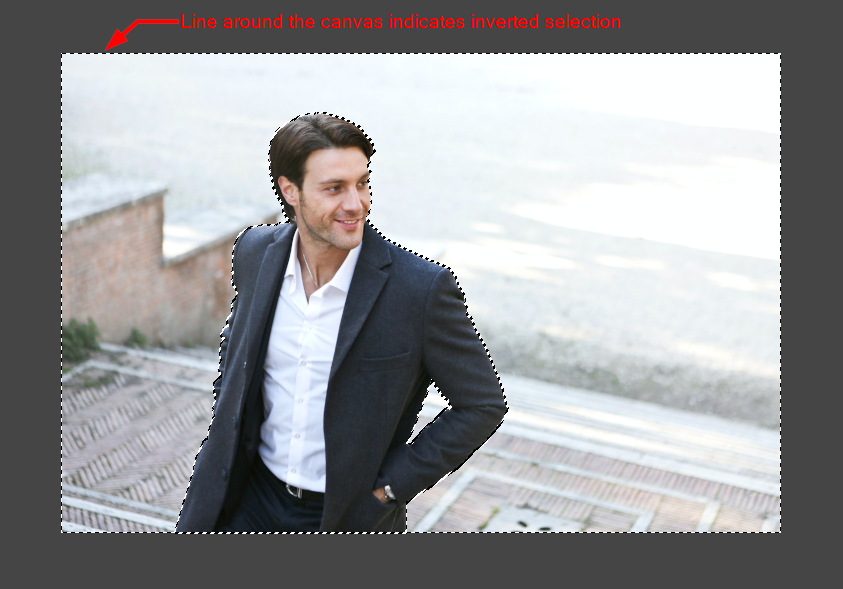
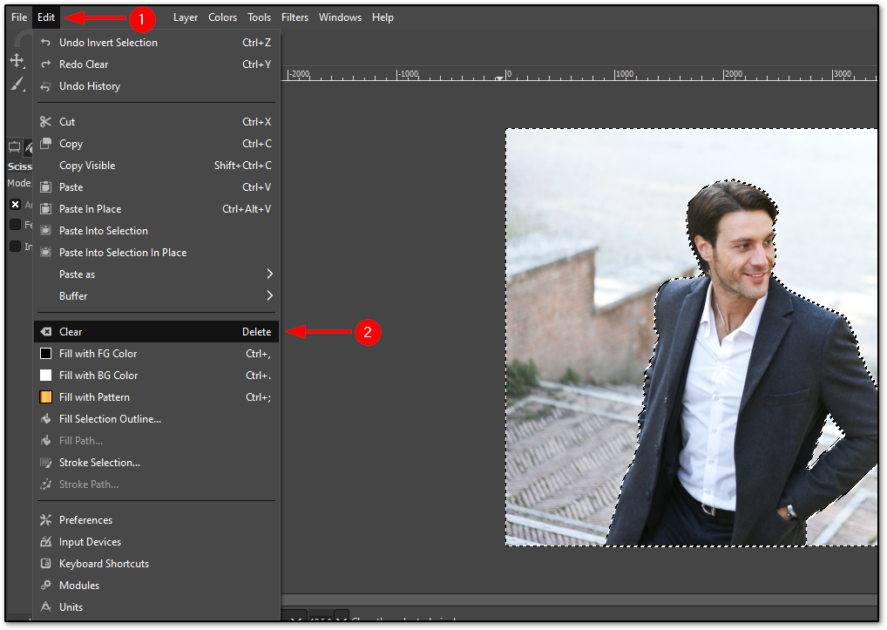
Now, you can remove the selection by pressing the Delete key or by going to Edit > Clear:
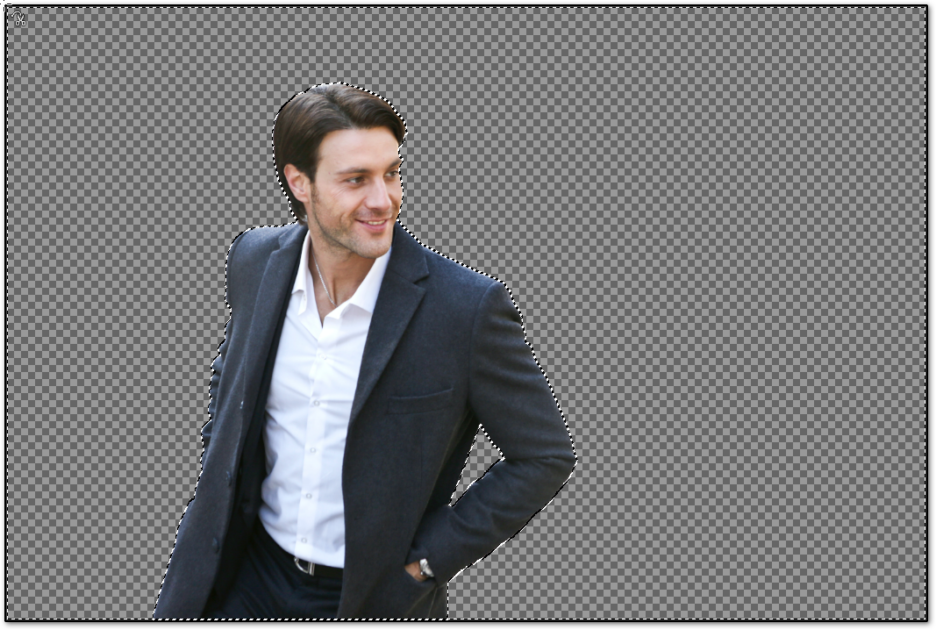
Once you remove press the Delete key or remove the background from the menu, you will see you are left with the subject with no background:
Step 6: Remove the selection
If you notice, even after removing the background, you are still left with the dashed lines around the canvas and subject, so let’s have a look at how to remove the selection.
To remove the selection, go to Select > None:
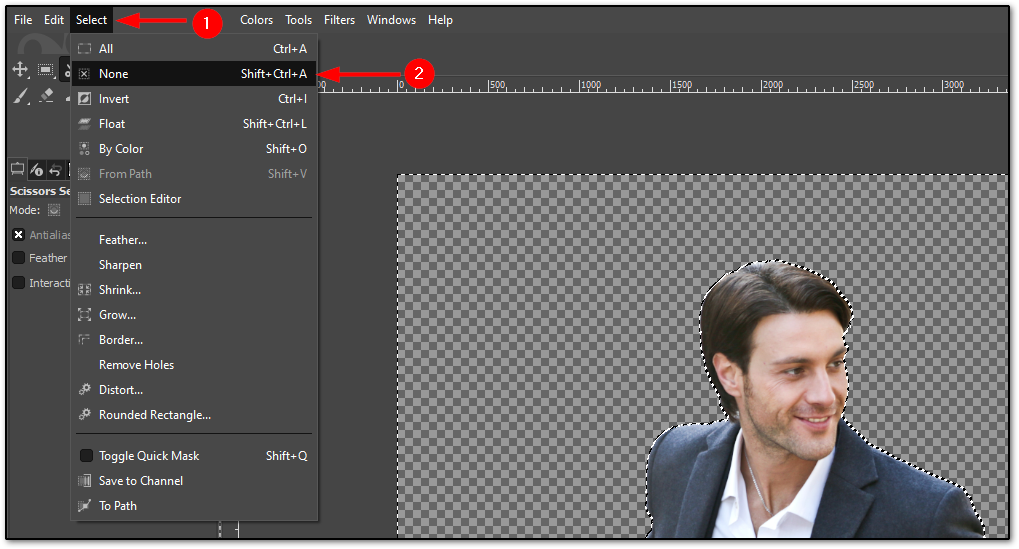
Once done, it will remove all the selections around the canvas and subject:

Step 7: Take care of rough edges over the subject
Just removing the background is not enough!
You may ask why. Well, once you remove the background and zoom in, you will find rough edges, especially around the head:
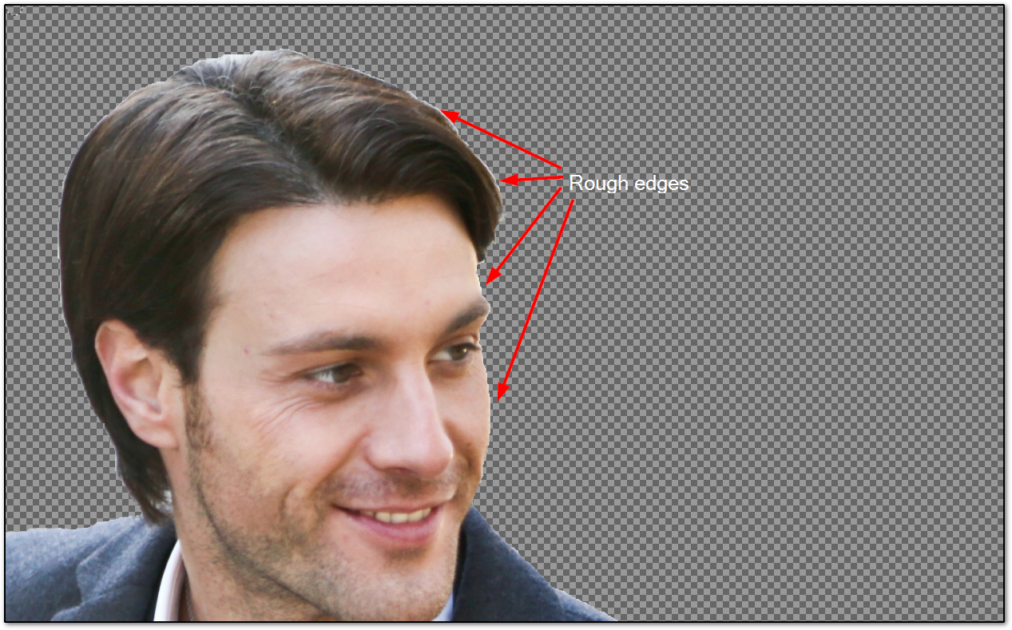
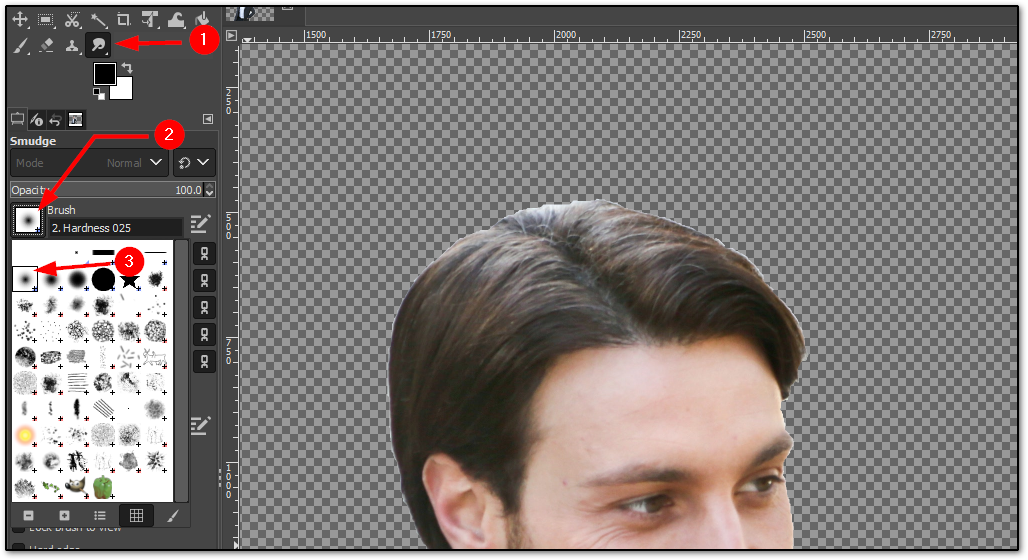
To remove these rough edges, you have to use the Smudge tool by following the given steps:
- Select the Smudge tool from the left menu bar or by pressing
S - Choose the brush named
Hardness 025 - Keep the size around 45-50 (as per the image size)
Now, use this brush multiple times (until you see a satisfactory result) around the border:
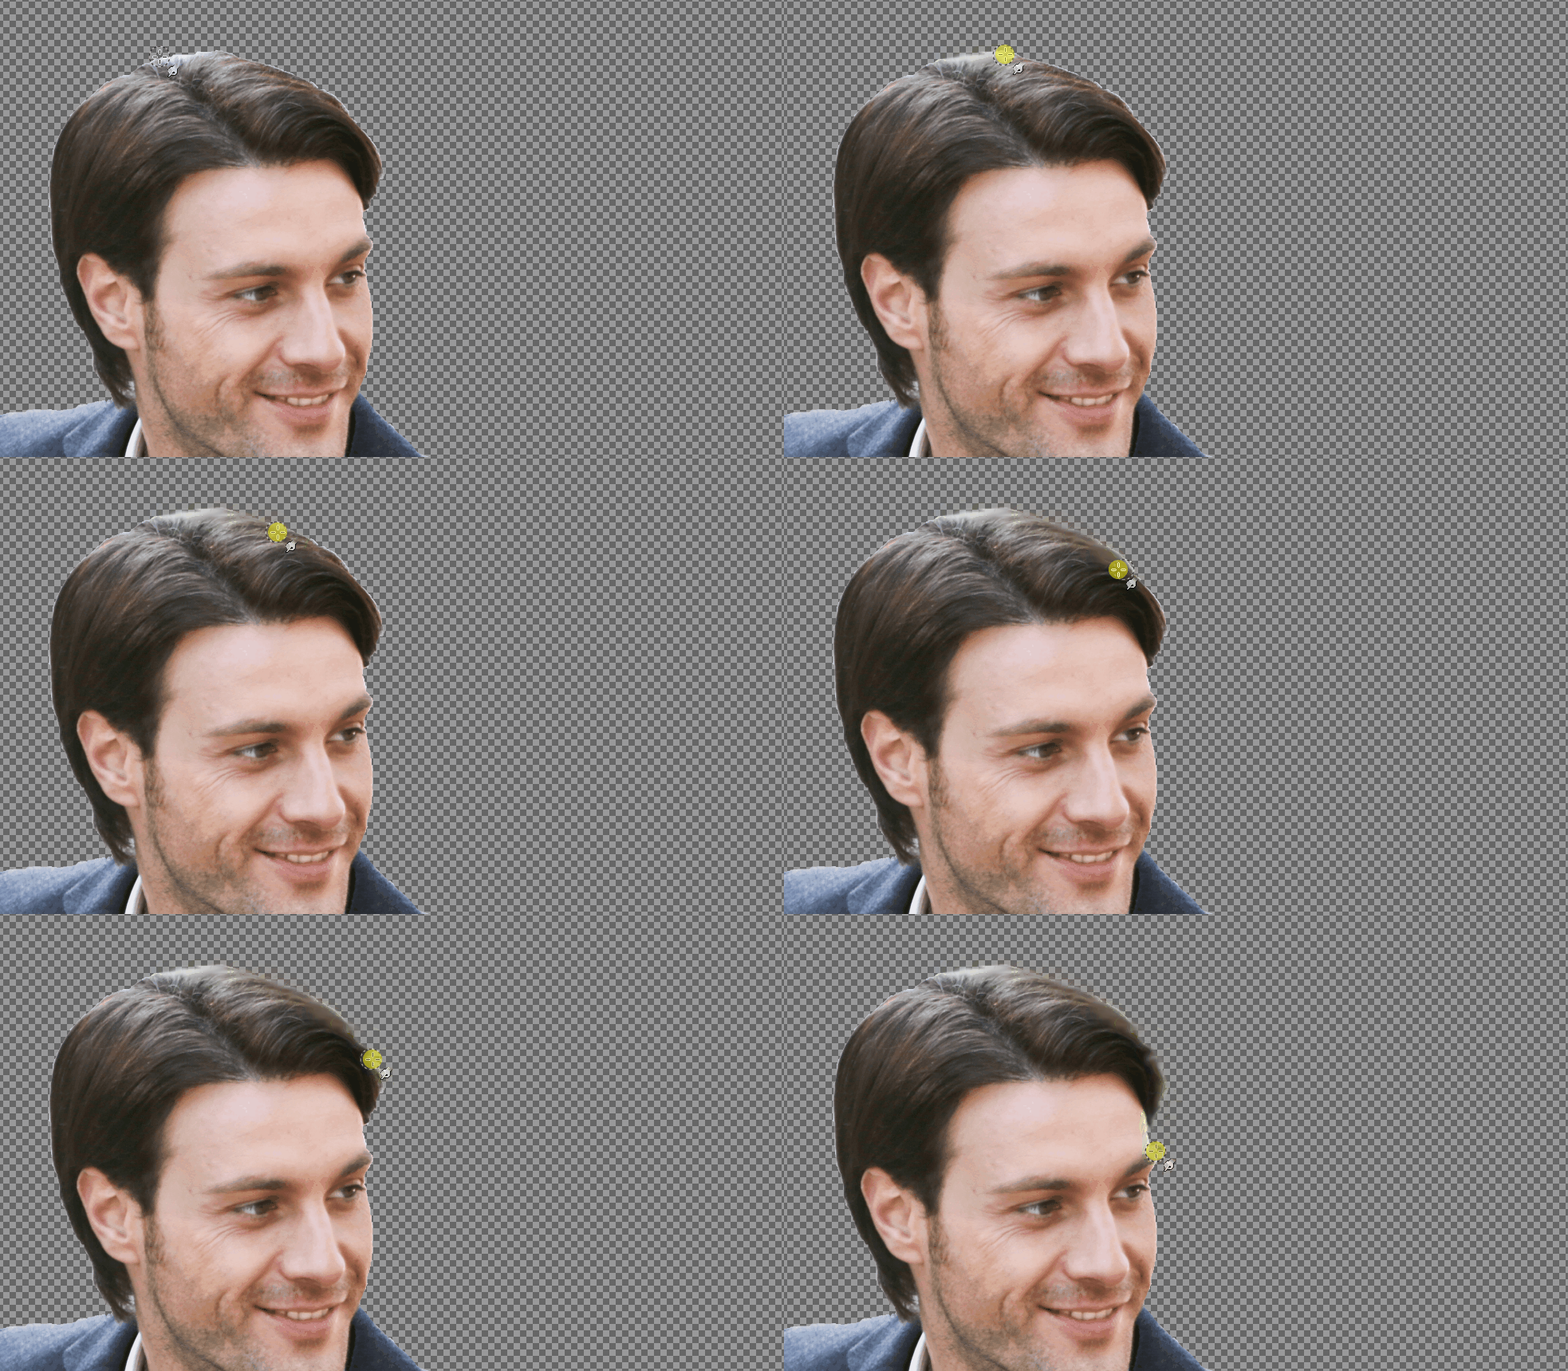
And the end result will be smooth around the edges, making it look like a natural image:

Step 8: Take care of the hair
In most cases, smoothing the border will do the greater job of the other parts except hair, and there’s a strong reason.
Unlike other body part that has a distinctive outline, hair is mostly an uneven part of the body, so even after smoothing it out, it may look artificial.
To solve this, you have to use a different brush – Bristles which is found in the same menu as the Hardness 025 (which you choose to smoothen out the border).
Choose a brush size between 15 to 20.
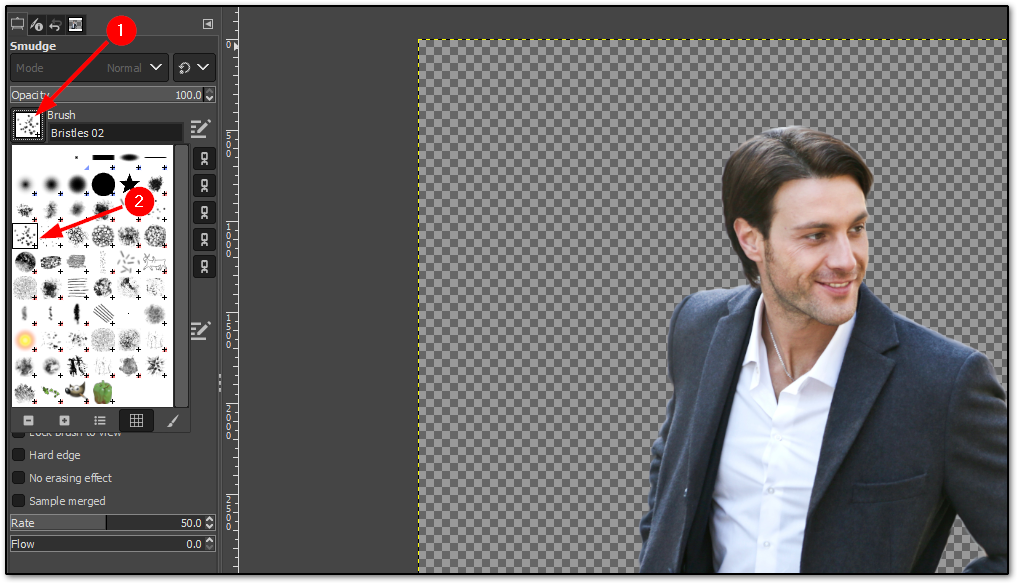
Now, use this brush over the hair of the subject, and you will see a hair-like texture around the head:
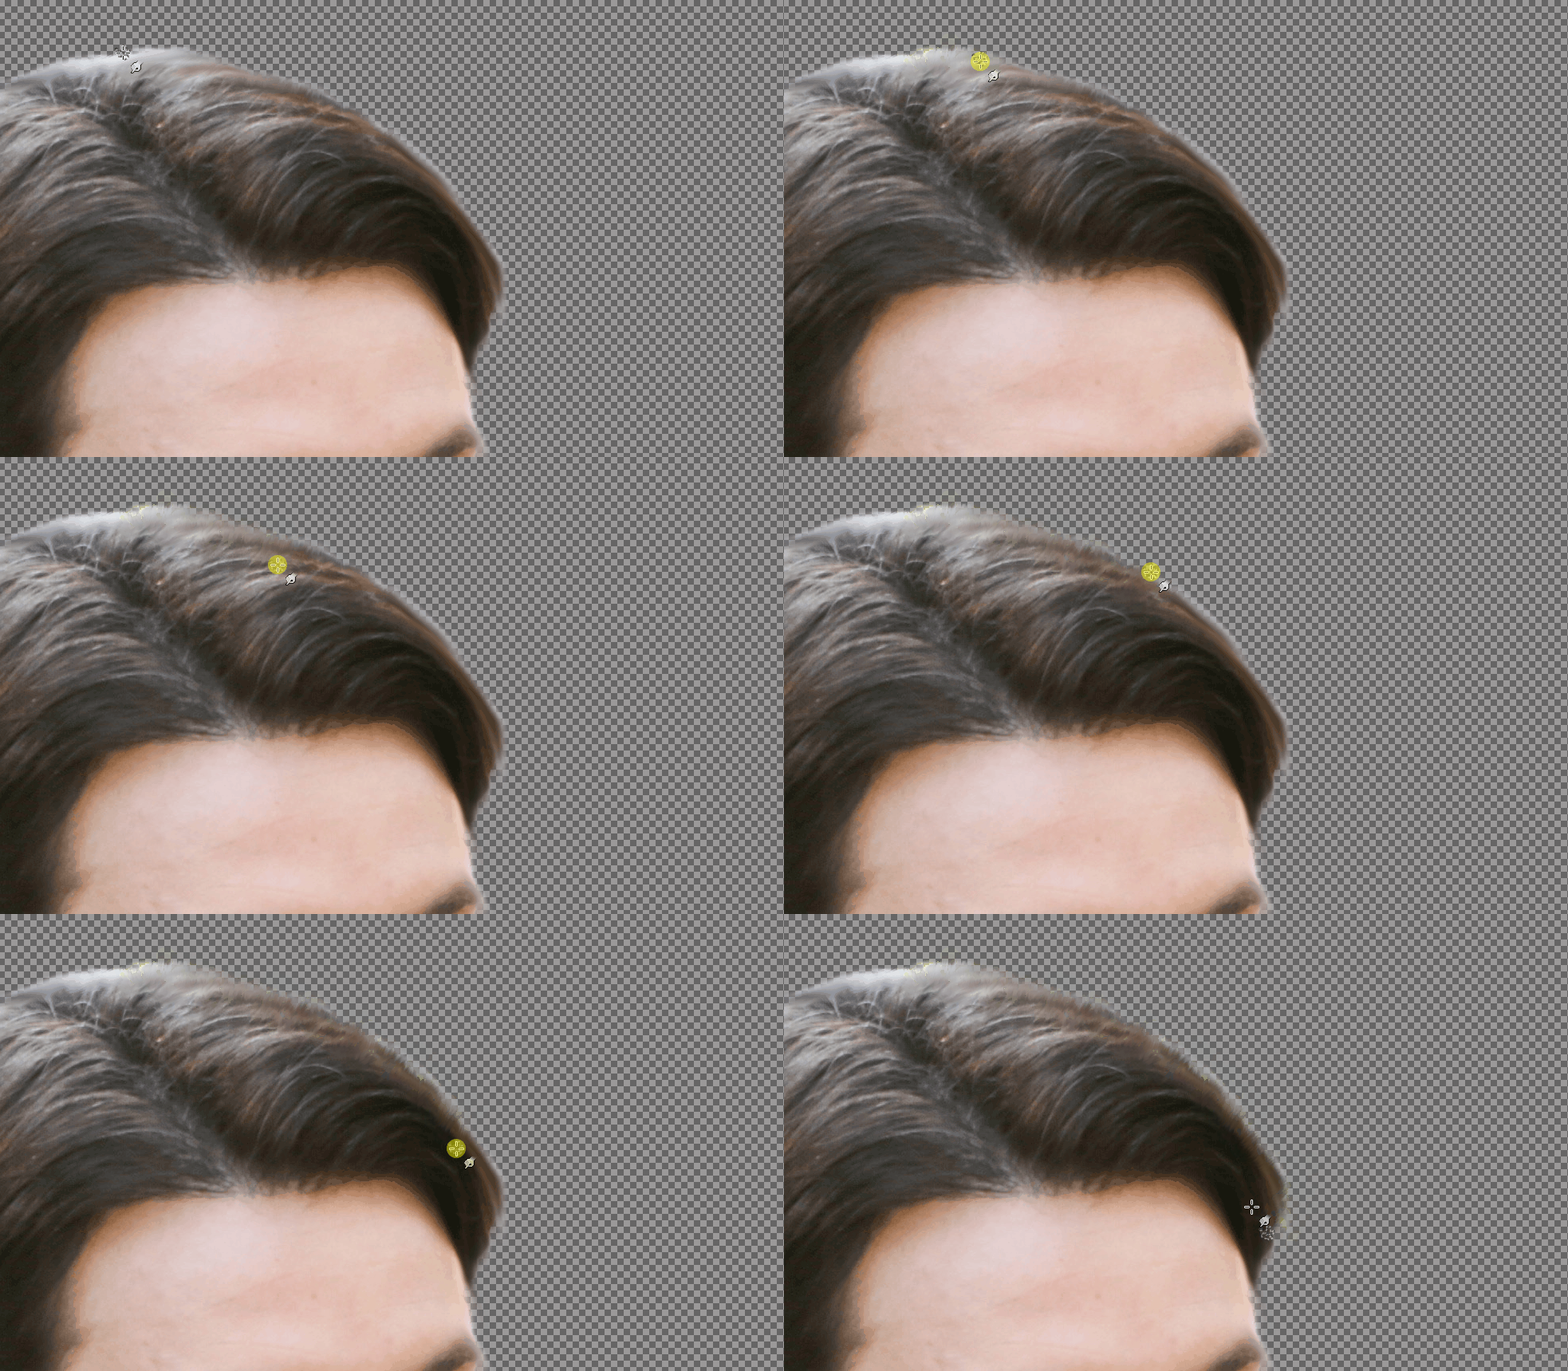
In some areas, you may need to increase the brush size to have an effective result (in my case, I had to use a brush size of 30 on the top point).
And here’s my final result:

Step 9: Save the transparent image
Please don’t hit the Save or Save as button; they will save the project, not the image!
To save the transparent image, go to File > Export As:
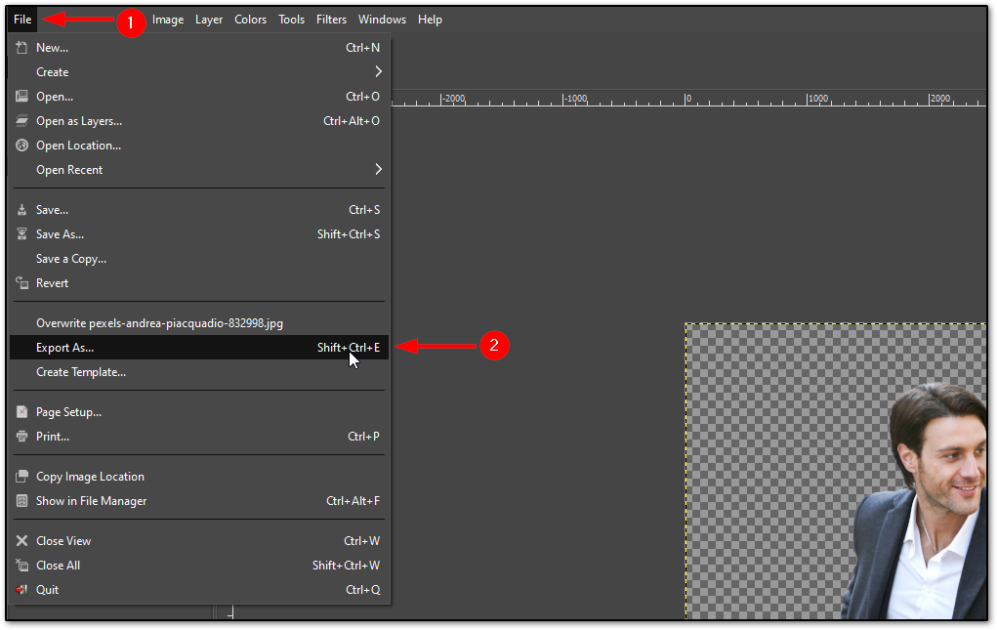
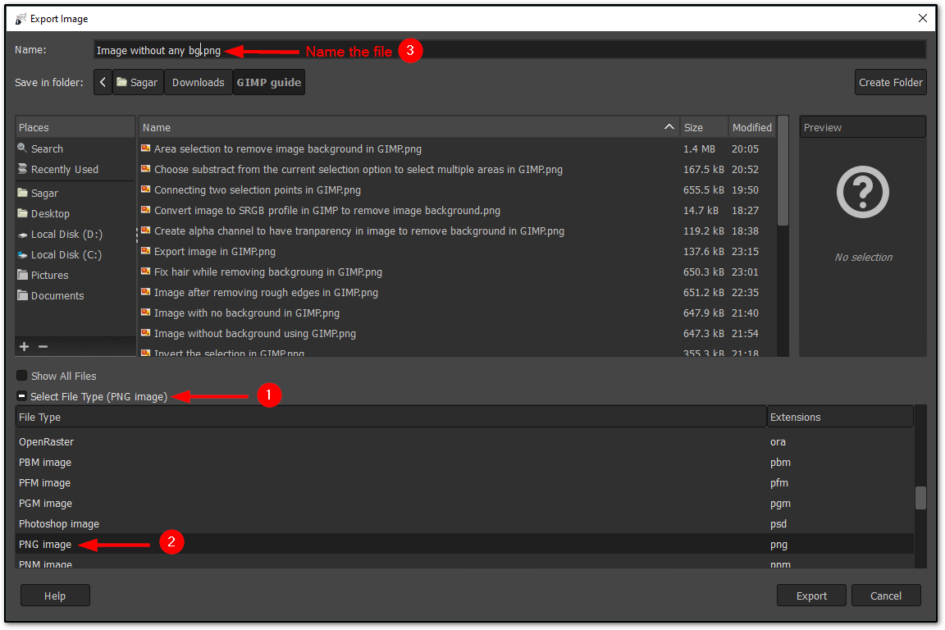
There, you have to perform the following steps:
- Click on Select File Type
- Choose PNG image
- Name the file
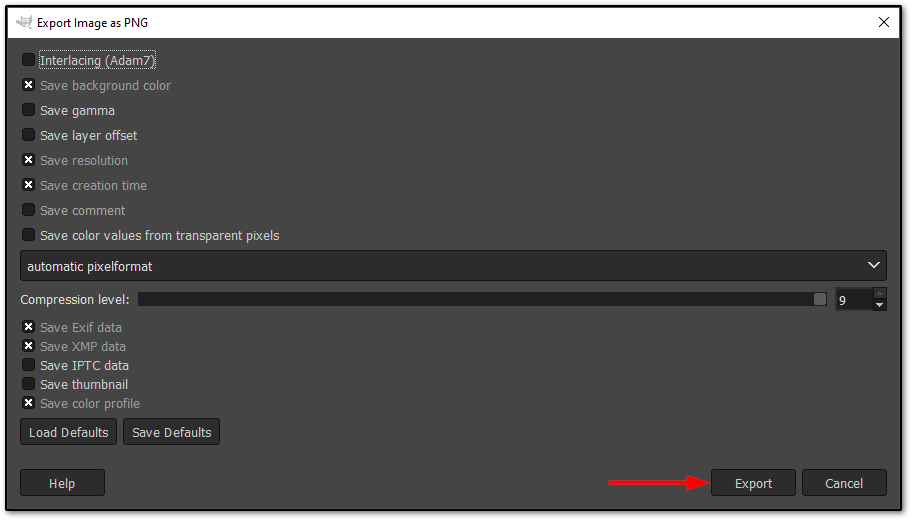
Once you do that, it will open a prompt asking you to choose quality and compression; I recommend going with the default settings.
And if you want better quality, you can reduce the compression level.
And that’s it!
Change the background of the image using GIMP (optional)
Once we have a transparent image, we can easily change the background of an image.
To change the background, first, we have to import the background image by going to File > Open as Layers. Alternatively, you can press Ctrl + Alt + O:
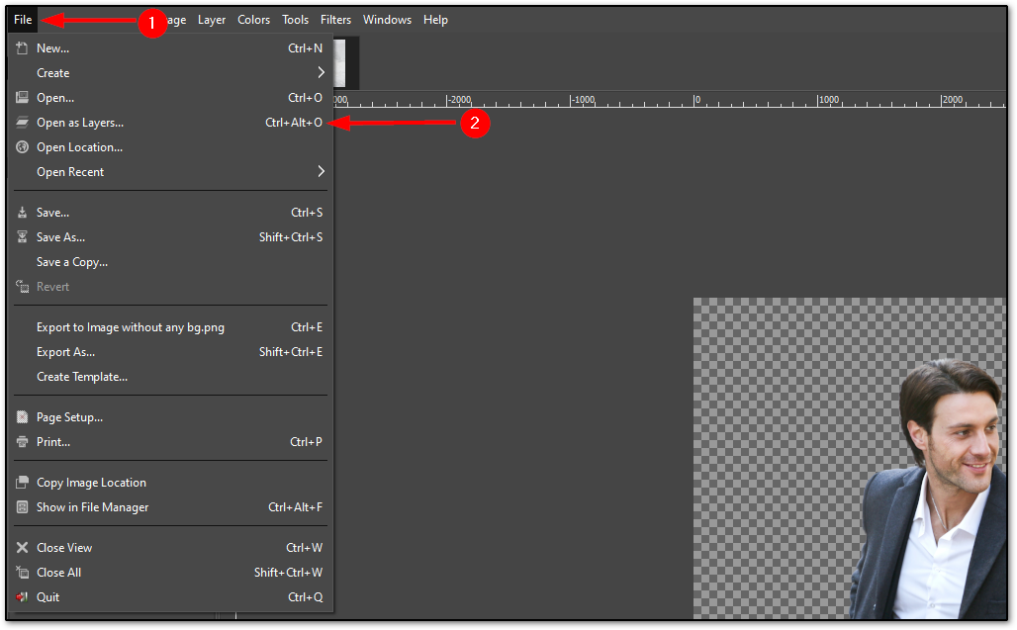
It will open the file manager, and from there, choose the background image of your liking.
But the opened image will be placed above our subject.
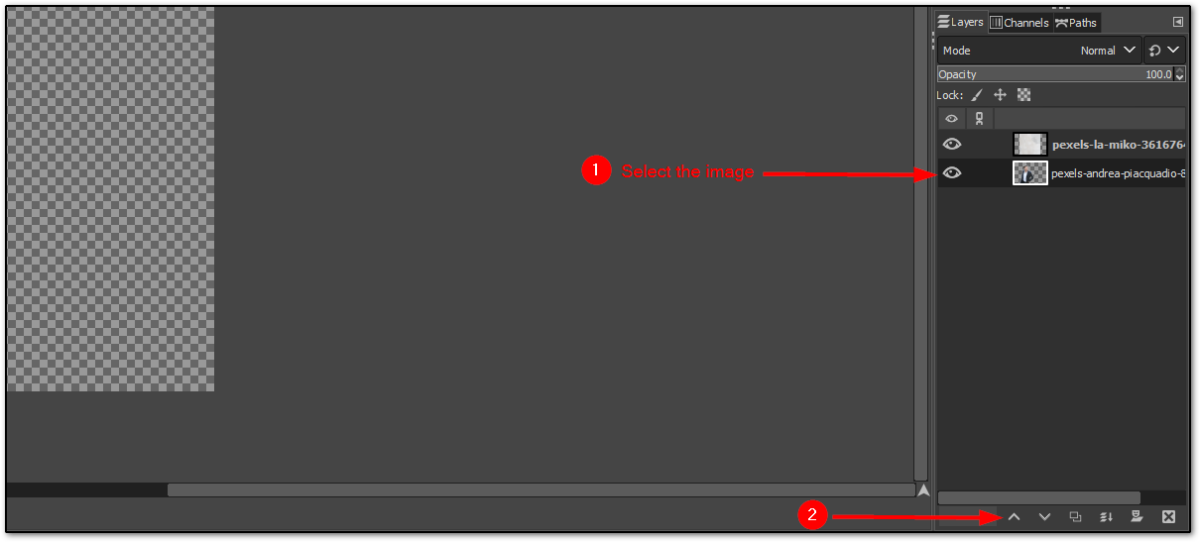
To solve this issue, all you have to do is follow two simple steps:
- Select the image from the
Layers(located on the right end) - In the bottom right, you will find the up arrow key, press it
What it will do is place our subject above the background:
But there’s one problem!
The background image won’t fit into the frame, so let’s look at how to solve this issue.
Fit background in the frame (by enlarging the background image)
There are multiple solutions to this issue, and one of the easiest is to scale the background image, which will enlarge the background image.
To scale the image, follow the two simple steps:
- Right-click on the background image layer
- Choose the
Scale Layeroption
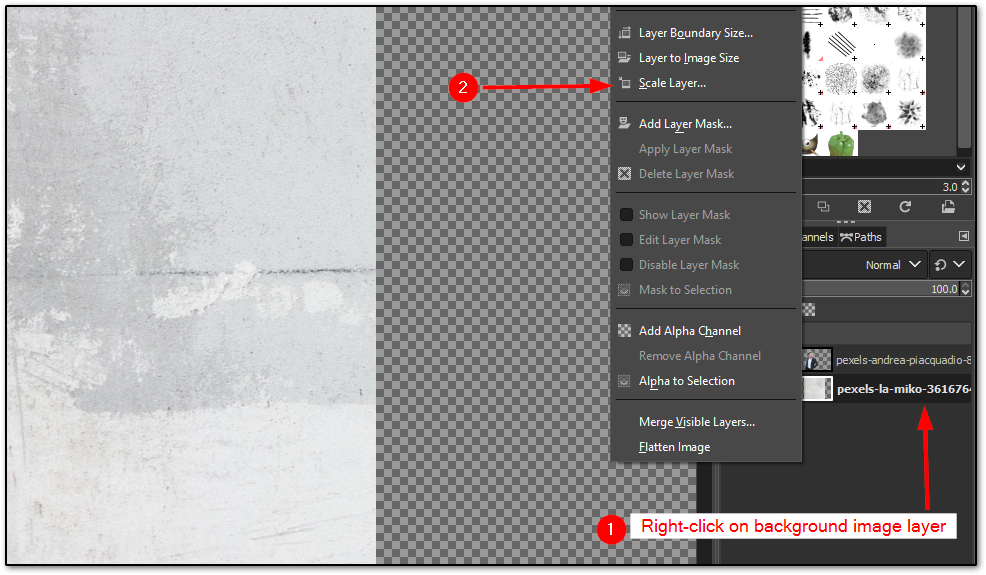
It will open a prompt to enter the width and height on which you want to scale your background image. Now, I can not suggest a perfect size for all because each image has different dimensions.
So you have to do some trial and error here to find the perfect range, and if you’re curious, it was 6000×9000 for my image background:
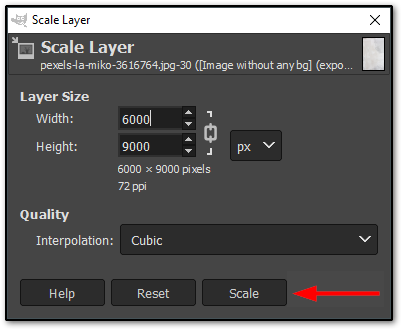
Once done, adjust the background and foreground as per your need.
And here’s the final result of removing the background and replacing it with a new image in GIMP:

You can save this image in your preferred image format like you did with the transparent image earlier (while saving the image with a transparent background).
Wrapping Up 😀
This was a step-by-step guide on removing the background in GIMP, including replacing it with the new one.
The guide was a little lengthy, but it was meant to cover all the basic steps with additional tips like adding texture to hair and smoothening out the border.
If you want some alternatives for any reason, here are some more tools to remove the background from an image.

