Whether you need to tweak critical system files or share your PC with someone else, you need to know how to manage user accounts in Windows.
The user account in Windows decides what you can do inside the Windows. I am sure you don’t want to let anyone with access to your PC install potentially harmful software (including malware) or even delete Windows or its system files.
This is why you need to know exactly what type of user accounts are available in Windows and what access they offer. In this post, you’ll find an explanation of user accounts in Windows and how to set them up.
Administrator Account
This is the primary account that is created when you first install Windows. Whether you create a local account or log in with your Microsoft account, an administrator account will be automatically created.
It has complete control over the PC and can change all user settings and most system settings/files. It can install and uninstall programs, change everything in Windows Settings, add/modify/delete user accounts, apply settings that affect all users, update or add new hardware drivers, etc.
The only thing it doesn’t have access to is the critical system files used by the operating system. These files are usually very dangerous for the OS if edited, and even simple modifications can corrupt the OS. For example, the administrator account can’t modify boot.ini file that manages the Windows bootloader.

Although it’s not recommended, if you ever need to edit these critical files, you’ll need to enable the elevated administrator account.
Elevated Administrator Account
An elevated or full administrator account is a version of a standard administrator account that needs to be specifically enabled using a Command Prompt command. It has complete access to everything on the PC, and you also won’t see UAC prompts in it since everything runs in it with admin privileges.
It’s not a replacement for the administrator account since it will let every app make changes at the admin level without any permissions required. Only enable it if you must edit a critical system file and disable it afterward. Here’s how to enable and disable it:
Search for the Command Prompt in Windows Search by typing CMD. Right-click on the Command Prompt and select Run as administrator.
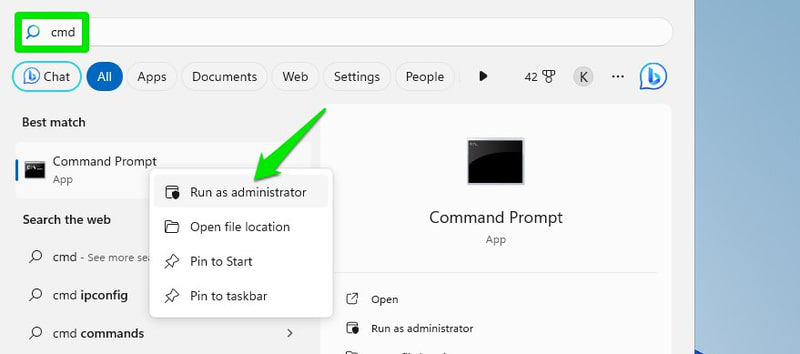
Here you can use the below two commands to both enable and disable it as you like:
net user administrator /active:yes
net user administrator /active:no

Once enabled, a new administrator account entry will appear on the login screen. It’s a completely new account with everything reset, so you or anyone else can access it without a password (unless added later). It still has complete access to other users’ data, I am sure you can guess how dangerous it can be.
Once you are done using it, make sure you go back to the default administrator account and disable it.
Standard Account
A standard account is a lower privilege account that the administrator account user can create to let other people use the PC without compromising the security. It can perform most day-to-day tasks without issues, but it will require admin permission to access system settings or apps that could impact the system or other users.
If you access anything that requires admin permissions, a UAC prompt will appear asking for the admin password. You or whoever is the admin need to enter the password to temporarily allow the standard account user to access it.
What It Can Do?
- Run all applications other than the ones that change system settings or affect other users.
- Unrestricted access to the internet.
- Download files.
- Print documents.
- Access local shared network.
- Change user-specific settings, like display settings, time and language, gaming, accessibility, etc.
What It Can’t Do?
- Install software since most require admin privileges.
- install or update hardware drivers.
- Change any file or setting that impacts other users or the OS as a whole. Some apps do still provide limited access, like Windows Firewall.
- Create or manage user accounts.
- Start or stop system services that require admin permissions (most do).
Create a Standard Account
The user with administrator account access can create a standard account. In the administrator account, go to Settings > Accounts > Family & other users. Here, click on Add account next to Add other user option.

You can use the other person’s Microsoft account that they use for logging in to other Windows PCs. If you don’t have that, then you can either create a new Microsoft account or a new local account.
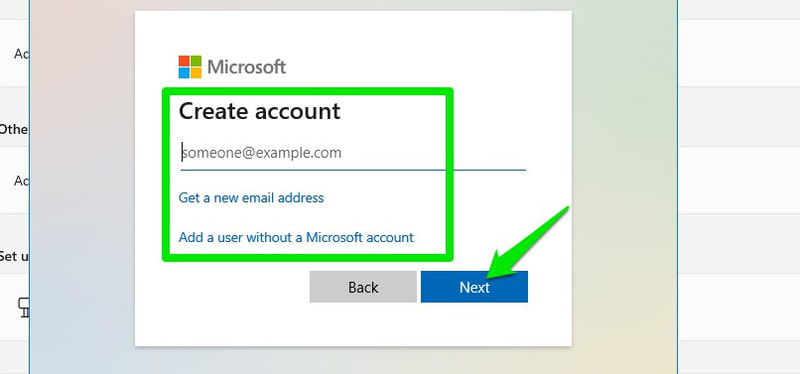
Once added, the new account will be created and it will be standard by default. However, you can make it administrator any time you want from the same settings.
Microsoft Account
Although the administrator account can be created as a local account, with Windows 8 and onwards, you can log in with your Microsoft account for additional functionality. If you choose to log in with a Microsoft account, it will create an administrator account and secure it with your Microsoft account credentials along with the below perks:
- Log in and access other Microsoft apps and services like OneDrive, Outlook, Microsoft Office, etc.
- Sync Windows settings and preferences between PCs that use the same Microsoft account. This also includes preferences and changes in the Microsoft Edge browser.
- Download and install apps from the Microsoft Store.
- Easier recovery of account in case you forget the password.
- Access to more login screen security methods.
- Add family members and use parental controls.
If someone with a standard account logs in using their Microsoft account, then all the benefits will be applied to that account as well.
Windows will ask you to log in using the Microsoft account when you first set it up. If you have chosen to create a local account, then you can log in or create a new Microsoft account from the Email & accounts option in the Accounts option.

Family Member Account
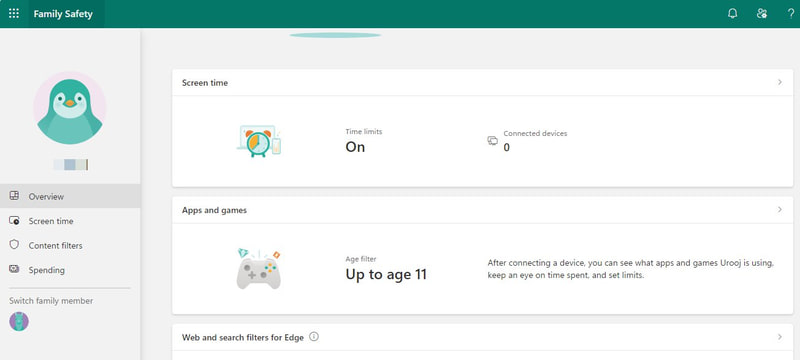
You can add a family member account that comes with additional parental controls and monitoring features. Even though it would be a regular standard or administrator account, it will have additional controls using the Microsoft Family Safety dashboard.
Below are the extra controls you’ll get:
- Set screen time limit based on total time or a specific time of the day.
- Filter apps and games based on age.
- Filter mature web results.
- Manage Microsoft Pay balance.
- See the complete activity report, including apps, games, and web browsing. It will also tell the total time spent logged in to the PC and on which activity.
Set Up a Family Member Account
Make sure you are logged in using your Microsoft account, and then follow the below instructions:
In Windows Settings, go to Accounts > Family & other users and click on Add account next to Add a family member option.

Here you need to either provide the family member’s Microsoft account email or create a new Microsoft account for them. If you will provide the account, then it will send a request to the family member to accept the invitation.
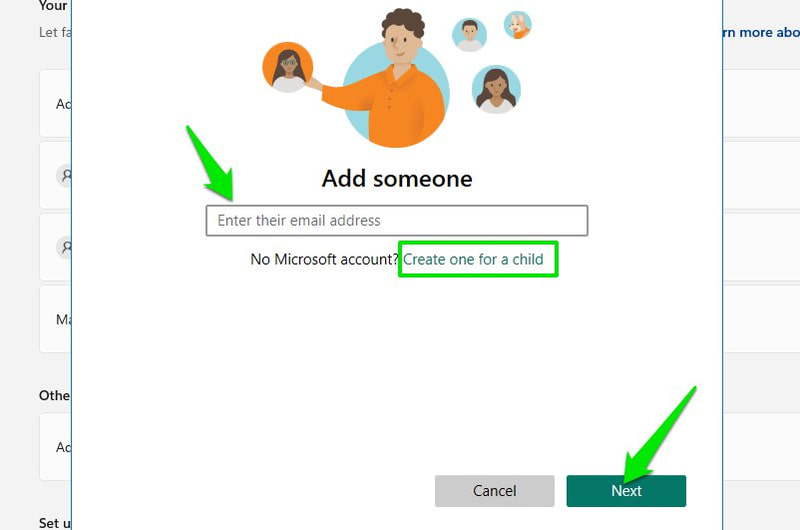
For demonstration, I’ll add a new account. First, provide the new account email ID (must use Outlook or Hotmail), password, and name.
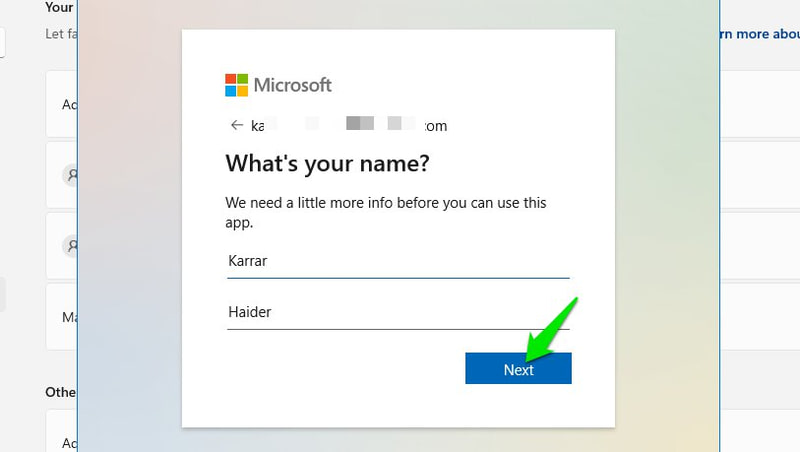
Afterward, it will ask you to provide the date of birth of the member. This is a very important step; Microsoft will configure and restrict the controls according to the age of the member.
For example, you won’t be allowed to monitor an adult member’s activity by default, and the kid’s web filter will be disabled. Similarly, kids have more strict controls enabled according to age, and monitoring will be enabled by default.
Once you provide the date of birth, the account will be created, and the members can log in to your PC using their new account credentials.
To manage the members, you need to open the Microsoft Family Safety dashboard, where all the members will be listed. A link to it will also be made available in the Family & other users option on your PC.
Do keep in mind that you can add only 2 members in the free account, get a Family Safety paid subscription to add up to 6 members, and many more features.
Kiosk
Kiosk is a special account that limits the complete functionality of the OS to a single app. Once enabled, it will allow the user to log in using the Kiosk account, but the account will directly launch a pre-determined app and the user won’t be able to do anything outside of the app.
Mainly, this feature is for businesses to create interactable catalog displays or self-service terminals for the public without risking users moving away from the app. The apps are also limited; they can’t access full storage data or launch other apps.
Kiosk is limited to apps installed from the Microsoft Store, so you first need to install your desired app from it. Once you have the app, go to Accounts > Family & other users in Windows Settings and click on Get Started next to the Kiosk option.

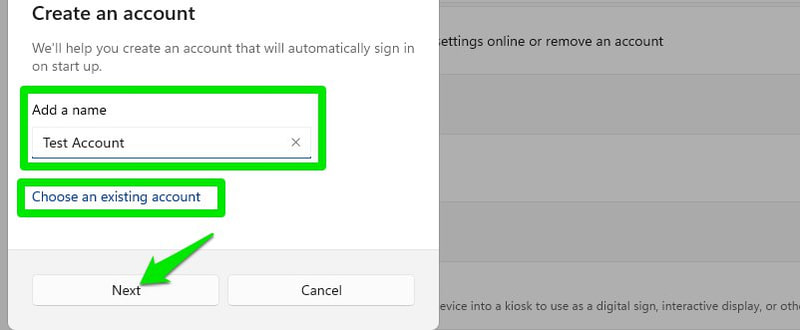
Now you can either create a new account or use an existing one. If you choose to create a new account, it will be a local account without any password protection.
Afterward, select the app from the list of all compatible apps and click on Next.
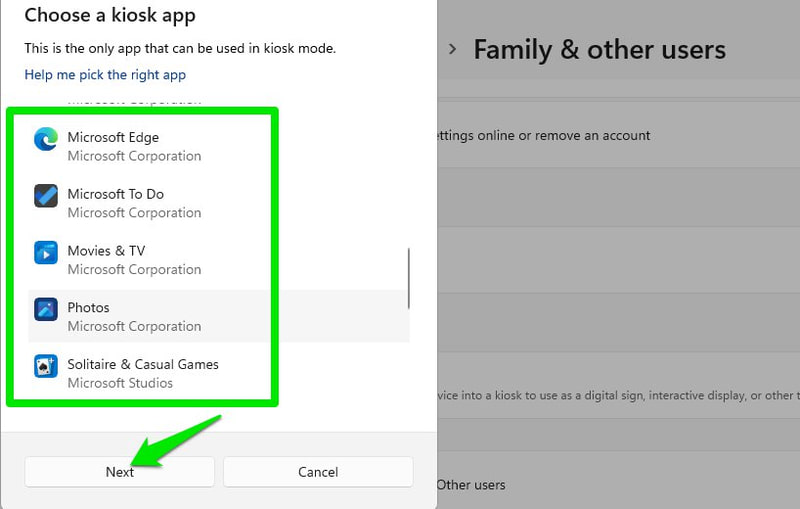
That’s it; the new Kiosk account will be created and listed alongside your other user accounts. When you need to exit the Kiosk app, press the Ctrl+Alt+Delete keys, which will bring you back to the login screen.
Ending Thoughts
The choice between administrator and standard account mainly depends on how much you trust the other person with your PC. Standard accounts are very safe, even if someone needs temporary access to your PC. It should be your first choice when sharing the PC.
Furthermore, logging in with a Microsoft account would be best for most users unless the privacy offered by a local account matters to you.
Next, you may also read about how to enable Copilot AI on Windows 11.

