Linux is an excellent choice of operating system until you stumble upon an error. It is not you; it is how users deal with Linux, which requires constant learning and troubleshooting.
Linux comes with plenty of amazing package managers. By default, most users start with APT, considering users opt to use Ubuntu – one of the most popular operating systems.
And, when using APT, you may find yourself stuck with “Unable to locate package error,” especially in Ubuntu.
That’s why, in this guide, we’ll learn how you can solve the error. Throughout the guide, we’ll be using Ubuntu. If you’re using another Linux flavor that uses APT package manager, you can follow it without issues.
Let’s get started.
What is the “E: Unable to locate package” Error?
The error is clear, and you can understand it yourself. So, you tried to install a package or application but got the error, “E: Unable to locate package_name.”
It simply means that Linux cannot find the package you’re trying to install.
And before you start to panic, you must know that it is a common error among Ubuntu or APT users.
The good news is that there are solutions for this kind of problem. Whether you’re a Linux newbie or a veteran, you can solve the issue by following our guide.
Also read: How Linux Package Managers Work: A Complete Guide
Reasons for Getting the “E: Unable to locate package” Error
We must also learn about the main reasons to understand the error better.
You’ll use the default APT package manager when installing a package in Ubuntu. You might use apt-get or apt to install the package. The command to do so is as follows.
$ sudo apt-get install package-nameIf everything works fine, you’ll not see any errors. The package will install as intended. However, sometimes, you get the “E: Unable to locate package package_name.” The output looks like the one below.
#output

Reading package lists... Done

Building dependency tree

Reading state information... Done

E: Unable to locate package package_name
When the error occurred, Linux failed to locate the package. So, it is up to us to fix the issue and ensure it doesn’t happen again.
Before trying to fix it, you must know the reasons. Some of the reasons that can lead to the error include:
- You misspelled the package name — most common.
- The resource list is throwing the problem
- The Ubuntu repository cache does not support new packages
- The Ubuntu version’s support period has expired
- The package version is unavailable for the Linux flavor you’re using
- The main respiratory is not available to install the desired package
Ways You Can Solve the Error “Unable to locate package”
In this section, we’ll look at the different ways you can solve the error.
#1. Package Name — Did You Type It Correctly?
One of the common mistakes that Linux users make is to “not” type the package name correctly. So, if you make a simple typo, Ubuntu will throw the error.
Let’s check an example when installing Gimp – an image processing tool.
$ sudo apt-get install gump#output
$ sudo apt-get install gump
Reading package lists... Done

Building dependency tree... Done

Reading state information... Done

E: Unable to locate package gumpAs expected, you’ll get the “E: Unable to locate package gump.” After all, there is no package “gump” out there.
A typo can happen more often than you think. That’s because Linux is case-sensitive, and even when you type the package name correctly, it might not work due to capitalization. So, if you try to install gimp by naming it Gimp, it’ll still fail.
$ sudo apt-get install gumpReading package lists... Done
Building dependency tree... Done
Reading state information... Done
E: Unable to locate package gumpSo, the only way to install gimp is to type the package name correctly.
$ sudo apt-get install gimpBut what if you need to know the package name correctly? In that case, you can use the apt search command to look for it. For instance, if you’re looking for a package containing “monkey” but are unsure about its full name, then run the following command to come up with the available package name.
$ apt search monkey

p   graphmonkey                     - a GTK#-based graphing calculator

p   libex-monkeypatched-perl        - experimental API for safe monkey-patching

p   libmonkey-patch-action-perl     - module to monkey-patching subs from other

p   libmonkey-patch-perl            - scoped monkey-patching Perl module

p   libtwelvemonkeys-java           - collection of plugins and extensions for J

p   libtwelvemonkeys-java-doc       - Documentation for libtwelvemonkeys-java

p   monkeysphere                    - leverage the OpenPGP web of trust for SSH

v   monkeysphere-validation-agent   -

v   node-fs-monkey                  -

p   searchmonkey                    - search files using regular expressions aim
#2. Update Package List/Repository Cache
Ubuntu interacts with the repositories differently. Rather than downloading the whole respiratory, it builds a local cache. The local cache contains the list of available packages.
When you run sudo apt update, Ubuntu creates a local cache.
$ sudo apt updateOnce you run the apt-get install command, the APT Package Manager will search the cache for the package. It’ll get the information, such as the version, before proceeding to download the package from online repositories over the internet.
So, if the package is not listed in the cache, Ubuntu will throw the error, letting you know about it.
This happens when you install Ubuntu or Debian-based Linux distro (such as Linux Mint) for the first time. As the cache is not built with the latest information, installing even standard packages can cause an error. If you have a fresh Ubuntu install, run the sudo apt update at least once to build up the local cache.
In some cases, the cache can need to be updated. And, then you have to update it using the apt update command.
You should also clean the cache before updating it. To do so, run the following command.
$ sudo apt clean && sudo apt update#3. Checking Package Available
Even when you type the correct package name and have your repository cache up to date, you can still get the “unable to locate package” error in Ubuntu. This happens because of the unavailability of the package — and no matter how much you try, you’re unable to install the package.
So, what’s your options?
You’ll need to learn about the Universe repository to understand your options. Generally, the Linux system doesn’t enable it by default, which can lead to an error. Or the Ubuntu version you’re running doesn’t have access to the package you’re trying to download and install.
To check whether your Ubuntu is not outdated, you’ll first need to check its version. You can do it by running the following command.
nitt@logan99:~$ lsb_release -a#output
No LSB modules are available.
Distributor ID: Ubuntu
Description: Ubuntu 22.04.3 LTS
Release: 22.04
Codename: jammyI’m using the latest stable 22.04 LTS version with the codename Jammy. Excellent; note them down and then head to the Ubuntu packages website.
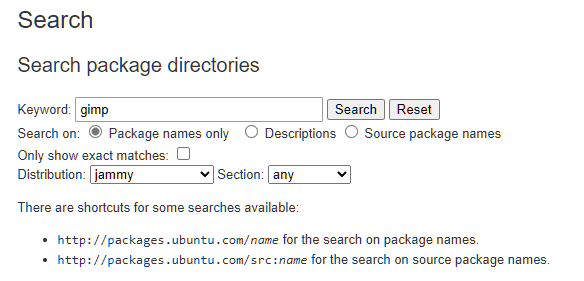
On this page, you can manually search for packages. It has a nifty Search section where you can search by entering a keyword. The keyword can be the package name or anything that can help you pinpoint the package.

So, now, all you need to do is enter the package name and press the Search button.

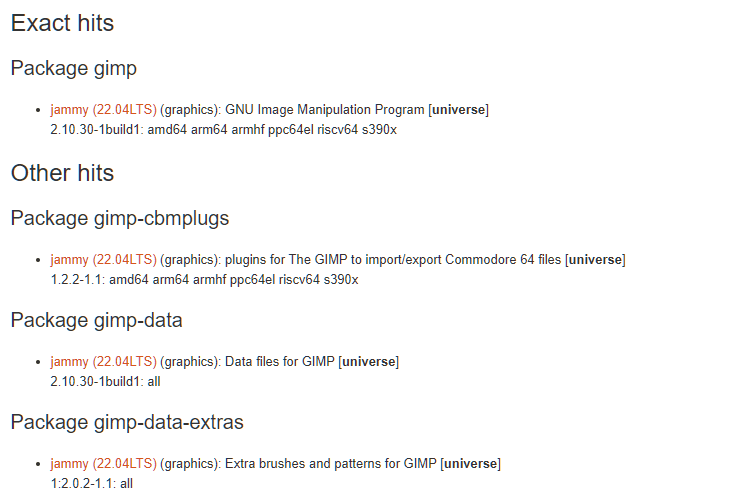
As gimp is a known package, we get an exact hit.

And, if you carefully notice, you’ll see that it is available in the Universe repository. To download and install the package, you must access the Universe repository for the Jammy 22.04 LTS version.
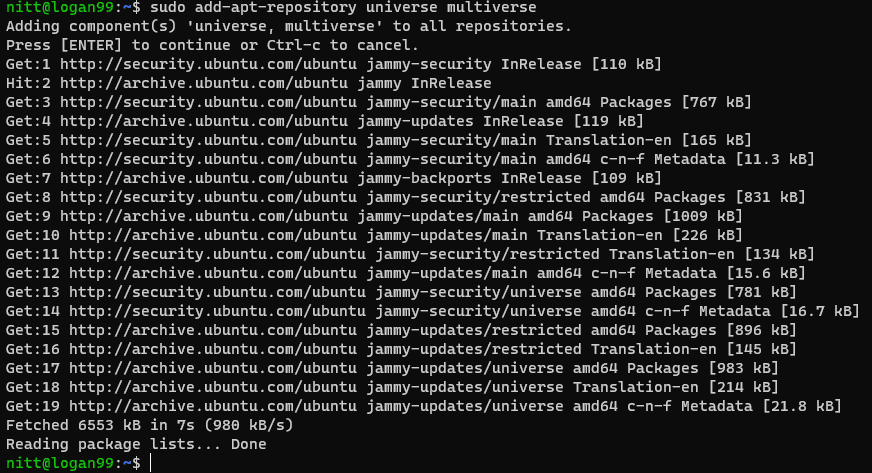
Now, you’re sure the package is available for your Ubuntu version. Next, you’ll need to enable the repository. To enable the repositories, run the following command.
$ sudo apt-add-repository universe multiverseThe above command enables the universe and multiverse repository.

Once that’s done, make sure to rebuild the cache again.
$ sudo apt updateYou can also install other repositories, such as main and restricted. Run the following command to do so.
$ sudo apt-add-repository main

$ sudo apt-add-repository restricted
But what if the package is not available for your Ubuntu version? In that case, you’ll have to use third-party repositories such as PPA. You can read more about it here: What is Ubuntu PPA and How to Install it?
#4. Make Sure that You’re Running an Active Ubuntu Release
Ubuntu offers an LTS version with long-term support for 3 or 5 years. This can lead many users to not update to a supported version, making the OS unavailable to receive any new updates. Once your Ubuntu version ends, you cannot install new packages and will get the “unable to locate package” error.
To check whether your Ubuntu is still supported, run the following command.
$ hwe-support-status --verbose #output
nitt@logan99:~$ hwe-support-status --verbose
You are not running a system with a Hardware Enablement Stack. Your system is supported until April 2027.
nitt@logan99:~$As you can see, my Ubuntu version is supported until April 2027. You can ignore the Hardware Enablement Stack as it is unrelated to the topic.
If your Ubuntu version is not supported, you only need to upgrade to the latest LTS version.
#5. Fix Repository
If nothing fixes the “unable to locate package” error, then it’s time to inspect Ubuntu’s source manually.list file.
The file contains all repository-related data. You’ll need to access the/etc/apt/sources.list file.
Generally, you must check if the repository links are active and match the official listing. To check, visit the official distro’s site and look for the information.
Conclusion – What if Nothing Works?
After an hour of troubleshooting — you still find yourself stuck with the same “E: unable to locate package” error.
It’s infuriating, and you’re going to give up on the package and look for an alternative package or try to re-install Ubuntu again.
Before you do so, it’s best to try all your possibilities. For example, you can start looking for an older version of the package that supports your Ubuntu version. You can find them through a third-party personal repository (PPA).
If you cannot find a PPA containing the package, check the official website for the software you want. Generally, they offer a direct way to download the package files.
If everything fails, then it’s best to look for alternative apps.
This leads us to the end of our guide, where we learned different ways to solve the error of “unable to locate packages.” By now, you must clearly understand how Ubuntu interacts with repositories through the cache to retrieve, download, and install packages.
Next, check out the best examples of the find command in Linux.

