Are you dealing with error code 0xC1900101 while trying to upgrade your Windows OS and looking for a guide to fix it? If yes, you have stumbled upon the right webpage.
The Windows operating system is known for its frequent updates. This frequency of updates has even increased further with the launch of Windows 11. Every major Windows update comes with several bugs and glitches. The same happened with Windows 11.
Even though Microsoft has fixed all major bugs from this latest edition of Windows, some errors are yet to be fixed. One such error that many Windows users have recently reported is a Windows update error with a series of error codes 0xC1900101.
There can be several things that may be causing this error. Since the error code doesn’t mention why this error occurred, troubleshooting it becomes a task. However, in most occurrences, it has been seen that this error occurs due to driver-related issues.
To make things easier, here I have created a detailed guide covering workarounds that you can follow to fix this Windows update error code 0xC1900101, along with detailed information about what this error is, why it occurs, and more.
So, without any further ado, let’s get started!
What is Windows Update Error Code 0xC1900101?
Windows update error code 0xC1900101 is a universal rollback code that primarily indicates some incompatibility issue with drivers or underlying driver-related issues. However, this error may sometimes occur due to other underlying problems, such as insufficient space, corrupted cache, etc.
Many people think this error occurs exclusively for Windows 11 users, but that’s not the case. People have also dealt with this same error code in Windows 10, and now, they mostly notice it on Windows 11.
On Windows 10, this error used to appear with a BSOD (Blue Screen of Death) stating the error code and the error message that says – “The installation failed in XYZ phase with an error during XYZ operation.”
Because of this clear error message, it was a bit easy on Windows 10 to identify the actual cause of the error, while on Windows 11, you just receive a notification stating, “Failed to install on XYZ date – 0xC1900101.” This makes troubleshooting this error a bit more challenging.
Besides that, I’d like to mention that this isn’t any specific error code. Instead, it is a series of error codes which may include the following error codes –
- 0xC1900101 – 0x2000c
- 0xC1900101 – 0x20004
- 0xC1900101 – 0x20017
- 0xC1900101 – 0x40017
- 0xC1900101 – 0x30018
- 0xC1900101 – 0x40021
The good part is that no matter what error code you receive, you’d have to follow the same approach to troubleshoot it.
What Causes Windows Update Error Code 0xC1900101?
As mentioned above, the error message doesn’t clearly explain the underlying reason for triggering this error for you.
There can be several reasons, and below, I’ve listed all major of them:
#1. Outdated/Incompatible Drivers
This is the most observed reason that triggers this error code 0xC1900101. Therefore, the drivers installed on your computer should be up-to-date, and you should ensure that the drivers installed to handle third-party applications don’t interfere with the OS update process.
#2. Conflict with Antivirus
Antivirus tools are notoriously famous for giving false threat detection messages. This happens primarily because most signature-based and anomaly-based antivirus software follows a definition-based approach for identifying threats.
Since you’re updating your Windows, you’re making several system-level changes. If the execution of system-level files matches the definition, antivirus software gives a false alarm and blocks the OS update process.
#3. Third-Party Software Conflict
Even though this is very uncommon, there are some possibilities that third-party software you’ve recently installed or applications that use system-level access are causing hindrances in the OS update process.
#4. Corrupted Windows System Files
There are chances that the essential Windows OS system files on your computer could be dealing with the corruption issue. Besides that, it is also possible that the OS update files haven’t been downloaded properly.
In both scenarios, these file-related issues could lead to installation failure and potentially show the error code 0xC1900101.
#5. Network Issues
Your computer downloads the OS upgrade installation files over the internet. If your internet connection isn’t stable, it may hinder downloading files. As a result, this error may occur.
#6. Insufficient Disk Space
Windows 11 requires at least 64 GB of storage for proper installation. Therefore, ensure you have allocated at least 64 GB of storage on the C drive for only system files. Besides that, for Windows 10, you need at least 16 GB of storage space.
#7. Outdated BIOS
An outdated BIOS starts affecting system functionalities and causes errors that primarily show BSOD. The same happens with error code 0xC1900101; therefore, there is a strong chance that your outdated BIOS may be the culprit.
Now that you know the potential causes that trigger Windows update error code 0xC1900101, let’s discuss the best workarounds you can follow to fix it.
How to Fix Error Code 0xC1900101?
Since the error message doesn’t explain what triggers this error, troubleshooting becomes challenging. You’ll have to go for the hit-and-try method.
To make things easier for you, here I have covered the workarounds that you can follow to fix this error easily –
Ensure You Have Enough Disk Space

Windows 11 requires at least 64 GB of disk storage to install essential system files, whereas the minimum storage requirement for Windows 10 installation is 16 GB. Besides that, you also need around 20 GB of free space to download upgrade files.
Therefore, if you are dealing with the error code 0xC1900101, you should first check whether your system drive has ample storage allocated for Windows installation.
If you don’t have ample free space on your system drive, you can try the following techniques to gain some storage –
- Delete temporary files, files inside recycle bin, unnecessary downloaded files, and Windows.old folder.
- Uninstall unused applications and delete their data and residue files.
- Extend the storage of your system partition.
Besides that, you can also consider installing a larger size storage device.
In case you can’t meet Windows 11 minimum storage requirements, you can consider installing Windows 11 Lite version, aka Tiny11, on your PC. It is a very lightweight version of Windows 11 with no strict hardware requirements.
Remove All External Devices
When upgrading your Windows OS, you should remove all non-essential external devices. This is because these external devices use additional drivers, and your Windows could freeze while trying to figure out drivers for them.
It is also possible that these external devices may use drivers that are incompatible with your current OS or the OS you’re upgrading to and may cause hindrance during the upgrade process.
Since the error code 0xC1900101 primarily occurs due to driver-related issues, you should better remove all the unnecessary external devices such as the DVD, printer, digital camera, etc. Just keep the keyboard, mouse, and other essential devices attached.
After removing external devices, restart your computer and check whether the error still persists.
Update or Uninstall Drivers
It is commonly known that faulty and incompatible drivers are the main culprits behind the error code 0xC1900101. Therefore, updating drivers or uninstalling problematic ones should be your topmost approach to fixing this problem.
Here is how you can manually update or uninstall drivers on your Windows machine:
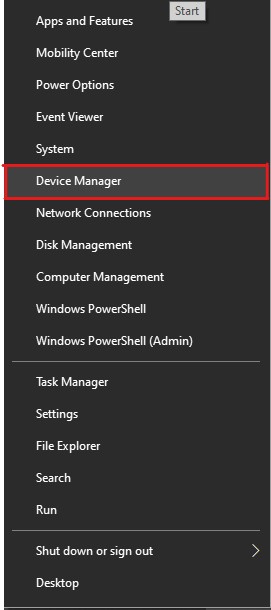
- First of all, launch Device Manager. For this, you have to right-click on the Start icon and select the Device Manager option.
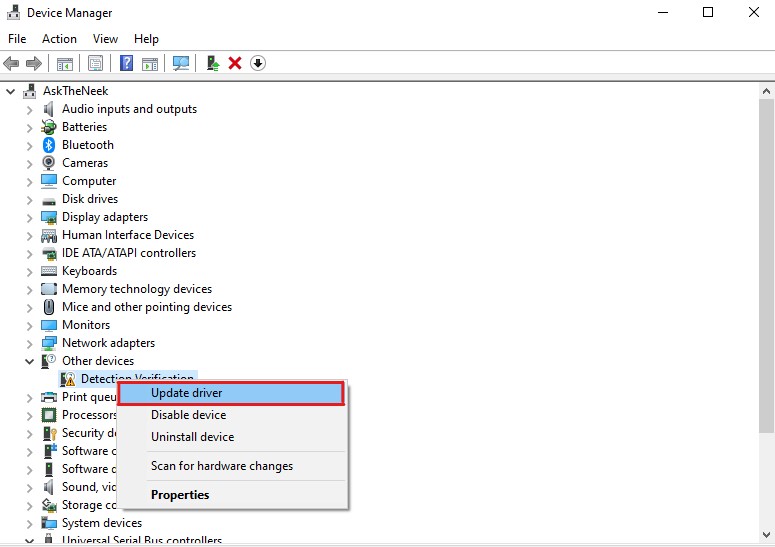
- Here, you will see a list of connected devices. Initially, you have to look for problematic devices only. The devices that may be causing the error code 0xC1900101 would likely have a yellow exclamation mark.
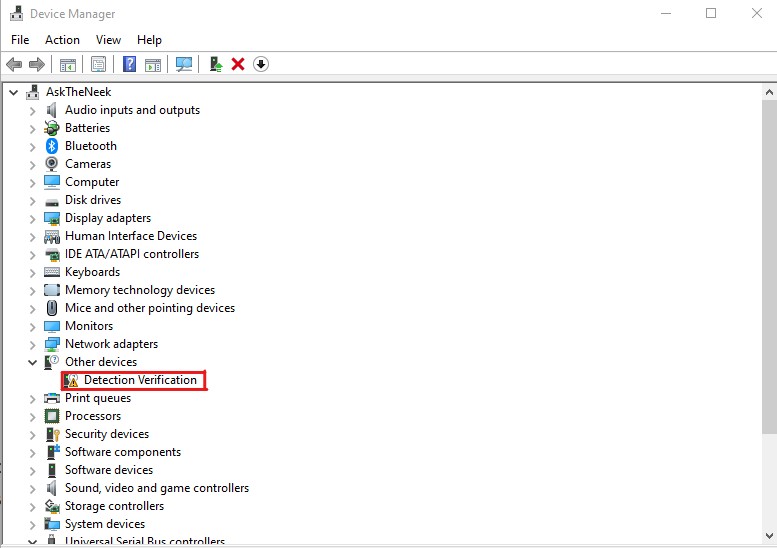
- Once you identify problematic devices, right-click on them and select the Update driver option to update the driver to the latest version.
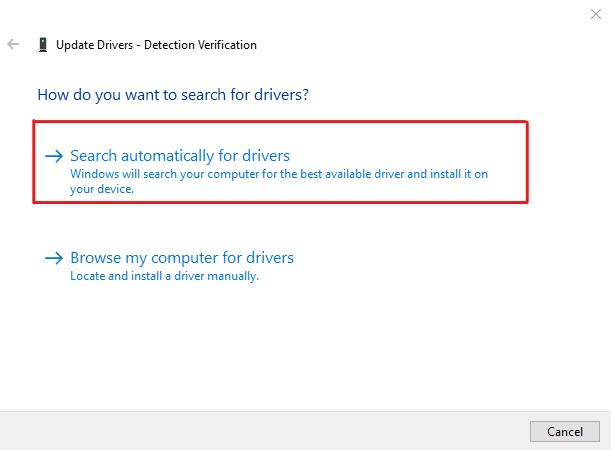
- A dialog box will appear. Here, you have to select the Search automatically for drivers option. This will search for the latest available drivers on the internet and install them.
- Alternatively, you can also opt for the Uninstall Device or Disable Device option.
Disclaimer – Be a bit cautious when you opt for the Uninstall Device option, as it will restrict that device immediately, and you’ll have to reinstall the drivers after fixing the error to make sure that device keeps functioning.
Once you’ve updated/uninstalled all the problematic drivers, restart your PC and see if the error has been fixed. If the error persists, you should update all the disk drivers installed on your machine.
You can update your drivers manually by following the method mentioned above or automatically using a third-party driver updater tool.
The manual method is free but takes time and requires some basic computer skills. If the manual method sounds good to you, you can follow the method mentioned above to update all the drivers one by one.
Alternatively, if you want to update the drivers automatically, I’d recommend using DriverFix. I recommend DriverFix because I’ve used this tool, and its ease of use has impressed me greatly.
You have to install and launch DriverFix on your computer, and after a quick scan, it will show you the list of outdated drivers. You can simply select the Update all option and take a coffee break. In the meantime, this tool will update all the drivers.
Once it updates all the drivers, restart your computer and check whether the error code 0xC1900101 issue is fixed. Updating all the drivers to the latest version should mostly fix the error. In case it doesn’t, you can follow the next workaround.
Note that DriverFix isn’t the only tool you can use to update drivers automatically. There are several other driver updaters that can do the same job.
Run the Windows Update Troubleshooter
If updating drivers couldn’t fix the error, try the Window Update Troubleshooter. This will help you identify the exact reason that could’ve triggered this error and also help you fix it.
Here is how you can use the Windows Update Troubleshooter –
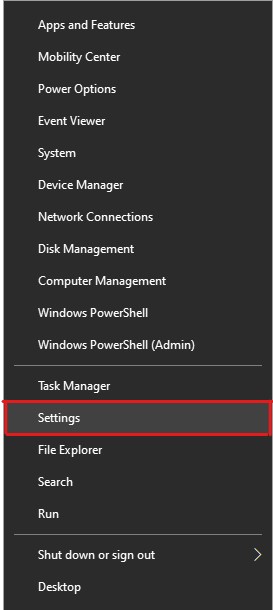
- First of all, launch Settings. For this, you need to right-click on the Start menu and then select the Settings option.
- Click on the Update & Security option.

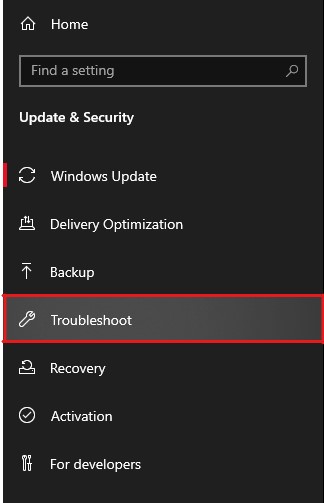
- From the left pane, select the Troubleshoot option.
- Now, select the Additional Troubleshooters option.

- It will show you a list of Additional Troubleshooters. Click the Windows Update option and then the ‘Run the troubleshooter’ option.
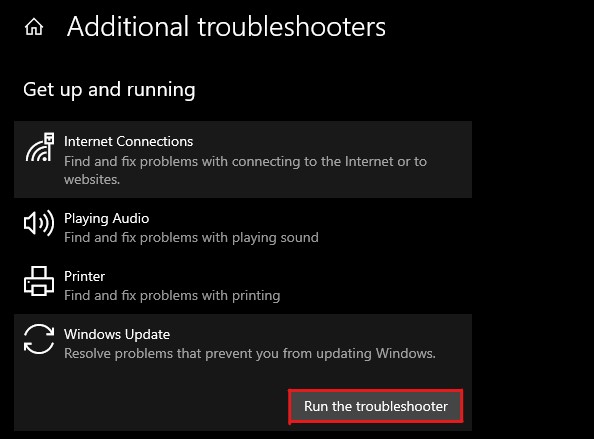
- It will run the Windows Update Troubleshooter and look for the problems.
Once the scan completes, the Windows Update Troubleshooter will show you the list of errors. You can choose the ‘Fix problems’ option to fix the error.
If the Windows Troubleshooter couldn’t find any problem, it will show you a message stating, “Troubleshooting couldn’t identify the problem.” This means some other underlying issues could be triggering this error code 0xC1900101. And you need to try the next workaround to fix them.
Do a Clean Boot
Updating your Windows OS in the Clean Boot mode can be a great way to fix this error instantly. This is because Clean Boot mode basically boots your Windows machine with only essential drivers and programs.
If this error has been triggered because of any corrupted software or driver, a Clean Boot would most likely fix the error.
Here is how you can do that:
- Launch Run. You can do it by pressing the Windows+R keys.
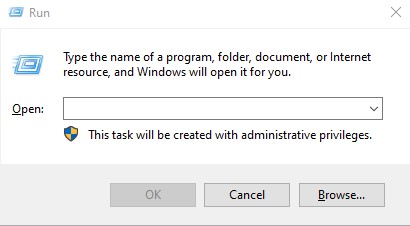
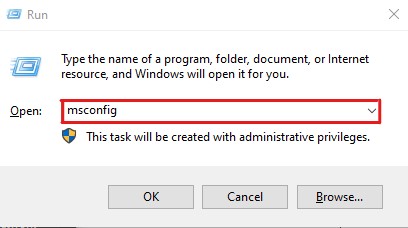
- Type
msconfigand hit Enter. This will launch the System Configuration window.
- Go to the Services tab and tick the checkbox of the Hide all Microsoft services option.
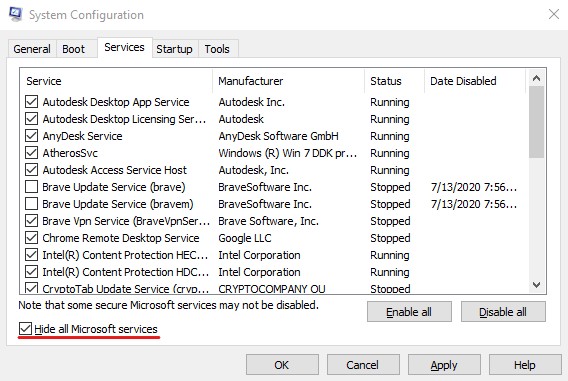
- Here, click on the Disable All option followed by the OK button.
- Now, open the Task Manager. You can open it by right-clicking on the Start Bar and selecting the Task Manager option.
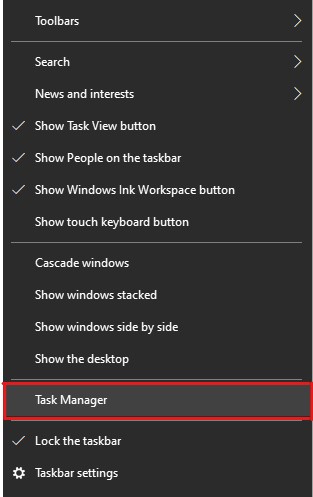
- Click on the Startup tab.
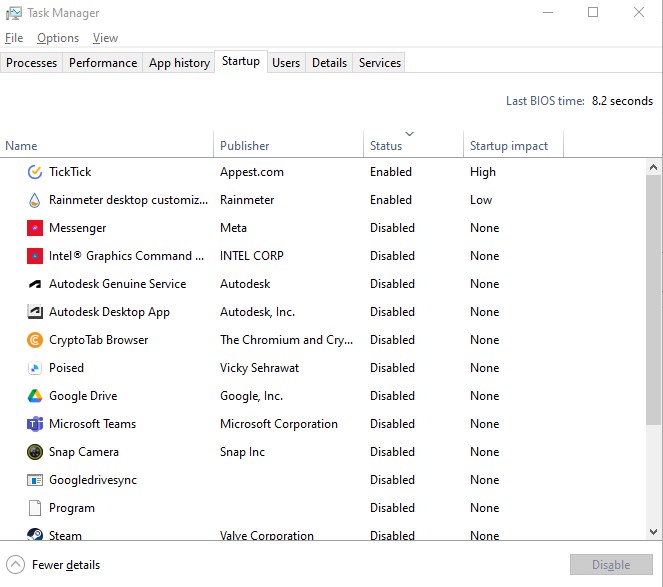
- Select all the unnecessary apps one by one and disable them.
- Restart your computer.
Now, try to update your Windows OS and check whether the error has been fixed.
Run the SFC Scan
System files play a crucial role in the functioning of the operating system. Corrupted or damaged system files could lead to several errors, like the Windows Update error 0xC1900101, including screen freezing, system crashes, and BSOD errors.
Therefore, when dealing with Windows Update errors like error code 0xC1900101, running an SFC scan would be a great idea. Just for a quick overview – System File Checker (SFC) is a built-in Windows utility that can be used to fix random system crashes and system file corruption-related errors.
Here is how you can run the SFC scan –
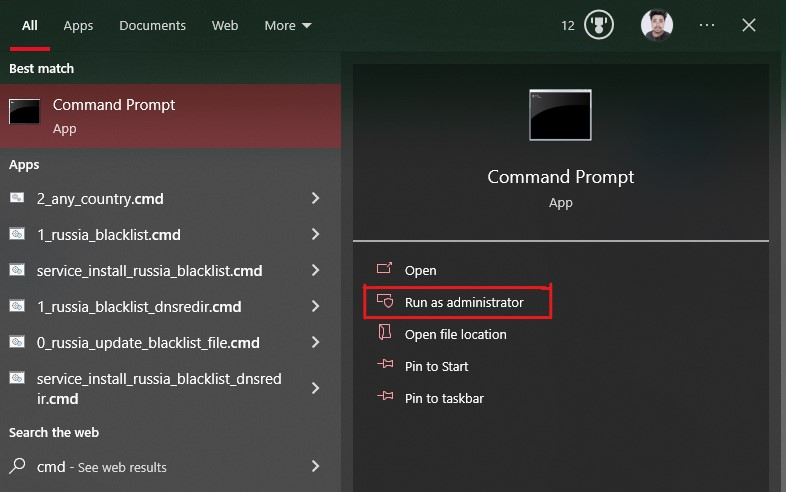
- First of all, press the Windows key to open the Start menu.
- Type
cmdto find the Command Prompt and click on the Run as administrator option.
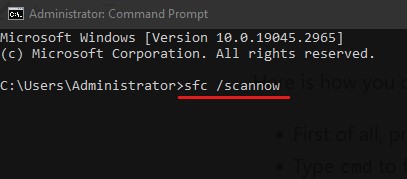
- Enter the following command –
sfc /scannow
- Hit the Enter key to run the command. This will initiate the System File Checker utility and start the automatic repair process.
- Give it some time and wait patiently, and don’t close the Command Prompt. It will scan all the files and fix the corrupted ones.
Once the process completes, it will give you a report mentioning the files it has fixed. If it couldn’t find any corrupted system files, it would show you the message stating Windows Resource Protection did not find any integrity violations.
Restart your computer in both scenarios and check if the error code 0xC1900101 persists. If yes, try the next workaround.
Remove Your Antivirus
Antivirus software is widely known for giving false virus alarms and restricting users from making system-level changes. Sometimes, antivirus software prohibits users from upgrading their OS and causes errors like 0xC1900101.
Disabling the antivirus could be an option, but the registry entries created by the antivirus programs remain active. Therefore, uninstalling your antivirus would be the sure-shot solution you have to fix this error.
Here is how you can remove your antivirus –
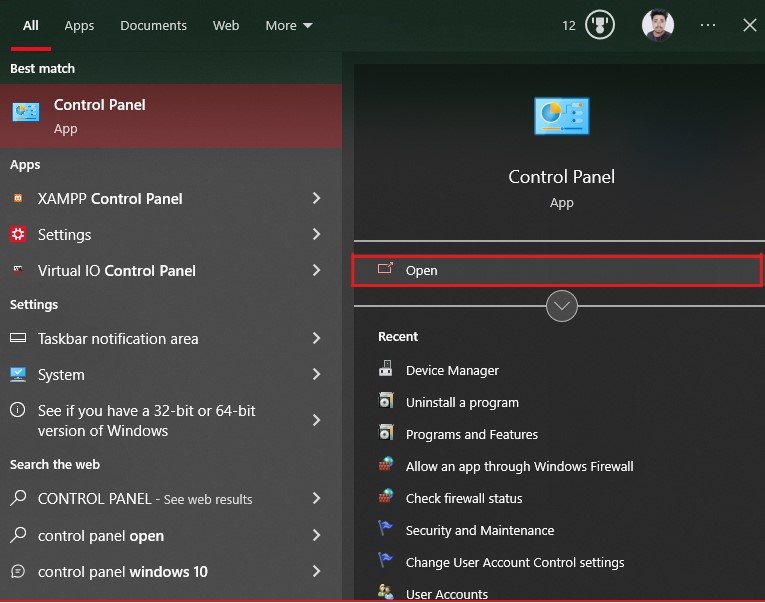
- Open the Start menu by pressing the Windows key.
- Type Control Panel and then select the Open option to launch the app.
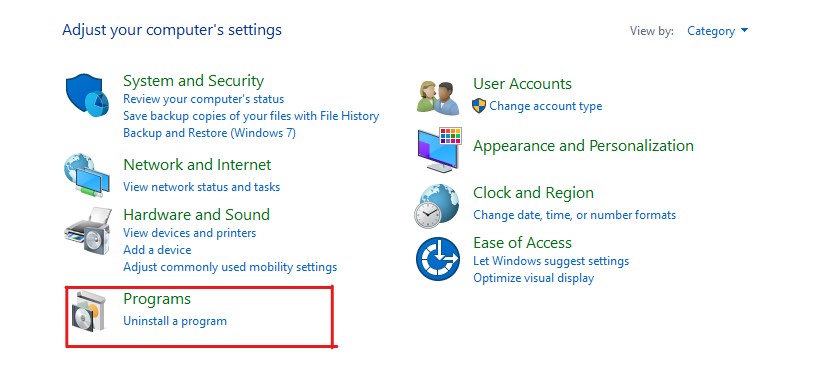
- Here, click on the Uninstall a program option.
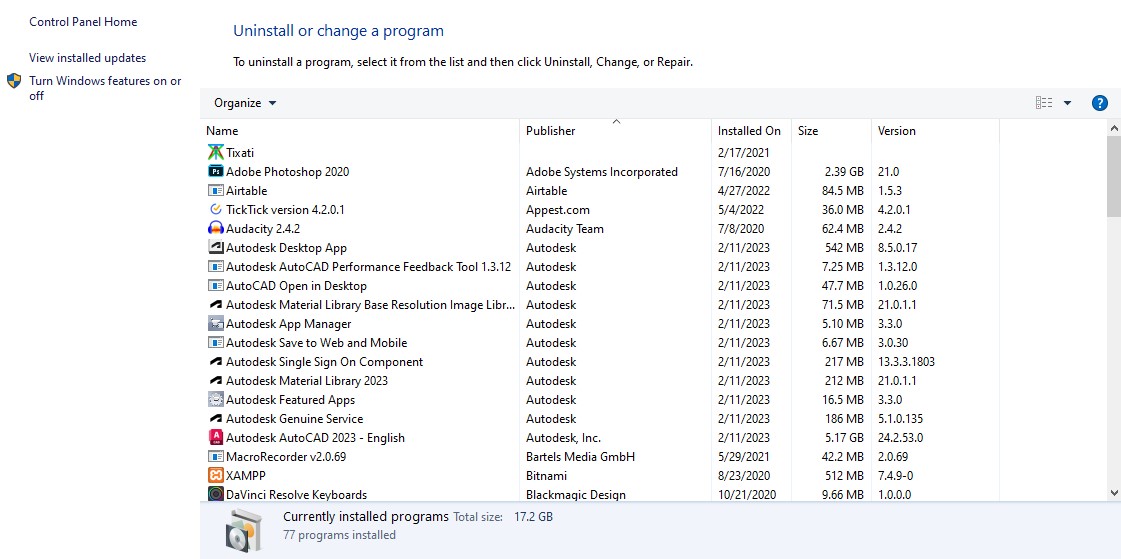
- Locate the antivirus on the list of installed programs and click on the Uninstall/Change option.
- A pop-up box will appear, asking you to confirm your decision. Follow the on-screen instructions to uninstall the antivirus.
Once you’ve uninstalled the antivirus, restart your PC. After that, run the Windows upgrade process, and check if the error has been fixed.
Remove Problematic or Recently Installed Applications
Even though it is very rare, sometimes recently installed programs may cause compatibility-related issues.
If that’s the case, you should uninstall these programs before attempting to upgrade your Windows OS.
Here is how you can uninstall these programs –
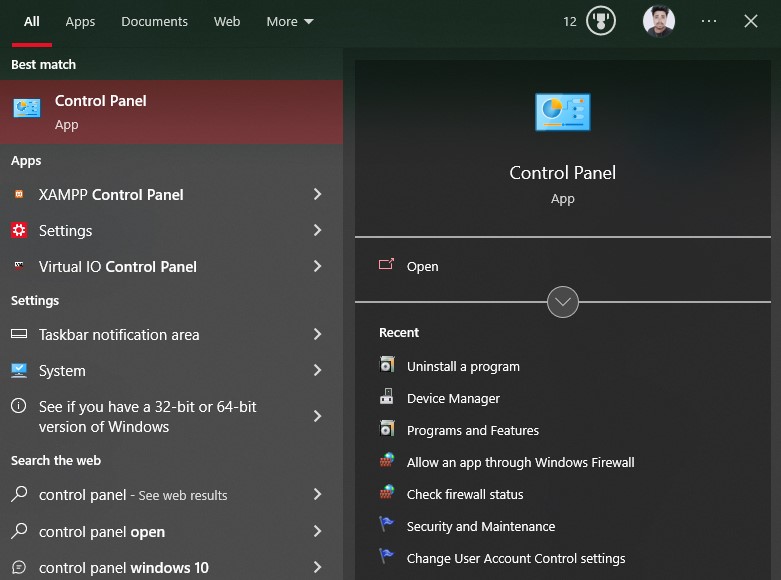
- Open the Start menu by pressing the Windows key.
- Type Control Panel and hit Enter key.
- Click on the Uninstall a program option.
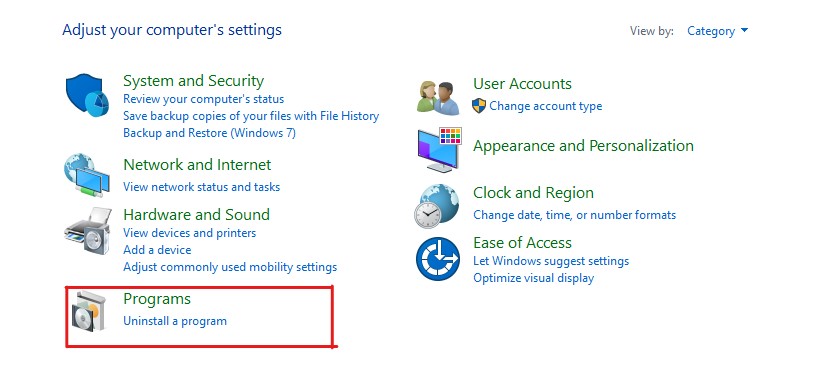
- Here, you will see a list of installed programs. Select the fishy programs that may cause issues with Windows Update, such as programs from unknown publishers.
- Click on the Uninstall option and follow the on-screen instructions.
Some programs that have caused this error for other users are Acronis True Image, Trusteer Rapport, and more.
Once uninstalled, restart your computer and try to upgrade your OS, and check if the error code 0xC1900101 has been fixed. If the error persists, try following the next workaround.
Update BIOS
Another reason this error 0xC1900101 occurs is because of outdated BIOS. People often don’t care about updating BIOS because it requires technical knowledge and doesn’t directly affect performance.
Even many manufacturers recommend not updating BIOS if your computer is working fine. The main reason behind that is that updating BIOS requires technical knowledge, and if something goes wrong, it could impact system stability or even corrupt your data.
However, an outdated BIOS may lead to hardware and compatibility-related bugs. And the updated BIOS can enable additional features and provide stability and enhanced security.
Besides that, the method to update BIOS varies significantly from manufacturer to manufacturer. Therefore, I’d recommend you check your motherboard manual before updating BIOS. You can also seek help from any computer expert who can help you with the same.
Reset The PC
If none of the above-shared workarounds fix the Windows Update error code 0xC1900101, you can consider resetting your PC.
Thankfully, Windows 10 can reset the PC without losing any personal files. It is a great option to reset all the settings to default.
Here is how you can reset your PC:
- Launch the Start menu by pressing the Windows key.
- Right-click on the Start icon and select the Settings option.
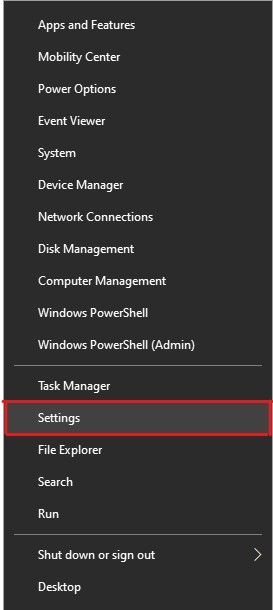
- Select the Update & Security option.

- Click on the Recovery option from the left pane.
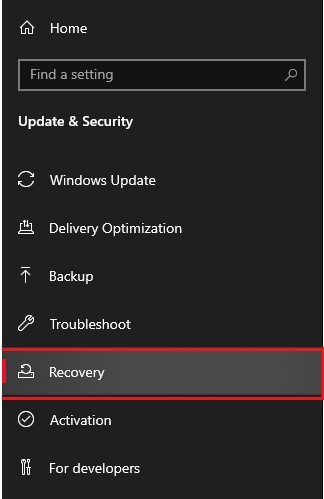
- Click on the Get Started button from the Reset this PC option.
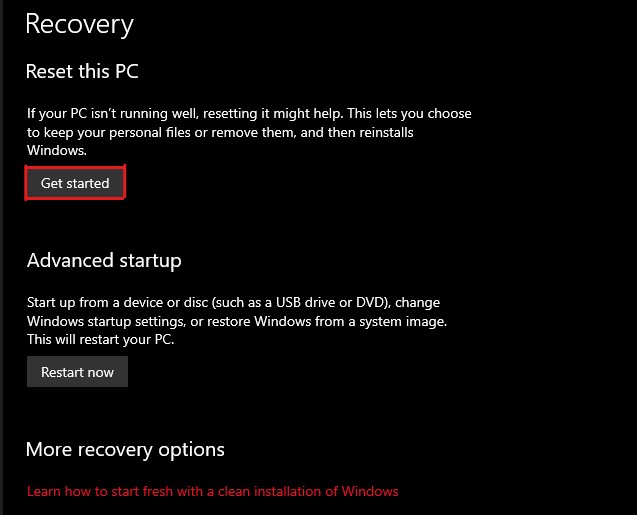
- Select the Keep my files option if you just want to reset to default settings. Otherwise, you can pick the Remove Everything option.
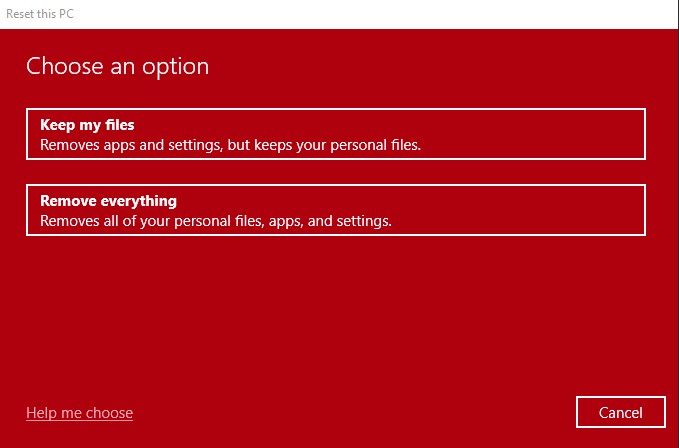
- Read the on-screen instructions and follow them further to reset your PC.
The reset process will initiate shortly. It would take a couple of minutes, depending on your chosen option.
Once your PC resets, you can upgrade your Windows OS very easily. This time you will not see any error code.
Tips to Prevent Errors Like Error Code 0xc1900101
This Windows update-related error is not so common, and preventing it from occurring is also possible.
Here, we have covered a few tips that you can follow to prevent this error:
- Always keep sufficient empty storage space on your system drive, especially while updating Windows OS. For Windows 11, it should be 64 GB.
- As this error primarily occurs due to incompatible and outdated drivers, you can keep your drivers updated to prevent this error.
- Run SFC scan regularly to fix any disk and file system-related errors if they exist.
- Disable antivirus programs every time you update your Windows OS, especially when using an anomaly-based solution.
- Always keep an eye on applications that you are installing on your computer. Always avoid installing applications from unreliable sources.
These are some ways to prevent errors like error code 0xC1900101.
Final Words
There you have it – a detailed article covering why this Windows update error occurs and how to fix it.
Error code 0xC1900101 can be tricky to deal with, mainly because it occurs with no clear statements that could explain why this error has been triggered. Besides that, this error prevents you from installing the latest updates on your Windows machine. Therefore, troubleshooting this error becomes an essential task.
Thankfully, you can follow the workarounds to fix the error and update your Windows to the latest version.
Next, check out things to take care of while you update the BIOS.

