Wondering how to install Python on Mac to utilize the robust hardware and operating system configuration of your Mac to develop and test programs faster? Keep reading!
Python is not just a programming language; it’s a cornerstone of the tech world, powering everything from web applications to machine learning algorithms. If you’re a Mac user, you’re in for a treat because the combination of Python and macOS creates a dynamic duo for software development and data science.
Python’s versatility, readability, and extensive libraries make it the go-to language for professionals and beginners alike. When paired with the user-friendly environment of macOS, you have a powerful combination that simplifies coding, experimentation, and project development.
Whether you’re a seasoned developer or a curious beginner, the Mac-Python alliance can significantly enhance your productivity.
In this comprehensive guide, I’ll walk you through various methods for installing Python on your Mac, ensuring a seamless setup.
How Crucial Is Python as a Programming Language?
Python is an indispensable programming language for the world of computation. Its readability and simplicity make it accessible to beginners, while the robust libraries and frameworks cater to advanced users. Also, its versatility spans web development, data science, machine learning, and robotic process automation.
Python is integral to data analysis and artificial intelligence. That’s because its open-source nature fosters a vibrant community, and freelance or white-collar developers love to code programs or data science solutions as a Python script. Globally, developers know that they can get ample and reliable support for free for Python should the code break.
Moreover, tech giants like Google and Facebook heavily rely on it. Python’s ubiquity in education aids new programmers. Its adaptability ensures it remains a fundamental tool for diverse tasks.
Also read: 15 beginner Python Projects to Practice and Learn
Reasons To Install Python on Mac
The primary reason to use macOS and Python for programming is extreme security that no other operating system except Linux can provide. Hackers and spammers around the world develop malware and virus programs for Windows PCs because the majority of computer users use Windows.
Since macOS has a smaller market share, hackers rarely target MacBooks and iMacs. Also, Apple has a robust security team that leaves no stone unturned to make macOS virtually immune to malware and viruses.
Other major reasons are as follows:
- MacBooks and iMacs have been specifically known for creative, scientific, and computer programming works.
- macOS is Unix-based, providing a robust command-line interface for development and scripting.
- Mac comes with a suite of developer tools like Xcode, Terminal, and Homebrew.
- Macs are known for their high-quality hardware, ensuring a smooth and reliable development experience.
- The intuitive macOS interface is conducive to productivity, with an efficient window management system.
- If you’re into iOS app development, Mac is essential due to its compatibility with Xcode.
- Macs tend to have a longer lifespan and are known for their reliability, reducing downtime.
Do Macs Come With Python for Mac Pre-Installed?
macOS uses Python scripting for some of its tasks and modules in the backend. Hence, until macOS 12.3, it would ship all MacBooks and iMacs with pre-installed Python 2.7 framework.
However, developers have stopped using Python 2.X editions because the Python Software Foundation is no longer supporting this Python build.
So, Apple announced in 2019 in a macOS Catalina 10.15 release note that it’ll stop shipping MacBooks and iMacs with preinstalled Python 2.7. However, Apple delayed the process and finally did it for macOS Monetery 12.3 releases.
So, if you’re using a dated Mac before macOS 12.3, you should have Python 2.7 preinstalled on your system. The newer Macs, like Ventura and Sonoma, no longer come with any build versions of Python.
If you need Python 3.X edition for functional programming, you must install it yourself by following any of the methods mentioned in the below sections.
How To Install Python on Mac
There are various ways to set up Python on Mac. Find below all the effortless and popular ways:
Update the Existing Version of Python for Mac
If you’re using macOS 12.3 or earlier versions, your MacBook or iMac already has a Python distribution. You just need to update or upgrade it to the latest Python build so you can develop awesome programs. Find below the steps:
Check Python Version
- Launch the Terminal app by looking it up on Spotlight.
- Type the following code in Terminal and hit Return:
python --version- The Terminal should show a version of the Python distribution like 2.7.
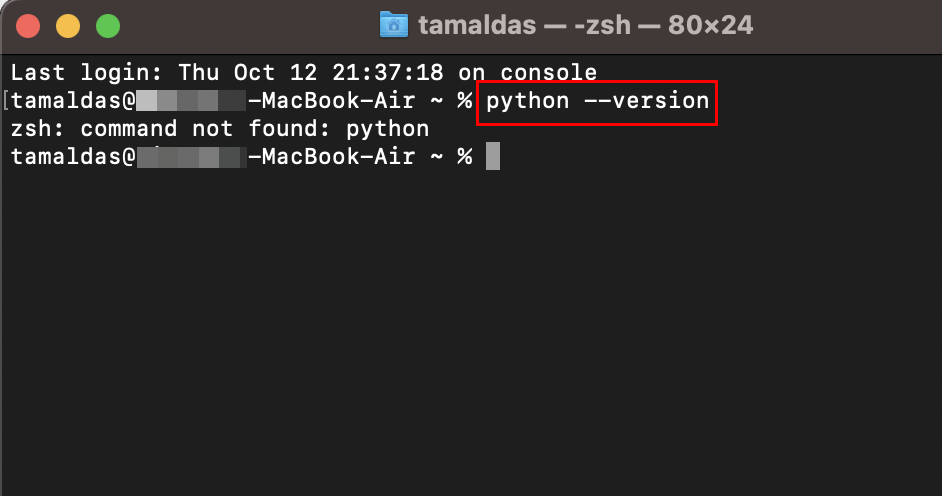
Since I’m using macOS Ventura to write this guide, my system is unable to show any Python distribution version because it doesn’t have any. But, macOS systems older than 12.3 will show a Python version.
Install Homebrew
After knowing your Python version, follow these steps to update or upgrade it using Homebrew:
- Copy and paste this command into the Terminal app:
/bin/bash -c "$(curl -fsSL https://raw.githubusercontent.com/Homebrew/install/HEAD/install.sh)"- Hit Return to execute.
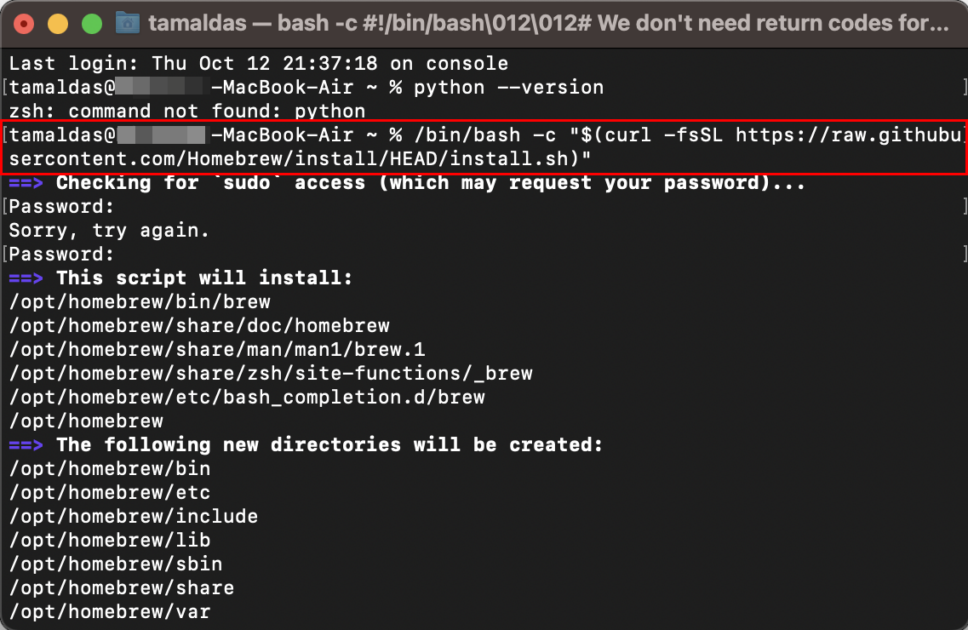
- Enter the system password to authenticate the action.
- Now, the Terminal will go through various stages to download the distributions it needs.
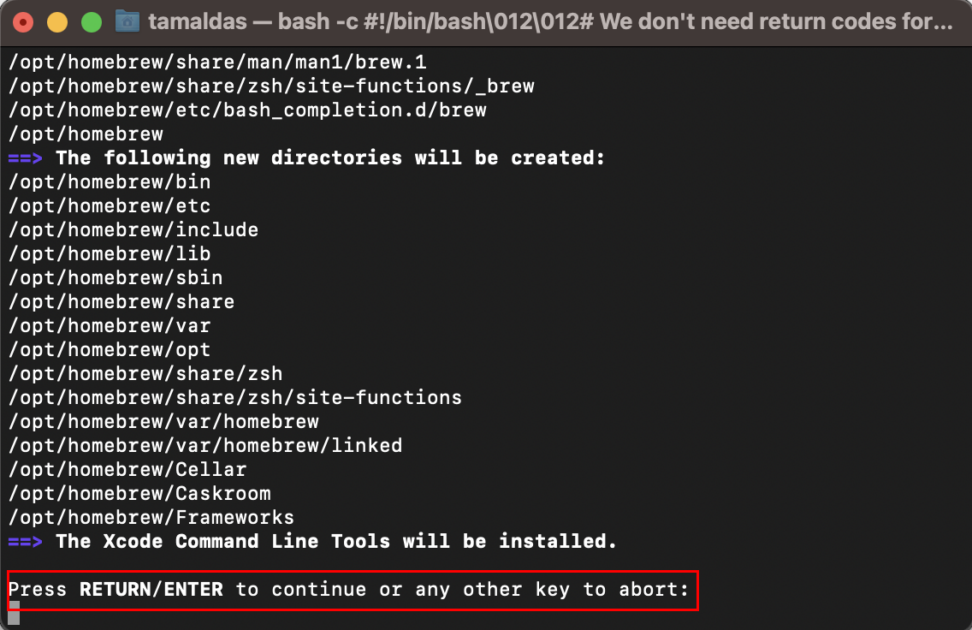
- Wait until you see the “Installation Successful” message.
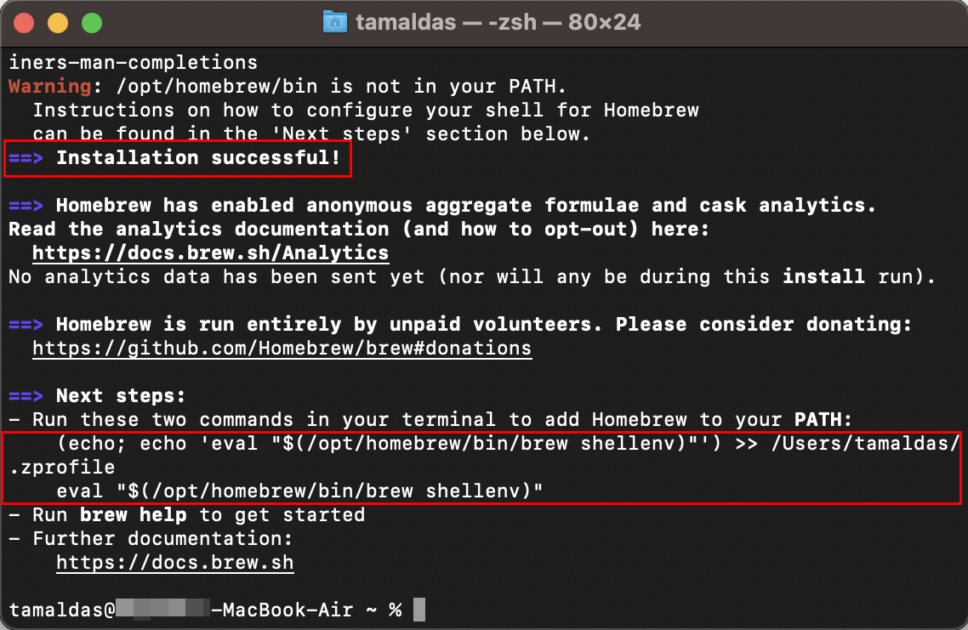
- Now, copy and paste the following script and hit Return to install Brew to Path:
echo 'eval "$(/opt/homebrew/bin/brew shellenv)’ >>
/Users/tamaldas/.zprofile eval $(/opt/homebrew/bin/brew shellenv)- The above script is generated at the end of the Homebrew installation on the Terminal so you can copy it from there or edit the username in this
/Users/tamaldas/.zprofilecode element before using the code.
Update or Upgrade Python Distribution
Now that you have Homebrew in your MacBook or iMac follow these steps to update or upgrade Python:
- Go to the same Terminal console.
- Copy and paste this code into it:
brew upgrade python- This will start updating the existing Python installation after authorizing the action with a password.
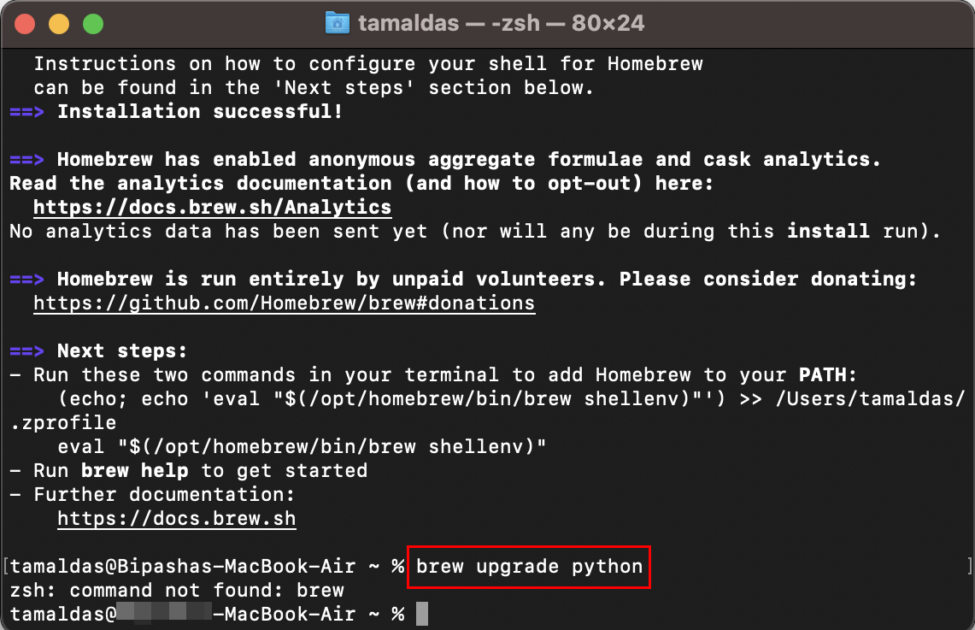
The code will work just fine on an older Mac that has the Python 2.7 framework. Since I’m using the latest Mac, Python isn’t available, and hence the Terminal shows this message, “zsh:command not found.”
Once the process is over, reboot the Mac to enjoy the latest Python distribution when coding.
Install Python on Mac Using an Installer
This is the most convenient way of installing the latest Python edition on Mac. Follow the steps mentioned here:
Get Python for Mac
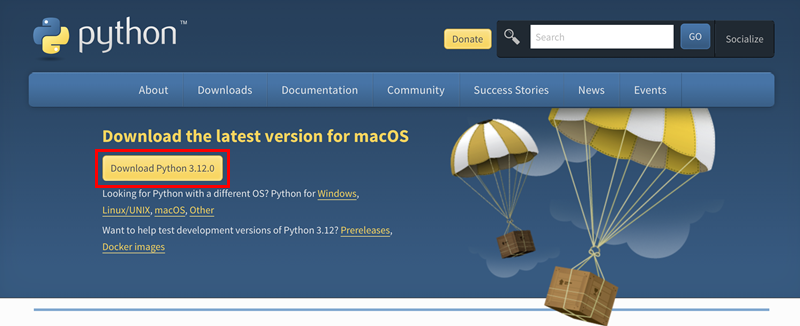
- Open Safari browser and visit the official website of Python language.
- Click the Downloads menu on the webpage menu.
- Click on the Download Python 3.12.0 button.
- A security popup might show up. Click Allow.
- The package will download and directly show up on the Dock of macOS.
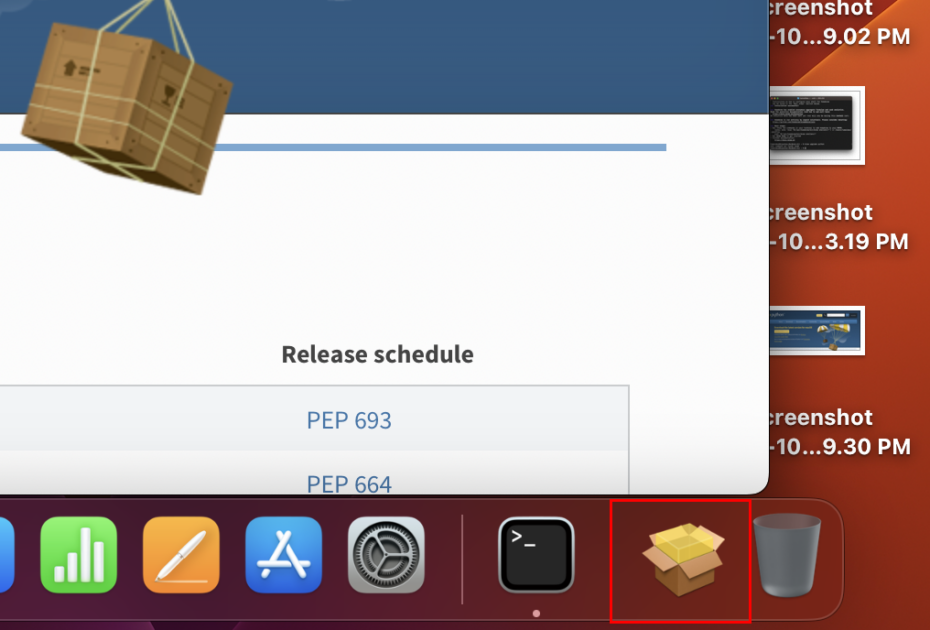
- Click on the Python installer to begin.
Install the Python Package
- Clicking the Python installer will show the Open in Finder button.
- Click on that.
- You should now see the installer in the Downloads directory of your Mac.
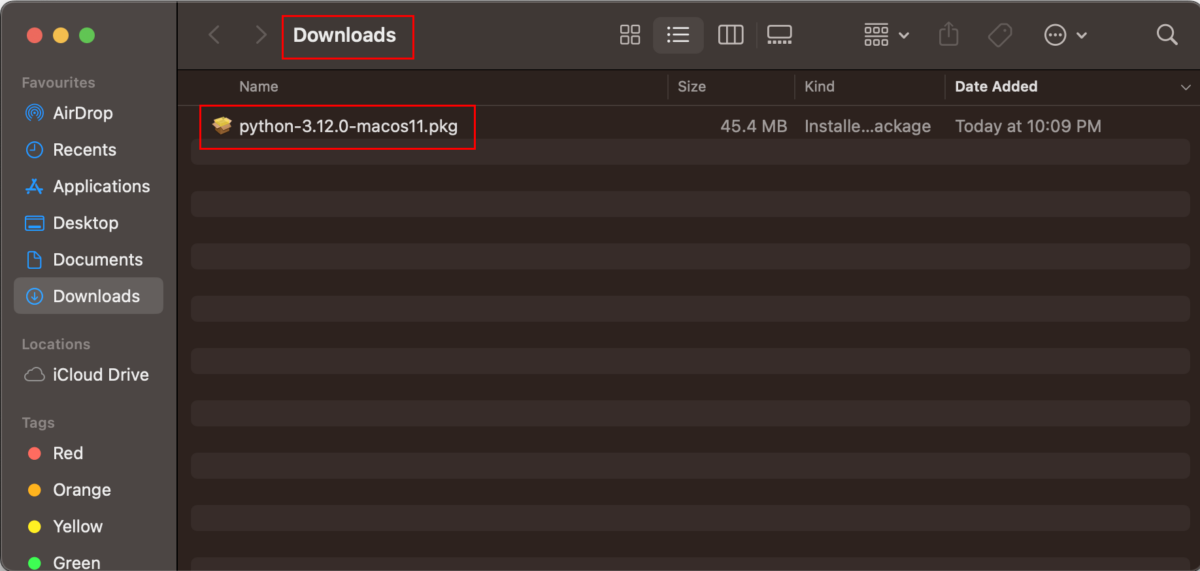
- Double-click the Python PKG file and the Install Python dialog will show up.
- Click Continue on this window.
- Again, click Continue on the Important Information dialog.
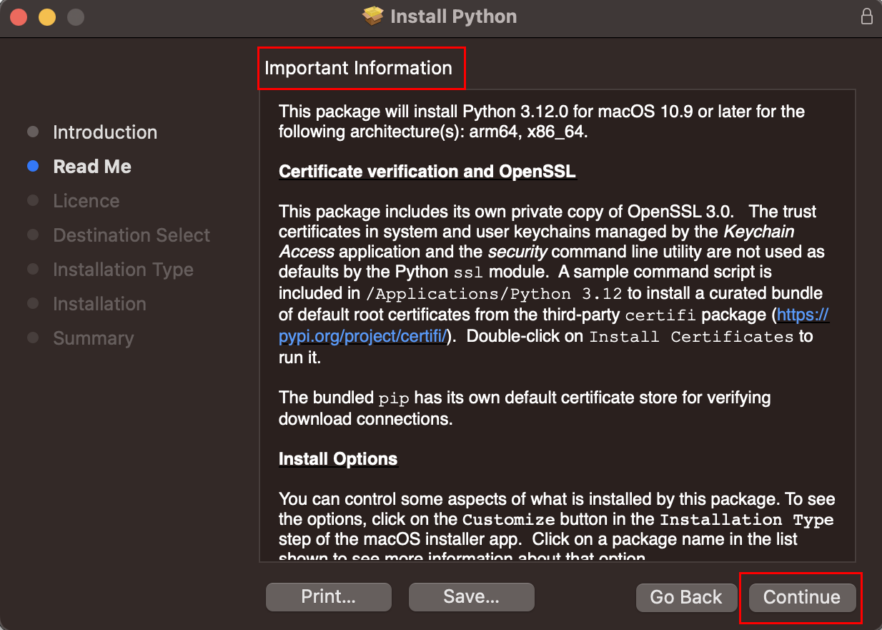
- You must click Continue and Agree on the Software License Agreement dialog.
- Now, select your Macintosh HD disc as the installation directory for Python, and click Continue.
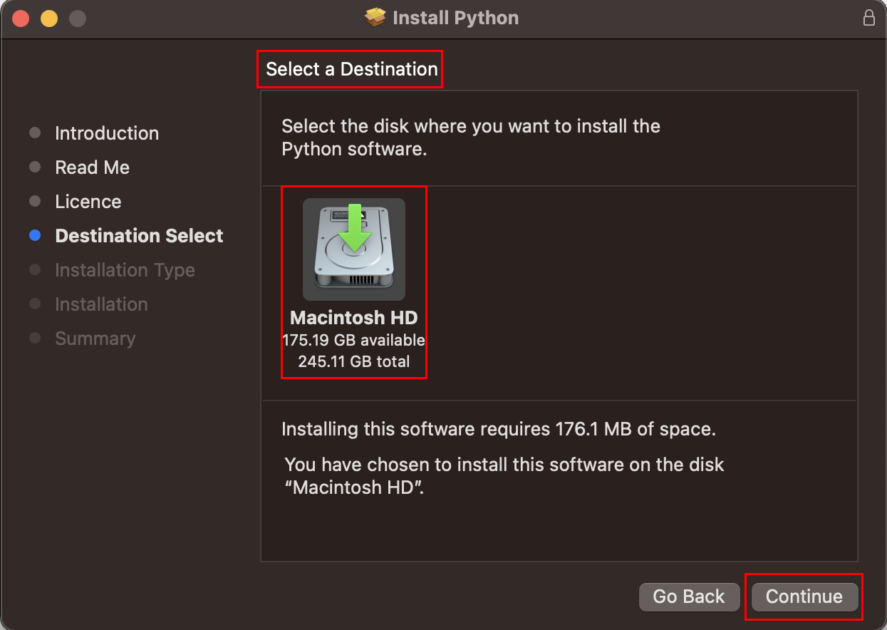
- Finally, click Install to start the package setup process.
- Authorize the process with the Touch ID or Mac passcode.
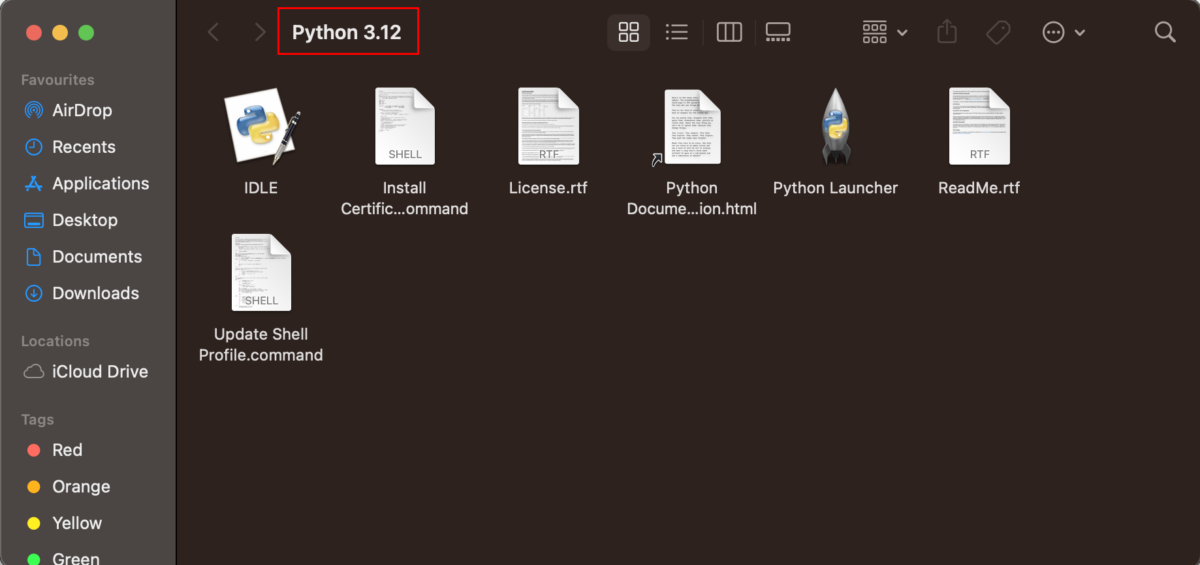
Once the installation is over, you should see the above folder.
Validate the Installation
Once installation is over, here’s how to validate the Python distribution:
- Open the Terminal app.
- Type the following command into it:
python3 --version- Hit Return.
- The Terminal should now show the installed Python version.
- If it matches with the version you installed, Python is working fine.
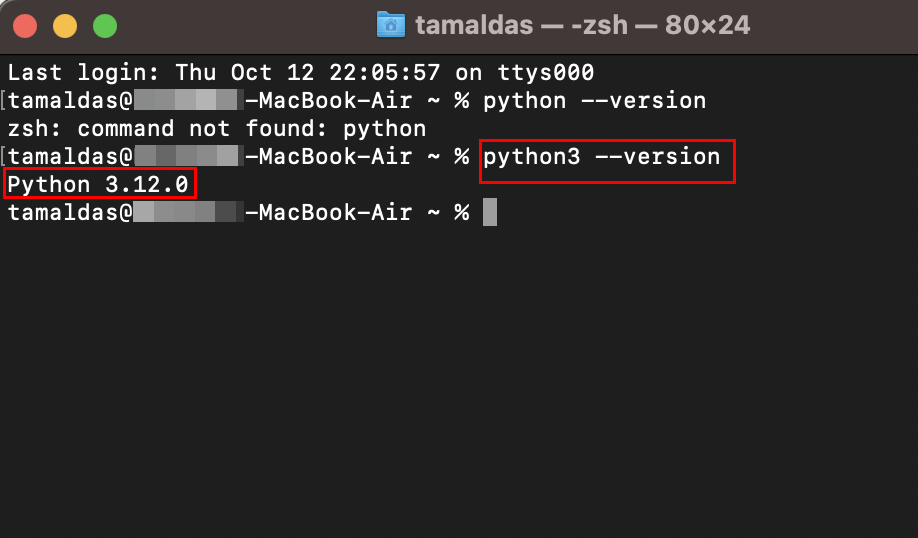
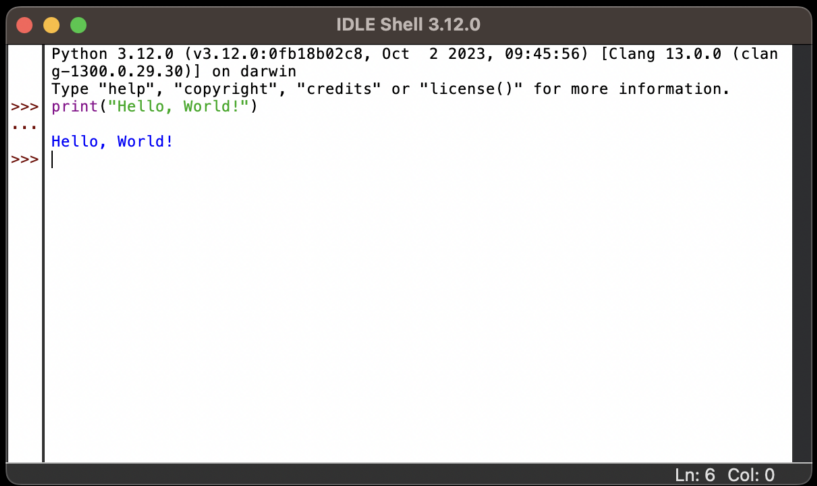
Another way to verify the Python installation is by executing the Python IDLE script. It launches the integrated development environment of Python. Here’s how:
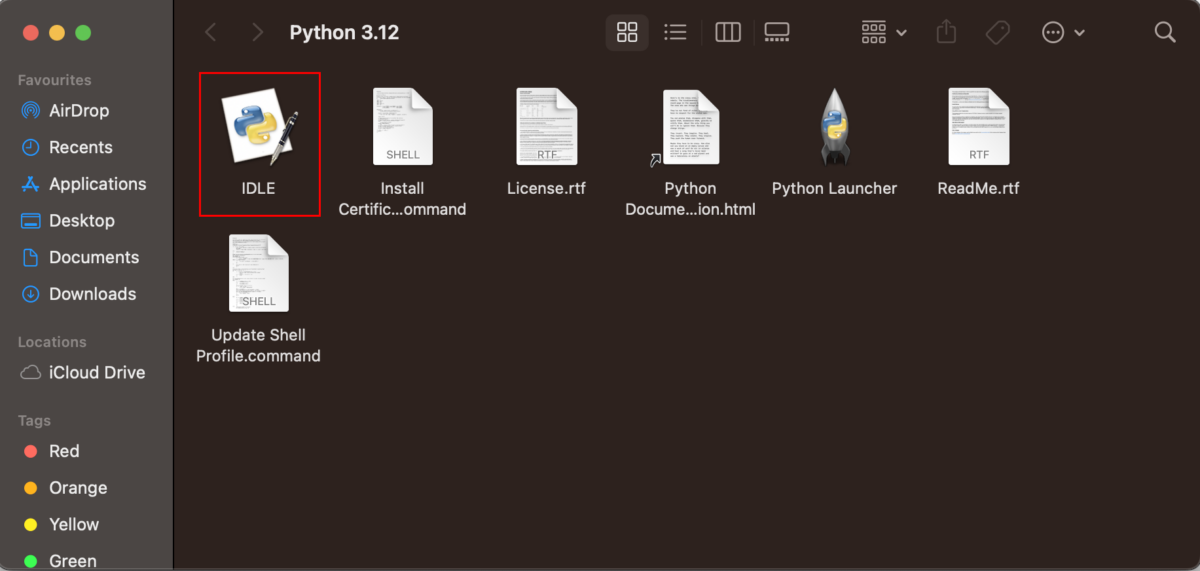
Double-click the IDLE file on the Python 3.12 installation folder. It should show up once the installation is complete.
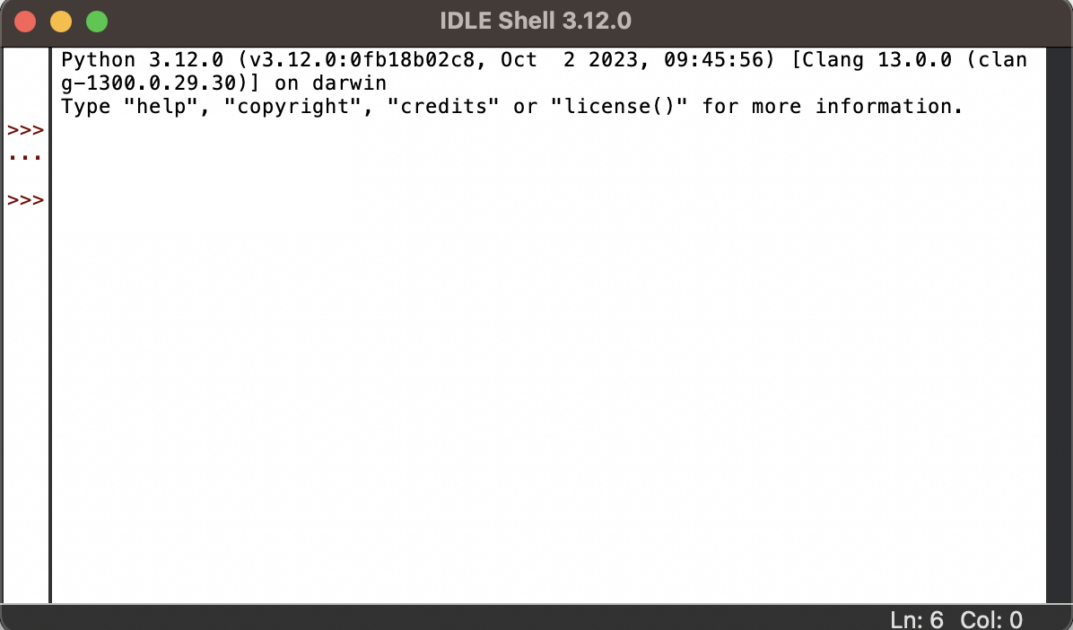
You should see the above Python scripting window. There, type the following Python script and hit Return:
print("Hello, World!")This should create the following response from Python:
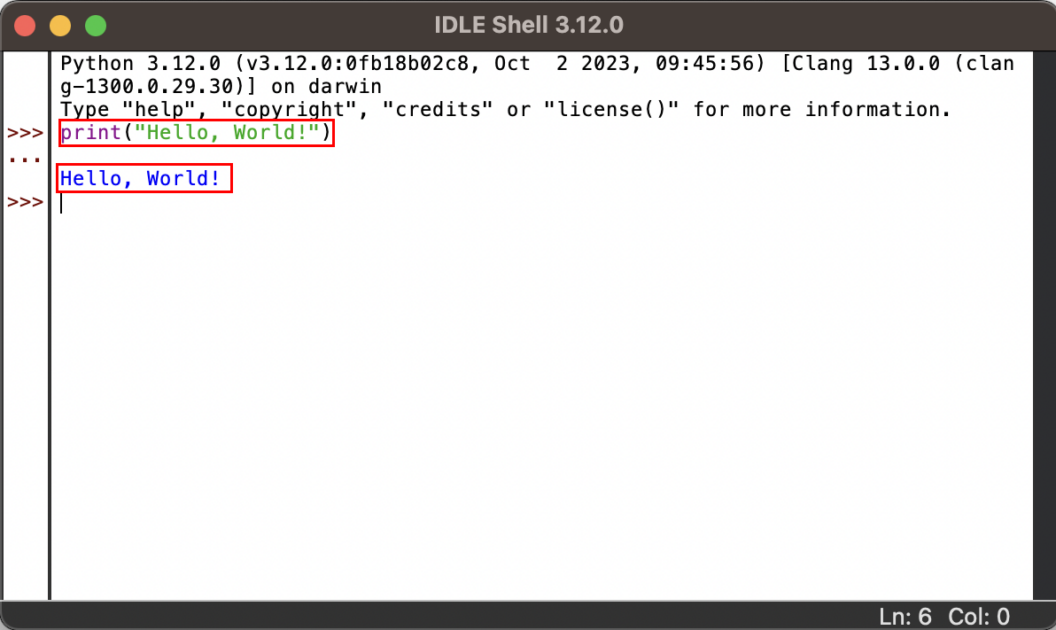
It confirms that your Python 3.12.0 installation is successful.
Install Python on Mac With Command Line Developer Tools
- Open Terminal and run the following command:
python3 –version- You should see the following message in a pop-up:
The “python3” command requires the command line developer tools.
Would you like to install the tools now?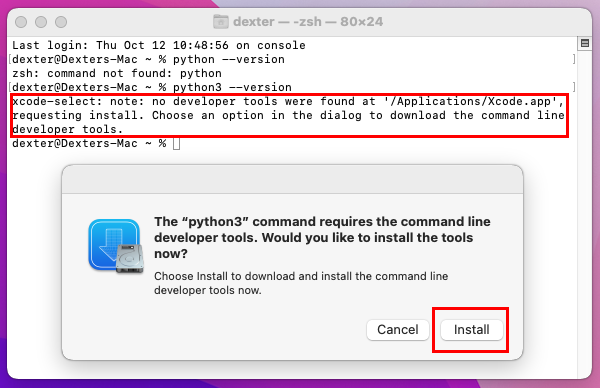
- Click the Install button.
- On the License Agreement page, click Agree.
- You should see the “Downloading software” dialog.
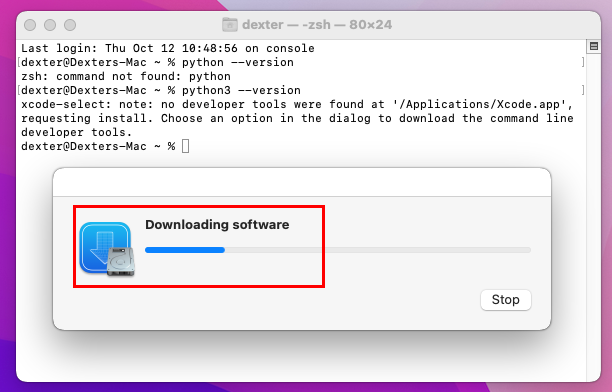
- Allow the process to complete itself.
Once the process is over, run the command “python3 –version” again on the Terminal app and it should show the installed Python distribution version.
Install Python on Mac Using Homebrew
- Run the Homebrew command as explained previously.
- Once Homebrew is installed on your Mac, open Terminal and run this command:
brew install python- The Homebrew package manager will start downloading and installing the latest Python framework compatible with the Mac.
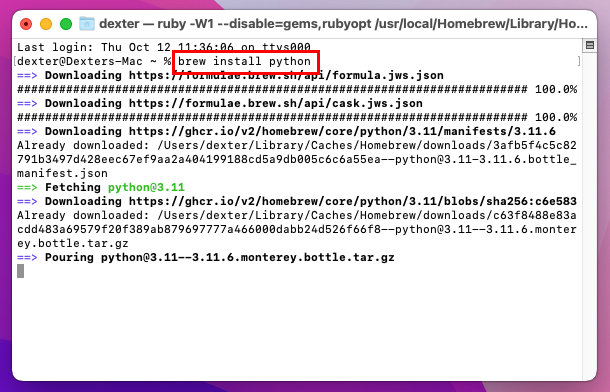
- When the process is over, run the “
python3 --version” command again to confirm the installed Python version.
Also read: Python Libraries and Modules Every Developer Should Know
How To Uninstall Python on Mac
There are two ways to remove the Python framework from your Mac. You can uninstall using the graphical user interface if you installed it using the package installer or the Terminal app. Here are the methods and their steps:
Uninstall Python for Mac From Applications
- On your Mac, click Go on the Mac toolbar at the top of the screen.
- A context menu will pop up. There, click the Applications button.
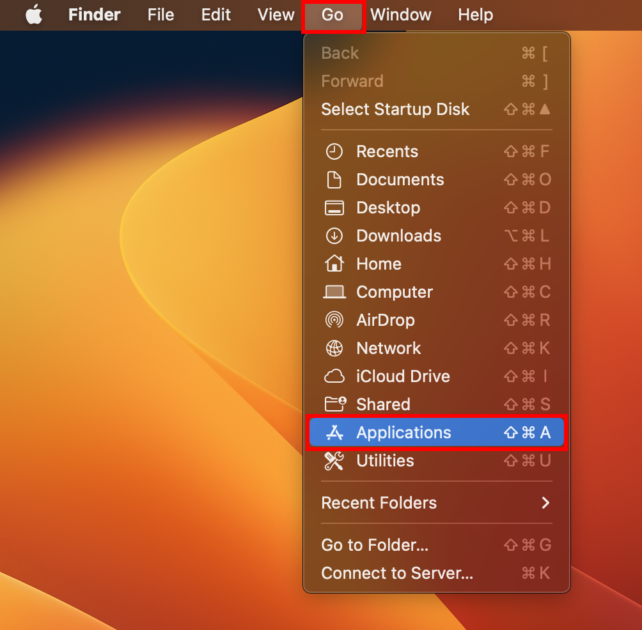
- On the Applications window, scroll down to find the Python 3.12.0 folder.
- Right-click to show the context menu.
- There, click on the Move to Bin option.
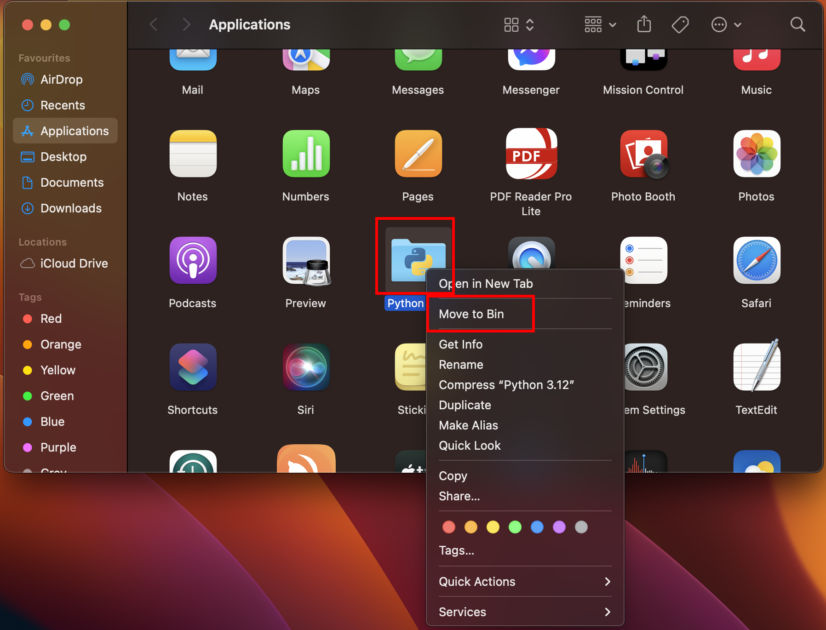
- Authenticate the action by using your Touch ID or Mac passcode.
That’s it! You’ve successfully uninstalled Python from your Mac.
Uninstall the Python Framework From Mac
- Launch the Mac Terminal app from the Spotlight or Launchpad > Utilities.
- In the command line interface, copy and paste the following command:
sudo rm -rf /Library/Frameworks/Python.framework- Enter the Mac passcode to authenticate the action.
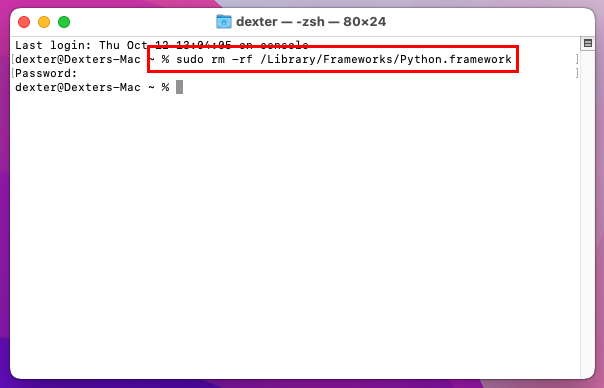
- Now, run the following command to validate if Python has been uninstalled or not:
python --versionThe above method works only if Python is installed by Apple as a part of the macOS setup.
Uninstall Python Using Homebrew
If you installed Python 3.X.X edition using Homebrew, you must install a Homebrew command to uninstall Python. Follow these instructions to remove Python:
- Launch the macOS Terminal app.
- Copy the following command and paste it into the Terminal app:
brew uninstall python- Hit Enter to start the process.
- You should see the Uninstalling notation on the Terminal app.
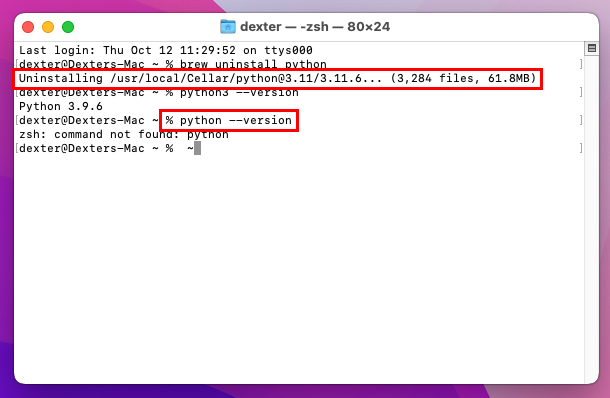
- Once done, any and all activities on the Terminal app will stop.
- Verify the uninstallation by running this command:
python3 --version- The Terminal app will show the following notation:
zsh: command not found: pythonConclusion
Knowing how to install Python on Mac is a fundamental skill you must know if you want to make a successful career in the programming sector.
Also, it becomes necessary to install Python 3.X or better on Mac because the dated Macs come with Python 2.7, which isn’t good for Pythoin scripting. Also, the newer Macs don’t contain any pre-installed Python framework so you must install it manually.
Try any of the above methods you like and enjoy blazing-fast Python scripting on your Mac.
You may also like to learn about the best resources to learn Python for beginners.

