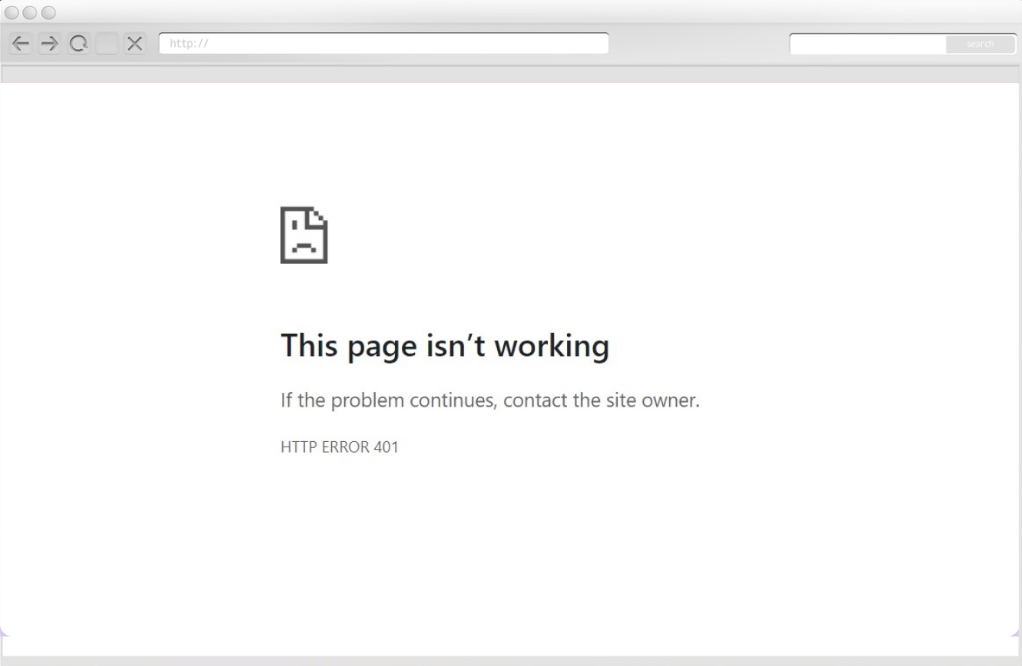
If you are browsing the web regularly, encountering errors such as “401 Unauthorized Error” is a familiar occurrence. This HTTP status code indicates that the user’s request for the specified resource was denied due to a lack of appropriate authentication credentials. As a result, users are unable to explore their desired content or complete their tasks.
The 401 Unauthorized Error can create a big influence on the browsing experience. It works as a gatekeeper, restricting access to a website or application that was requested. Also, it makes sure that only authorized users can access critical information or carry out certain tasks.
Understanding the causes and implications of this error is essential for getting your site back on track. In this article, we will explain some common reasons behind this error and provide some easy and stepped approaches to resolve it.
Common Reasons Behind The 401 Unauthorized Error
The HTTP 401 Error is commonly known as “Unauthorized” or “Access Denied.” These errors typically appear on sites that require user authentication to access their content. So, the issue is either related to the provided user credentials or the browser’s ability to recognize them as valid.
Here are some common reasons behind this error:
Incorrect Credentials
When a user provides invalid login credentials, the server will prohibit access to the site and return 41 errors. The credentials can be username, password, or other information required to access the website.
Missing Authentication Token
User sessions are verified via user authentication tokens which are mostly implemented by web apps. The server will refuse the user request and provide a 401 error if the token is not given, expired, or provided incorrectly.
Inadequate Permissions
Certain resources could necessitate certain user credentials or roles in order to access them. Therefore, a 401 error will be returned from the server if the user doesn’t have the required permissions.
Authentication Misconfiguration
401 Error can also appear If the server setup of your website is invalid or includes invalid security certificates.
Flaws in Server-side
The 401 Unauthorized Error can also be triggered by issues with the server, such as broken authentication modules or failed database connections.
Faulty URLs
Another potential source of the problem can be traced back to a little error. An obsolete link or poorly created or mistyped URLs are the reason behind it.
Redirect Loops
Incorrectly implemented redirection rules may result in a situation in which the user is asked for authentication repeatedly. As a result, the 401 error appears due to this redirected loops and disables access to the requested resources.
Backdated Browser Cache
When your browser cache and cookies are obsolete, they will hamper the authorization process. Thus, the browser fails to come up with valid authentication credentials or removes them. Ultimately, the server rejects your request and triggers the error.
To resolve this, one essential step is to clear cache in laptop browsers regularly. Doing this helps eliminate outdated or corrupted data that could interfere with the website’s authentication process.
Plugin Issues
Sometimes incompatible plugins can also activate the 401 error. Since incompatible plugins can hamper the login process. Let’s say you are using a security plugin activated on your website. When you try to login into your site, the plugin may detect your attempt as a malicious activity and
Now that we know about the reasons behind the 401 error, it’s time to reveal the processes to resolve the issue. Before starting, you must know a simple refresh can sometimes fix the 401 issues on your webpage.
So, here are some step-by-step approaches to fix the Error effortlessly:
Browser cache and cookies play a vital role in optimizing the browsing experience of a user. How? It provides faster loading time and creates a personalized browsing environment for the users. However, if these cached files and cookies become the reason behind the 401 Unauthorized Error.
Browser cache and cookies reside in your device’s (PC or Mobile) internal storage. The data that remains unchanged during repeated website visits are saved through the cache. The browser preloads static assets from a live version of the website. Thus, the loading time of your website becomes faster than usual.
On the other hand, cookies contain data pieces that remember the information about the user’s device and behavior. It contains authentication details that allow users to stay logged in to specific websites.
However, obsolete or damaged cookies and browser cache might prevent users from successfully authenticating with a web server. In such circumstances, you must remove it manually to get your site up and running.
Here are the step-by-step instructions for clearing your browser cache and cookies (Google Chrome):
- In the Chrome browser, click the three-dotted menu located in the top right corner.
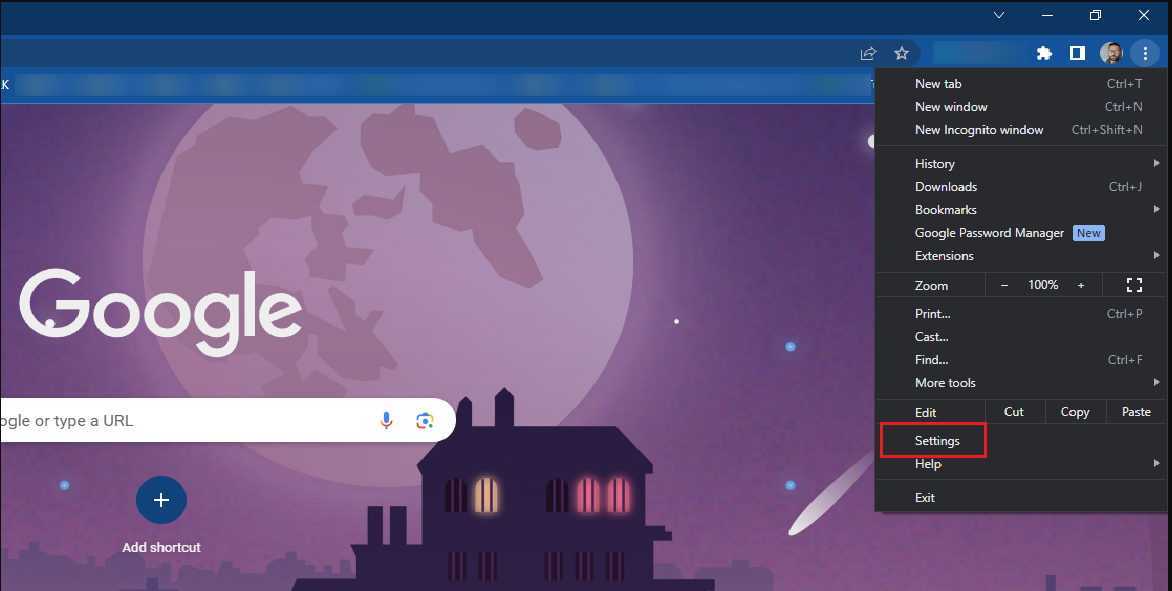
- Now, go to Settings > Privacy and Security > Clear Browsing Data
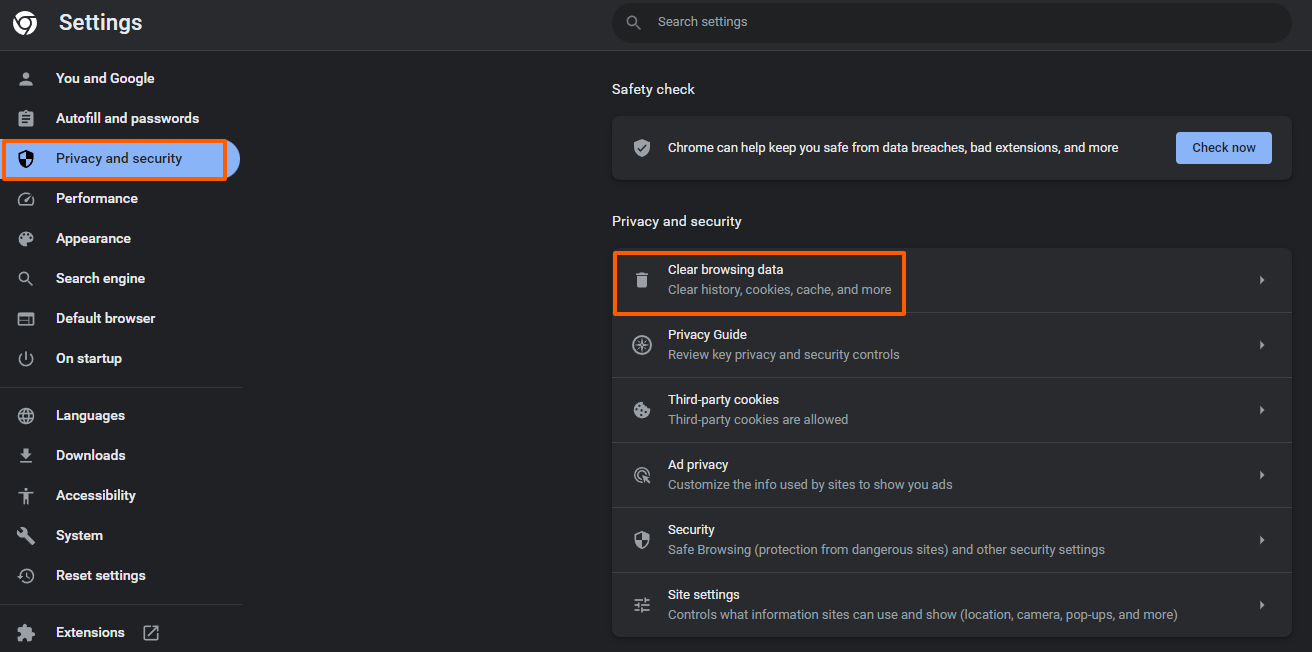
- Then from the Time Range menu, select All Time.
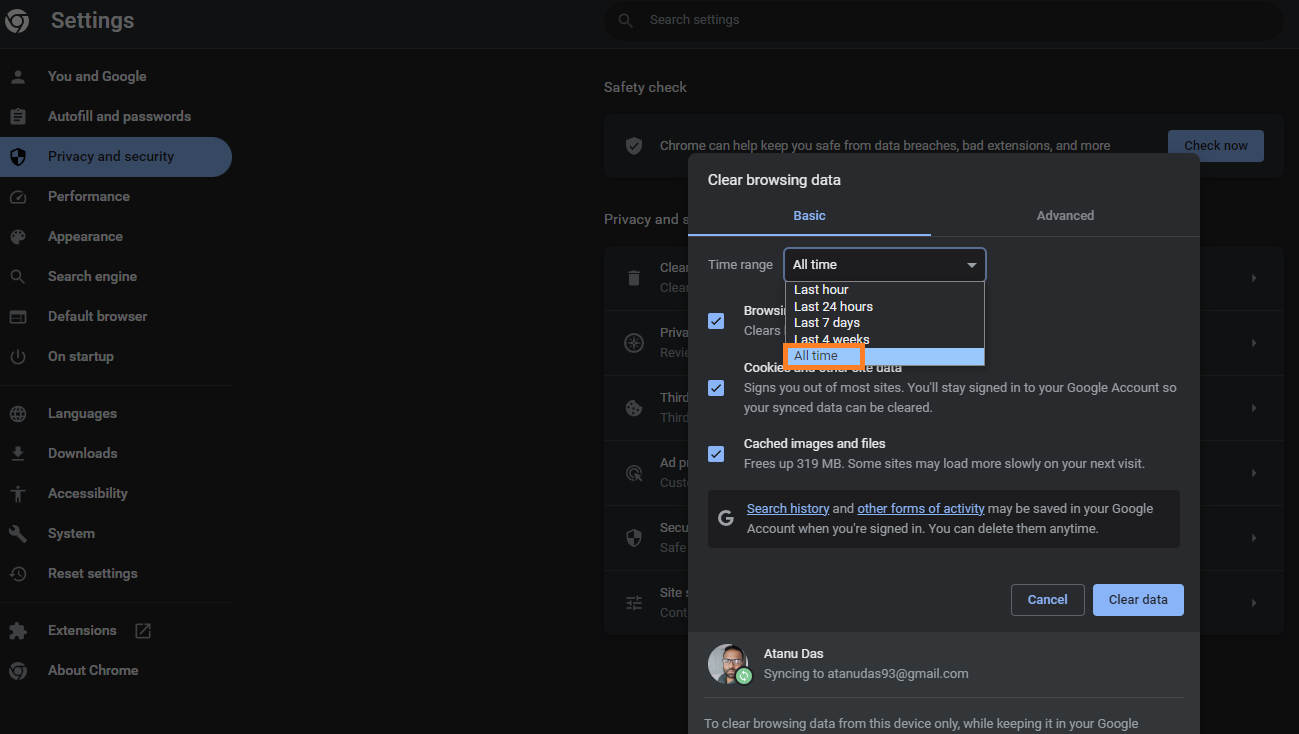
- Check the boxes saying Cookies and other site data, and Cached images and files.
- Lastly, click the Clear Data button to execute the clearing process.
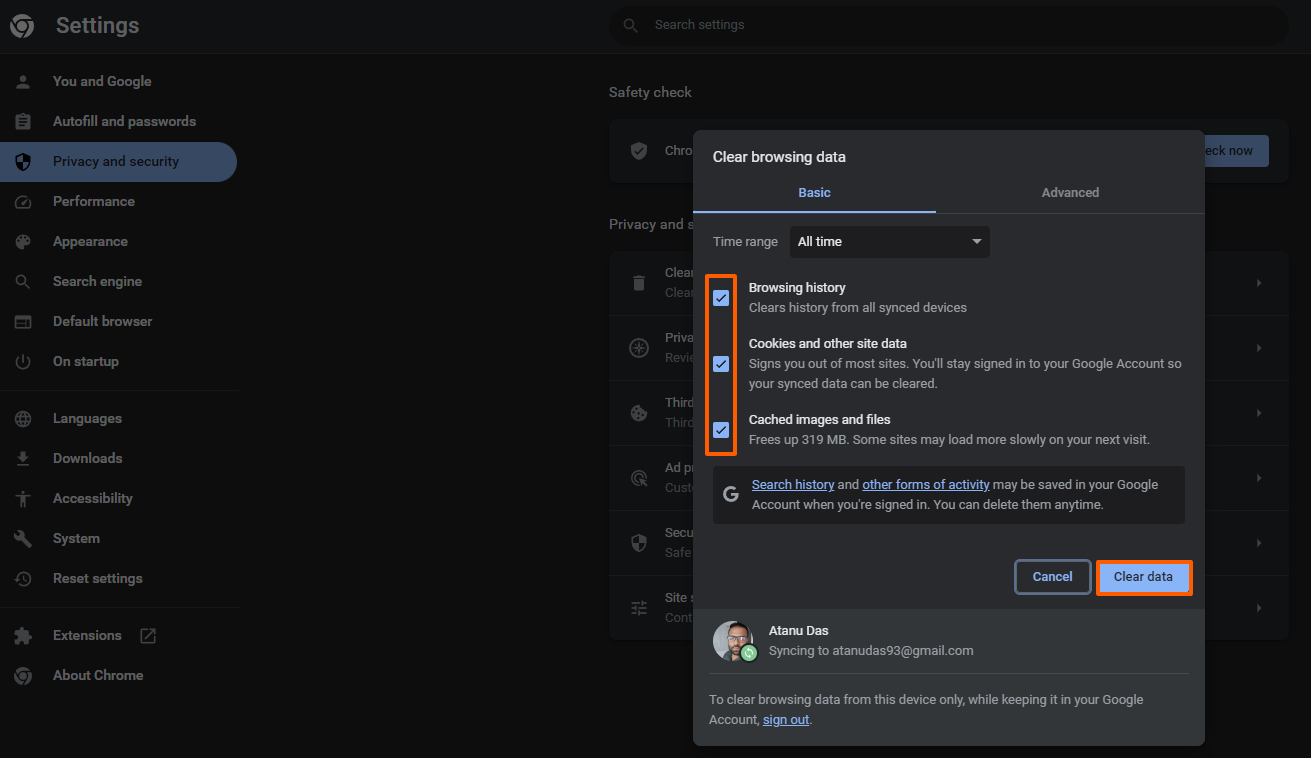
Keep in mind that depending on the browser you are using, the precise procedures may change. But the general approach of clearing browser cache and cookies remains the same.
Hopefully, the 401 Unauthorized Error is now resolved, but if not, then let’s proceed to the next step.
Flush The DNS Cache
Browser cache and cookies are not the only things that are stored on your device. DNS is also stored locally, and its purpose is to expedite the process of matching URLs with their corresponding IP addresses. As a result, you will get a faster loading time on your website.
Keep in mind that the DNS cache operates at the system level, which is different compared to the browser cache and cookies. When the DNS cache has out-of-date data, such as inaccurate URL and IP address specifics, the 401 HTTP status code will show up.
Flushing the DNS cache currently stored on your device is an easy solution for this. Thus, your device will perform new requests and revalidate the URLs. Here are the steps that you can follow and easily flush the DNS cache on the Windows environment:
- Begin by navigating the search bar on your desktop
- Click the search bar and type “Command Prompt”
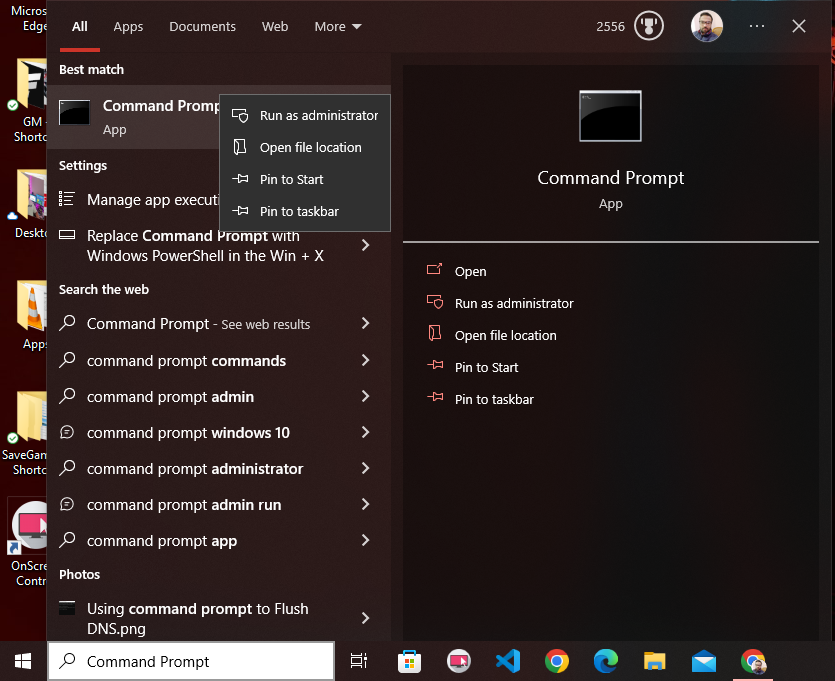
- Then right-click and open the command prompt app as an administrator.
- Enter the command “ipconfig/flushdns” and press the Enter key.
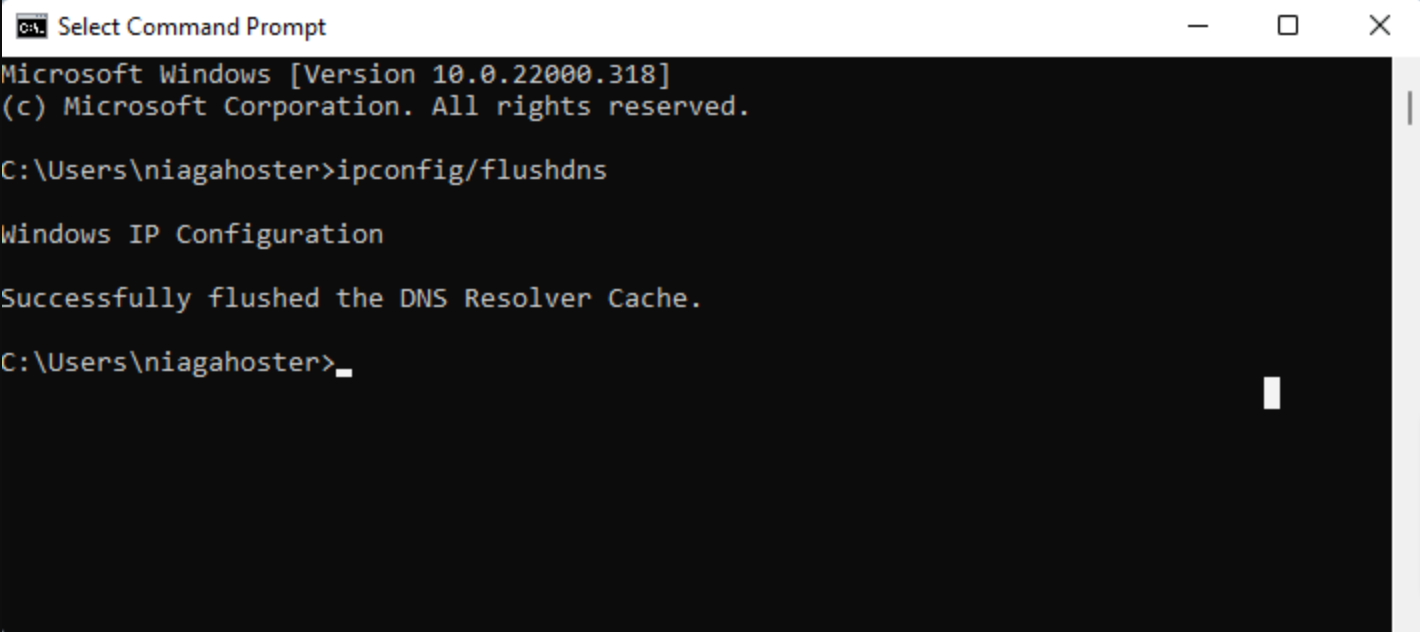
- Within a few seconds, you will see the message “Successfully flushed the DNS Resolver Cache” when the process is successful.
- You can also do this same operation in Mac by going to Finder > Applications > Utilities > Terminal
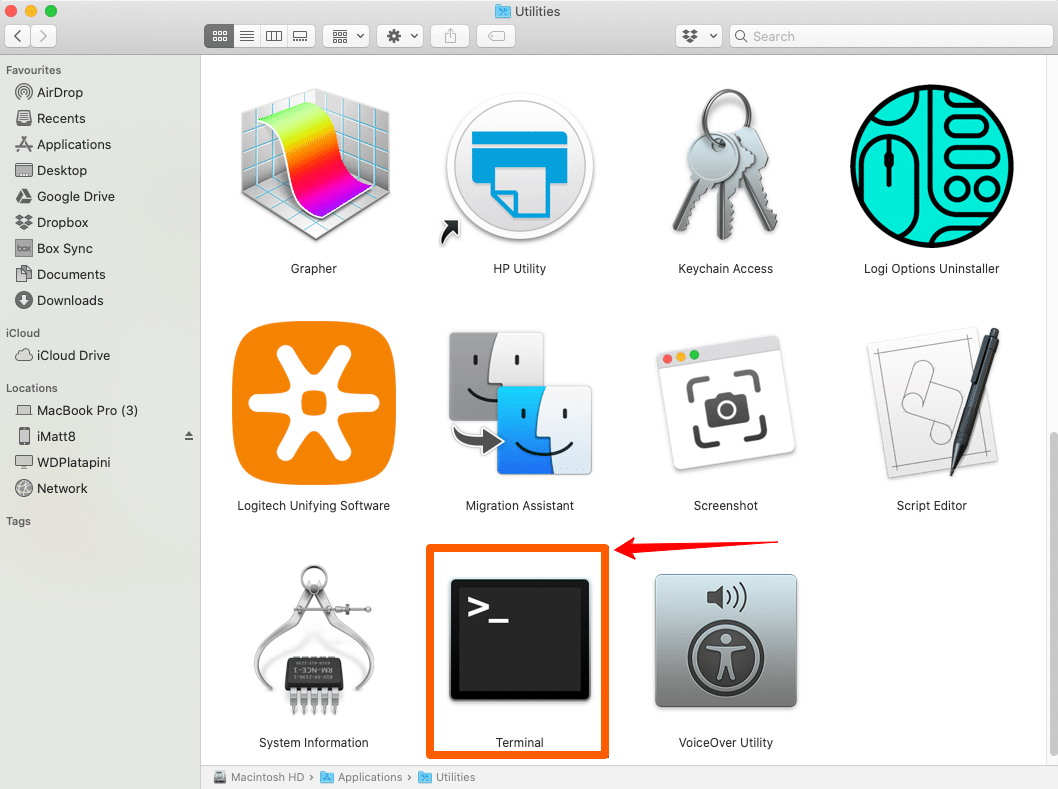
- Open the Terminal application. You can find it in the Applications folder, under Utilities, or use Spotlight search by pressing Command + Space and typing “Terminal”.
- In the Terminal window, type the following command and press Enter:
sudo killall -HUP mDNSResponder- You will be prompted to enter your administrator password. Type your password (you won’t see the characters as you type) and press Enter.
- Once the command is executed, you will see the Terminal return to the command prompt. This indicates that the DNS cache has been successfully flushed.
Fix Erroneous URLs
One of the easiest solutions to get rid of 401 Unauthorized error is fixing the URLs when it includes errors. Yes, 401 error codes can occur due to a simple mistake like placing an incorrect URL in the browser. So, examine the URL before thinking about any other possibilities or solutions to the error.
Double-check the URL and look for any special characters or numbers that might have been entered mistakenly. Plus, double-check for typographical errors while following hyperlinks from a different website. Because the hyperlink can be mistyped or outdated. Thus, the 401 Unauthorized Error would show up.
You can take an attempt to access the restricted resources by entering the website’s homepage. Then you can navigate to the particular affected page to make sure that you have the right URL.
Besides, simply search the targeted URL in Google that will clear out your confusion because if it doesn’t exist in the search engine result, you won’t get it there.
Disable Problematic Plugins
It’s important to consider that the 401 error that you are facing is not only because of your browser issue. If you are seeing an error in a WordPress site, it is worth exploring the possibility that one or more plugins are responsible for it.
Certain plugins, particularly those related to security, can cause the 401 error. This happens when the security plugin detects a login attempt as a suspicious activity or a threat. Plus, plugin compatibility issues can also trigger the 401 unauthorized error.
Here are the processes to deactivate the plugins and resolve the issue:
- Login to your WordPress dashboard by entering your credentials.
- Now, navigate to Plugins > Installed Plugins from the dashboard menu.
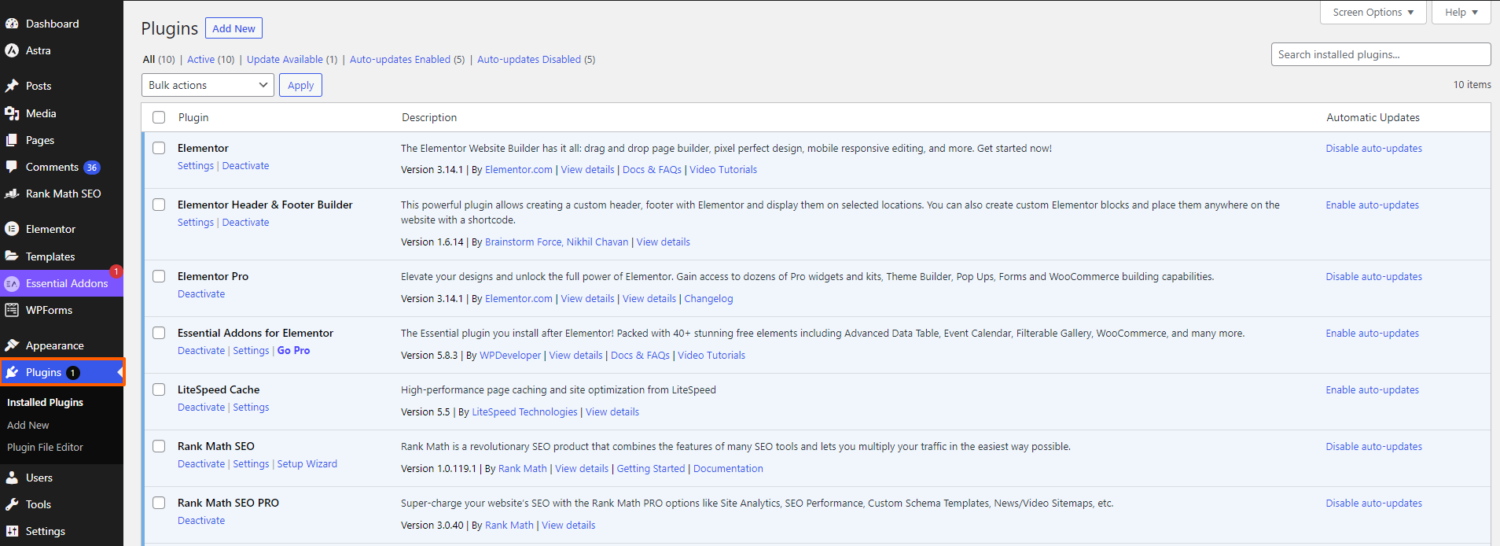
- On the Installed Plugins page, you will see a list of all the plugins installed on your WordPress site. Click the checkbox located at the top of the list and select all plugins.
- With all plugins selected, locate the Bulk Action dropdown menu and choose Deactivate option.
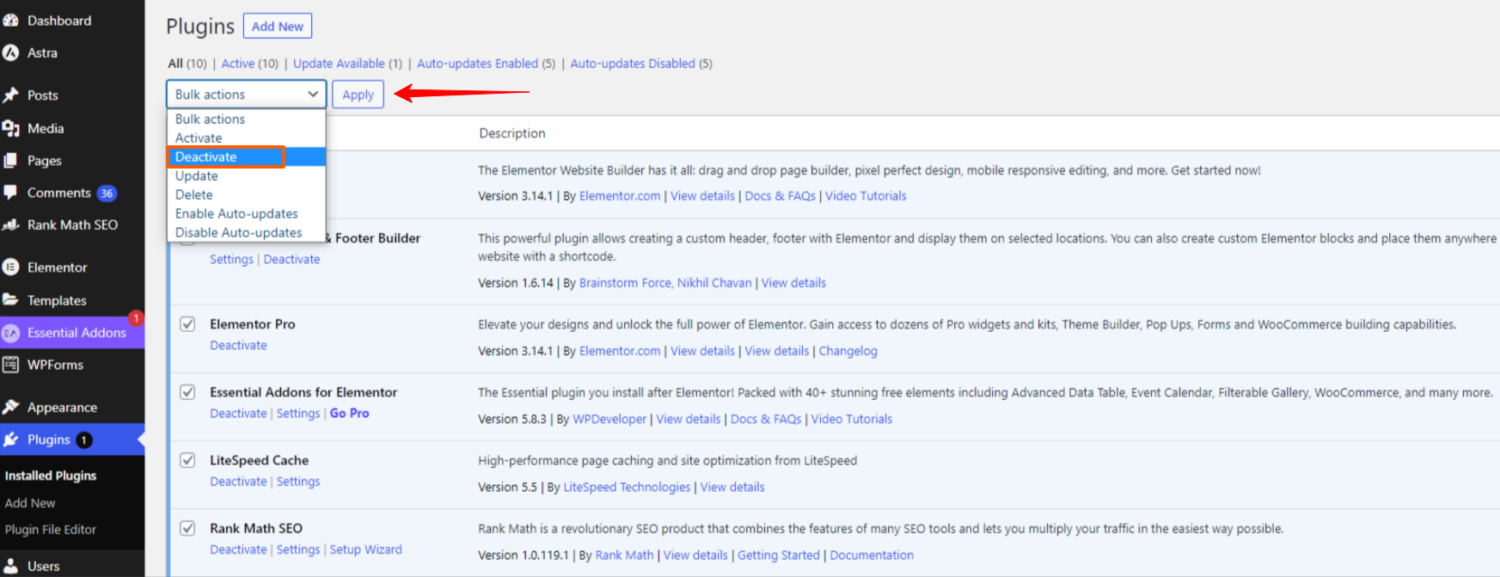
- After selecting the Deactivate option, click the Apply button next to it. Now, all your plugins will get deactivated simultaneously.
- After the deactivation process is done, reload the page that showed the 401 error. Check if the error is fixed and if you can access the desired page.
- If the 401 error is resolved after deactivating all the plugins, sort out the problematic plugins. Then get back to the Installed Plugins page and activate each plugin manually.
- Reload the page once each plugin has been activated to see whether the 401 error still persists. Follow this procedure until you find the precise plugin that causes the problem.
- If the problematic plugin is not essential for your site, then simply remove it. But if it’s crucial, contact the developers and get their assistance to resolve the issue.
Resolve Server Side Issue
The 401 response is transmitted through the WWW-authenticate header that contains challenges or strings. These strings specify the required authentication method for providing access to certain pages. Thus, exploring the response that this header sends and the authentication method used by it will help you identify the error.
Here are the steps to check the WWW-Authenticate header view the reason behind the 401 Unauthorized error:
- Go to the web page that is displaying the 401 error in your preferred browser.
- Now, right-click on the page and select Inspect to access the developer console in your browser (Google Chrome). Alternatively, you can use the shortcut
Ctrl+Shift+J.
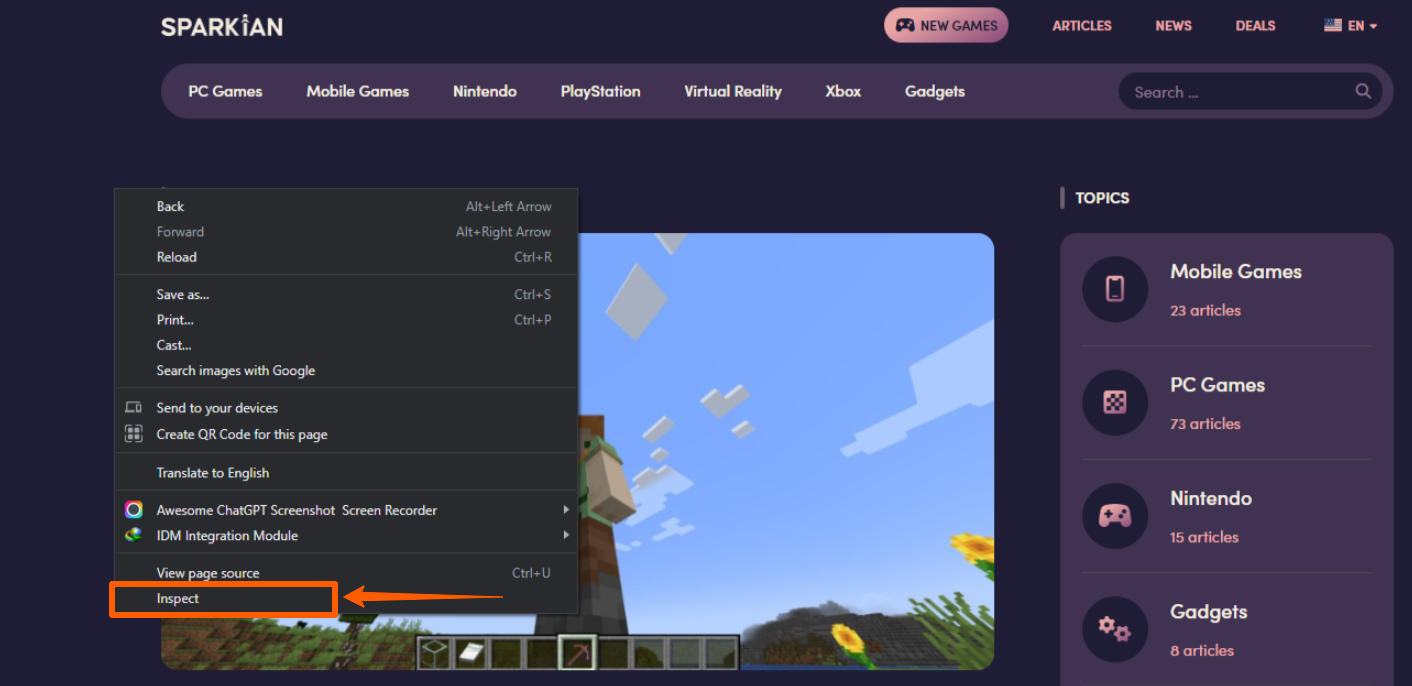
- Inside the developer console, locate and click the Network tab.
- Reload the website when the Network tab is chosen by hitting F5 or the refresh button. A list of the network resources that the page has visited will be presented by this operation.
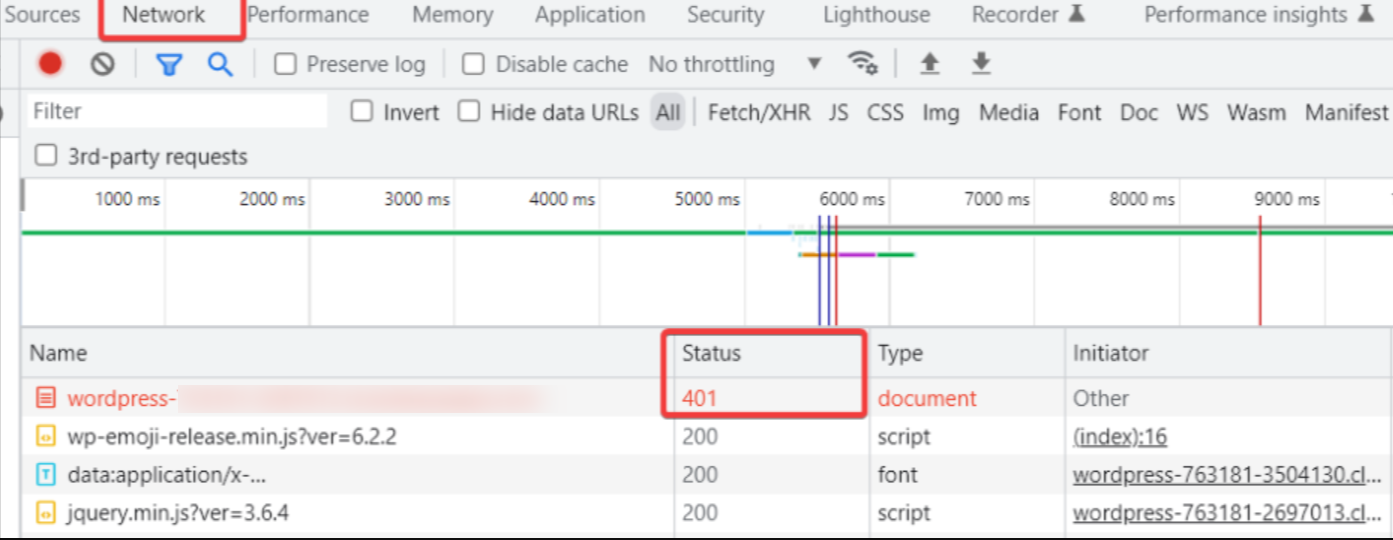
- Now sort out the entry with the 401 status code included in the network resources list. You can find it by clicking the Status Header, which will let you sort the table based on the status code.
- Then select the entry with the 401 status code, click the Headers tab, and look for the Response Header section.
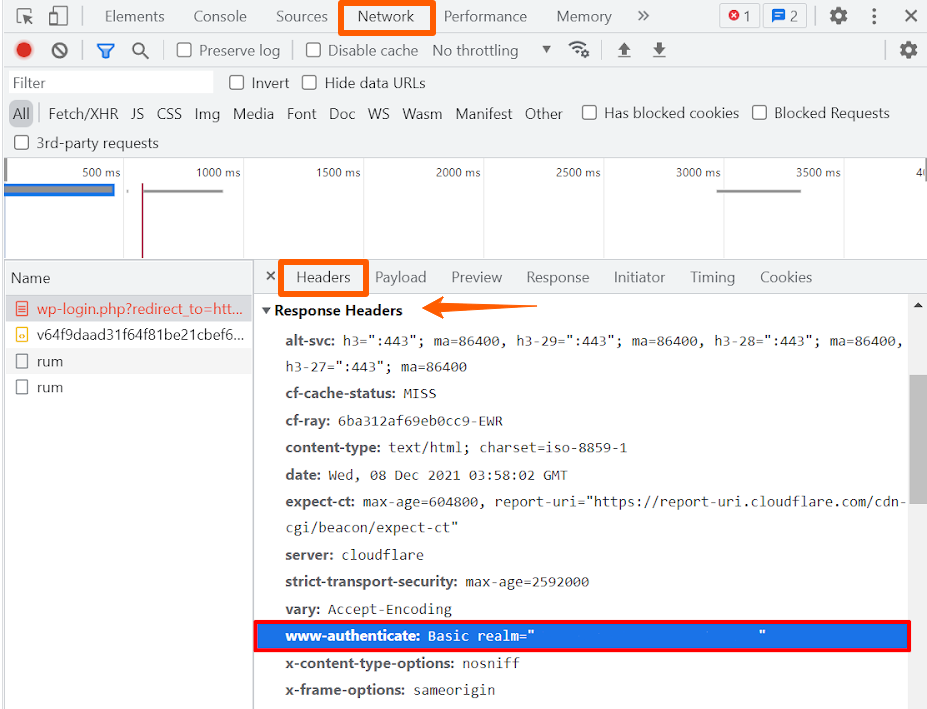
- Locate the WWW-Authenticate header, which contains info regarding authentication schemes required for access.
- Inspect the data in the “WWW-Authenticate” header, paying close attention to the indicated authentication technique or schemes. This data can shed light on the kind of authentication the server anticipates.
- Consult the HTTP Authentication Scheme Registry to learn more about the authentication scheme and its criteria. This resource offers comprehensive guidance on how to use the offered authentication mechanism and resolve the issue.
Final Thoughts
If you are facing the 401 error, keep patience and follow the methods that we’ve explained in this guide. Also, don’t forget to take these precautions if you want to avoid this error in the future:
- Make sure that you are entering an accurate username, password, or authentication credentials.
- Safeguard your authentication details and avoid sharing them anywhere.
- Note and renew authentication credentials before they expire.
- Familiarize yourself with the necessary authentication methods for accessing resources.
- Verify the accuracy and currency of URLs and hyperlinks to prevent incorrect access attempts.
- Regularly check server logs and error messages for authentication-related failures.
- Update software, CMS, and plugins to address security vulnerabilities and authentication problems.
You may also explore some common Chrome Errors and how to fix them on Windows.

