Struggling to fix the Event ID 1001 on Windows? If yes, you have stumbled upon the right webpage.
Windows errors can be troublesome and quite annoying. The situation gets more infuriating when you can’t find the cause of the error, and troubleshooting becomes more daunting.
The error that triggers Event ID 1001 is quite the same. The error log doesn’t provide much information about the cause of the error. Despite this, this error can be fixed by yourself in most cases.
To make things easier, I have prepared this detailed guide on troubleshooting Event ID 1001. You can easily follow the workarounds mentioned in the guide and eliminate this annoying error quickly.
So, without any further ado, let’s get started –
What Is Event ID 1001?
Event ID 1001 is an error reporting ID captured in Event Viewer, a Windows utility designed to log Windows events. It is arguably one of the most annoying Windows errors to deal with. One of the reasons I said that is that the error that triggers this event ID doesn’t have any specific pattern.
Most commonly, this reporting ID gets captured when an error causes a sudden system lockup on your Windows machine, leaving your device unresponsive, which eventually leads to a complete system crash. However, that’s not the only symptom of this error.
This error could also lead to the Blue Screen of Death errors, annoying screen flickering with the system crash, application failure, corrupted system files, and more.
However, that’s not the most annoying part. The most concerning part is that these lockups get triggered anytime, such as while playing games, attending a virtual meeting, or even when your PC is idle. This worsens the situation, making troubleshooting a must.
Since identifying the actual cause of this error isn’t that easy, troubleshooting this Windows error becomes a task. Thankfully, you can follow this guide to troubleshoot this Event ID 1001 on Windows.
How to Check if Error Event ID 1001 Occurred on Your Windows Machine?
As the title states, the Event ID 1001 error is like a silent killer for your PC. Therefore, even if it exists on your PC, it won’t pop out and tell you that your PC is infected with this error. Instead, this error will cause different problems, such as screen flickering, other BSOD errors, system crashes, etc.
So, if you are dealing with such problems very often, you need to check whether Event Viewer has logged any information about Event ID 1001.
Here is how you can check if this error exists on your PC using the Event Viewer –
Step 1: First of all, press the Windows+S button to trigger the Windows Search utility.
Step 2: Type Event Viewer in the search box and launch the application.

Step 3: Click on the Windows Logs listed on the left pane to expand the list, and then select the Application option.

Step 4: Click on the error log with the Event ID 1001. You can use filters or sort the list accordingly to locate such error logs easily.
Step 5: After finding the error log, read the information provided in the General tab.
If this error occurred on your PC because of any specific application, you will find information here. However, if the General tab doesn’t provide much information, the error may not be application specific. Besides that, this error log could also occur due to multiple Windows errors.
What Causes the Event ID 1001 Errors?
If Event Viewer hasn’t provided any information, finding the cause for this error would become a challenging task. A wide range of errors could trigger this error log on your PC, consisting of hardware and software-related issues.
Here, I have covered some of the most common ones –
Outdated or Corrupted Drivers
Outdated and corrupted drivers are among the most common causes of Windows errors, including the error code 0xc1900101 and the Event ID 1001. Bad drivers don’t only malfunction the device they are associated with but also affect the performance and stability of other Windows services and devices.
Malware or Virus Attack
There is no doubt that malware and viruses are the biggest enemies of your PC. They don’t only compromise system security but also cause several issues, such as file corruption, registry modification, resource consumption, and so on. Malware infection is also among the top culprits that cause this error.
Overheating
Overheating can trigger several system errors and potentially lead to severe system issues, including system instability, performance degradation, component damage, and even BSOD errors. Therefore, if your PC components, primarily CPU and GPU, overheat a lot, that may be the reason you are dealing with this event log error.
Memory Issue
Virtual memory size is another common cause of this error. If the virtual memory isn’t adequately configured, you may face out of memory errors, notice performance degradation, and reduced multitasking capability.
However, the size of the virtual memory on a PC varies significantly for users and depends on various factors. These factors include the physical RAM size, usage pattern, the type of applications you use, and more.
Hardware Failure/Issue
Hardware failure or any issue with them could lead to several system-related problems, including Event ID 1001. However, identifying whether the hardware failure is the cause of this error is quite challenging.
Incompatible or Corrupted Software
Similar to drivers, incompatible software can lead to several Windows errors and problems. This case is quite true for a wide range of software, which includes –
- Antivirus software
- System optimization software
- Virtualization software
- Software suites with overlapping functionalities
Besides that, outdated and corrupted software could also cause similar errors. Therefore, keep an eye on them as well.
Corrupted System Files
Corrupted system files on your Windows machine could also lead to this error. System file corruption could happen for a variety of reasons. These reasons include malware infection, improper downloads or installation of updates, outdated Windows, and more.
Power Supply Issue
The power supply issue is part of the hardware failure. However, it is easy to check whether PSU is causing this error compared to other components.
These are the possible causes that trigger Event ID 1001 and lead to several other Windows errors. Now that you know the potential causes, let’s discuss the workarounds you can follow to fix the error.
How to Fix the Event ID 1001 Errors?
Since the possibility of multiple errors causing this Windows error report log makes it difficult to ascertain the cause, you’ll have to opt for the hit-and-try method.
To help you further, here I covered the workarounds you can follow to eliminate errors causing this Windows error report log.
Run SFC and DISM Scans
System File Checker (SFC) and Deployment Image Servicing and Management (DISM) are among the best free Windows tools for system scans and repair. These utilities are offered by Microsoft Windows itself and come pre-installed with the OS.
SFC is a utility that can be used for system file repair and system integrity verification, whereas DISM is primarily used to repair Windows images. The combination of these two tools can fix most of the file corruption-related issues on Windows.
Here is how you can use SFC and DISM tools together –
- First of all, trigger the Windows Search utility by pressing the Windows+S key.
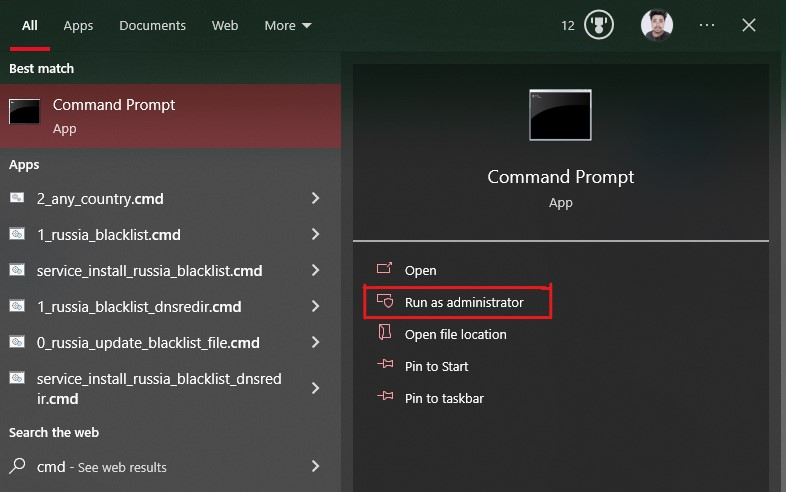
- Type cmd in the search box and select the Run as administrator option to launch the Command Prompt utility.
- First, type the
sfc /scannowcommand and hit Enter to execute the command. This will launch the SFC tool and initiate the automatic scan and repair process for the misconfigured and corrupted system files.
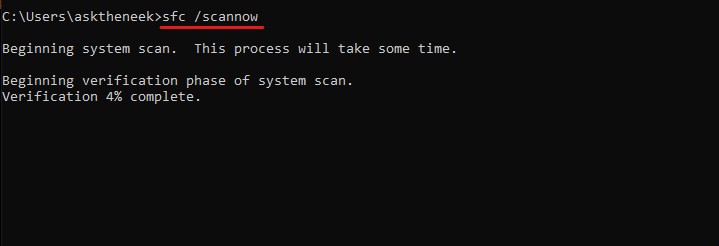
The SFC scan would take some time to complete the verification process and display a scan outcome.
- Once completed, we will use the DISM utility. Type these commands one by one and hit Enter after each command.
dism /Online /Cleanup-image /ScanHealth

dism /Online /Cleanup-image /CheckHealth

dism /Online /Cleanup-image /RestoreHealth

dism /Online /Cleanup-image /StartComponentCleanup
These commands will scan, check, and restore corrupted Windows images and system files, along with a thorough cleanup. This process will again take some time.
After this, restart your PC and check whether the Event ID 1001 error exists.
Scan Your PC for Viruses and Malware
Malware and virus-infected computers are prone to a wide range of errors. This Event Viewer reporting ID error is one of them. Therefore, running a thorough virus scan could help you fix the error.
Besides that, regular virus and malware scans can also protect your PC from other threats, improve system performance and stability, and ensure computer security.
The steps below will help you run a complete system scan using Windows Defender, a built-in Windows utility.
- First of all, launch Windows Settings by pressing the Win+I key.
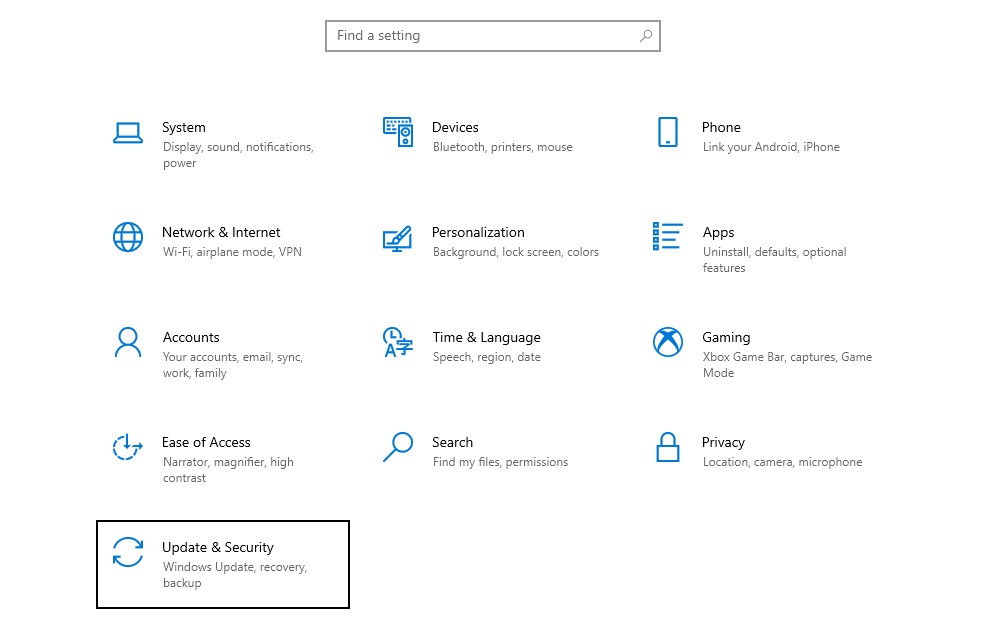
- Select the Update & Security option.
- Select the Windows Security option from the left pane.
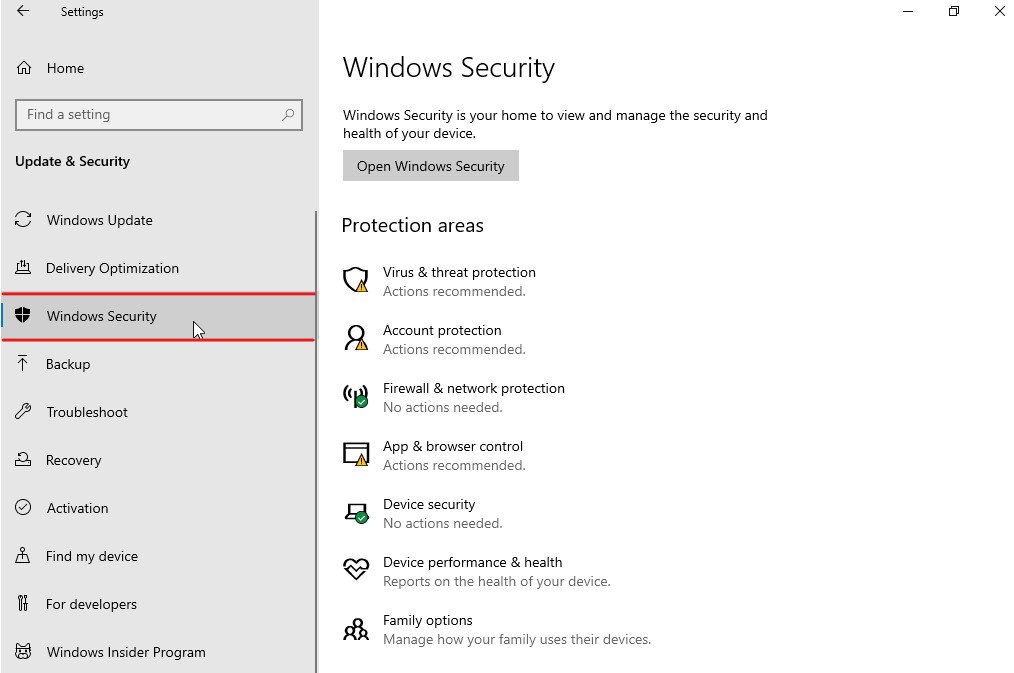
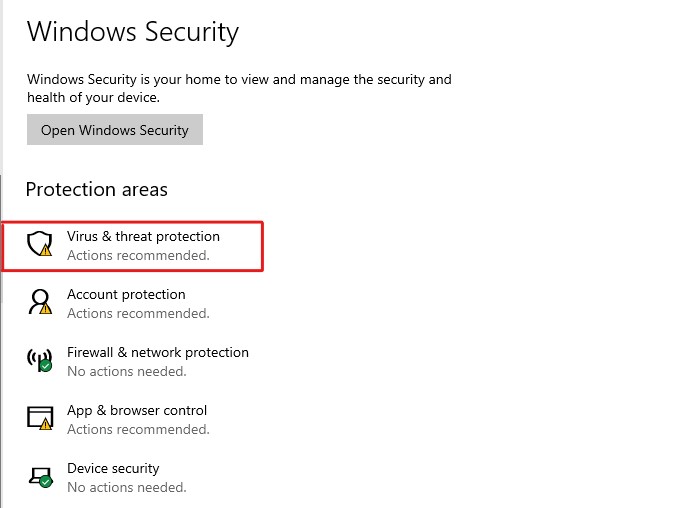
- Select the Virus & threat protection from the Protection areas. This will open a new Window on your screen.
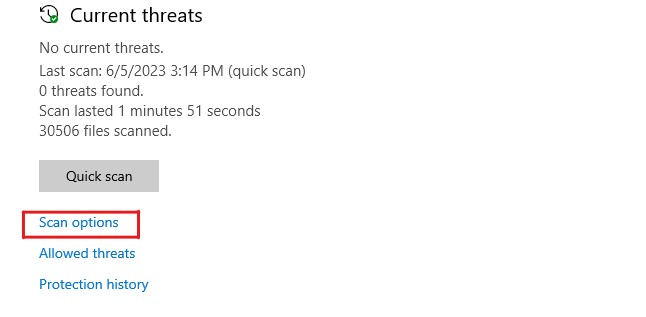
- Click on the Scan options.
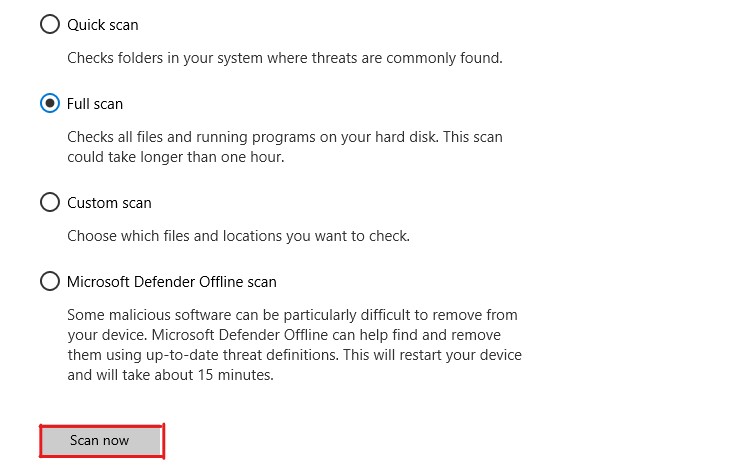
- Select the Full Scan option and press the Scan Now button. This will initiate scanning for malware, viruses, and other threats.
After Windows Defender completes scanning, it will show you a list of the existing threats and terminate them instantly. Windows Defender will also provide fixes you can apply to remove those threats.
Apply those fixes and reboot your PC. Check whether the error has been fixed. If it still exists, follow the next workaround.
Configure Virtual Memory or Page File
Large virtual memory creates the illusion of larger memory spaces that could be used while multitasking or launching heavy software and games.
On the other hand, if your PC doesn’t have adequately configured virtual memory, you could face several issues related to multitasking, performance degradation, and out-of-memory errors. Therefore, configuring the virtual memory could help you fix the Event ID 1001 error.
Here is how you can configure the virtual memory on your PC –
- First of all, launch the Run dialog box by pressing the Win+R key.
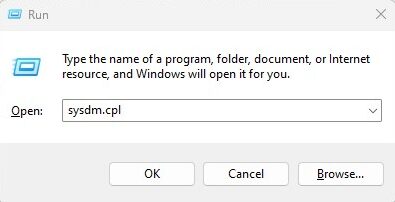
- Type
sysdm.cpland hit the Enter key to launch System Properties.
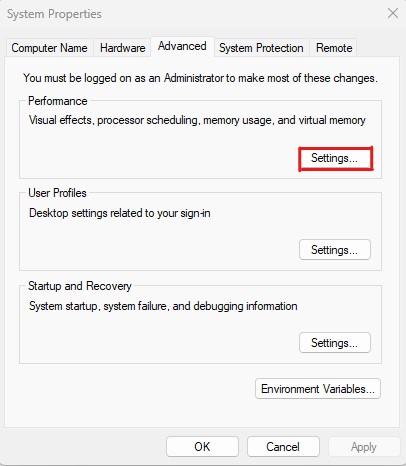
- Select the Advanced tab and then click on the Settings button under Performance.
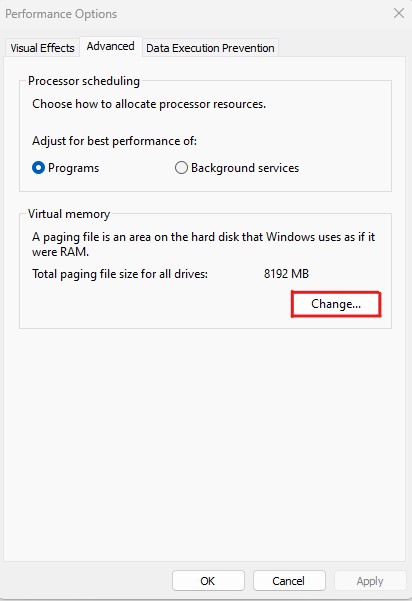
- Click on the Advanced tab on the Performance Options window.
- Click on the Change button under Virtual memory.
- Here, uncheck the option that says Automatically manage paging file size for all drives and then select the drive where you have Windows OS installed.
- Select the custom size option and configure the Initial size and Maximum size value for the virtual memory.
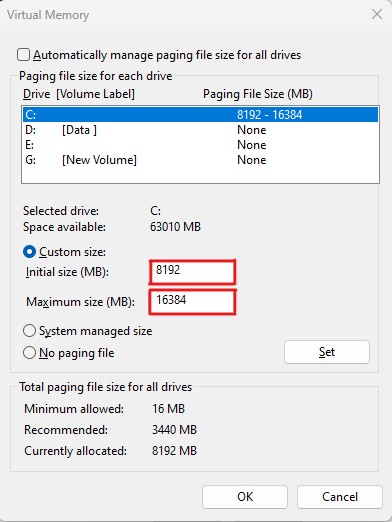
- Click on the Set button and then the OK button.
Now, restart your PC to apply the changes.
Once your PC reboots, all the changes that you have made will be applied. Check if the error has been fixed.
Deciding on the right virtual memory size can be tricky. While determining the virtual memory size, consider these factors to make the right decision –
- The virtual memory size should fall within the range of 1 to 3 times the amount of physical RAM.
- If you use heavy software such as games, video editing tools, virtual machines, etc., and often multitask, consider having a larger page file size.
- The virtual memory is stored on your system drive. Therefore, ensure your system drive has sufficient space to accommodate the desired virtual memory size.
Many people have reported facing this error because of driver-related issues. These driver-related issues include driver failure and outdated or corrupted drivers.
Since that could be the case with you, updating drivers or removing the corrupted ones could fix this error. Here are the steps you can follow to fix driver-related issues –
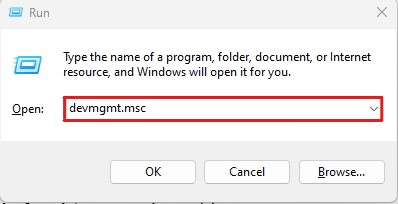
- First of all, open the Run dialog box by pressing the Win+R key.
- Type
devmgmt.mscand hit Enter to launch Device Manager.
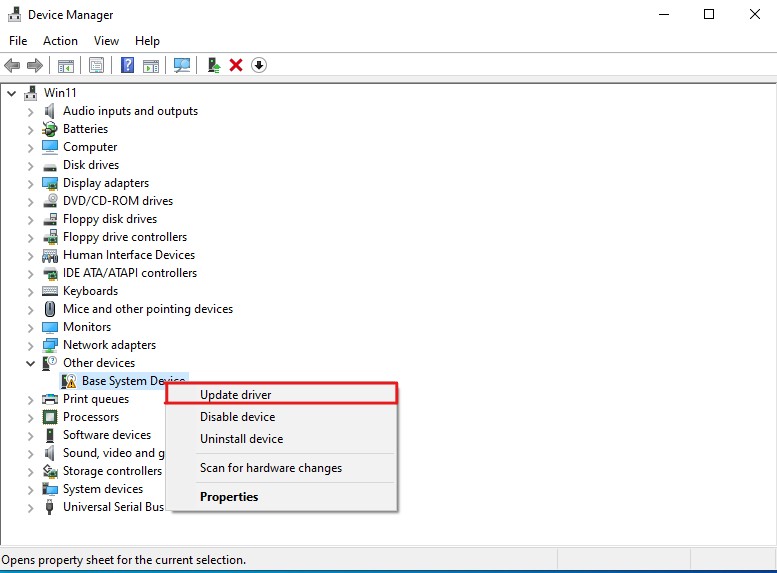
- Locate the problematic devices. You can identify these devices as these devices mostly have a yellow exclamation mark.
- Right-click on these problematic devices and click on the Update Driver option.
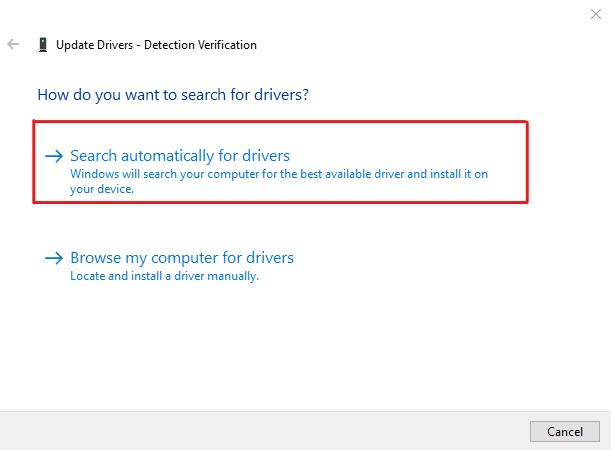
- It will launch the Update Drivers wizard. Here, select the Search automatically for drivers option.
- If the wizard can’t find any driver or shows any error and the device isn’t essential, disable the device.
Note that disabling or uninstalling a device will immediately terminate its functionalities and make it unresponsive. Therefore, avoid disabling/uninstalling devices essential for your PC, such as display adapters, processors, network adapters, and more.
Besides that, after fixing the error, reinstall the drivers of those devices to bring them back to the functional state.
Close Unnecessary Background Apps
Since this error primarily freezes your system and makes it unresponsive, closing superfluous background apps could fix the issue. I would also recommend you keep an eye on apps that automatically launch on startup and disable the unnecessary ones.
Follow these steps to close unnecessary background apps on Windows –
- Launch the Task Manager by clicking right on the Taskbar and then selecting the Task Manager option.

- Look for the programs listed under the Apps section. Right-click on the ones you are not using and select the End Task option.

- Follow the same procedure to close all the unnecessary programs and services listed under the Background processes section. However, double-check the programs listed under the Background processes section before terminating them, as some services and processes listed there are essential for Windows.
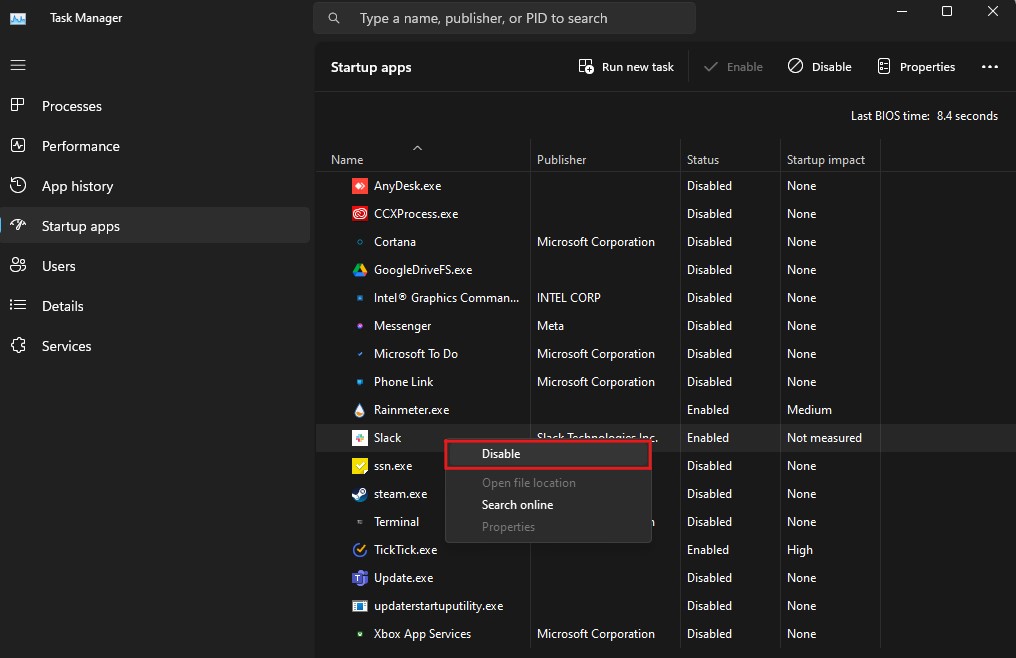
- Now, click on the Startup tab. Here you will see programs that are configured to launch when you start your PC.
- Now, disable all the apps (or the ones that you don’t want to launch when your computer starts.) and reboot your PC.
Once your PC restarts, you most likely won’t see the Event Viewer error stating that your PC has rebooted from a bugcheck Event ID 1001 or a similar error. However, in case you do, follow the next workaround.
Free Up Some Hard Drive Space
When your system drive doesn’t have sufficient free space, your PC is prone to several issues, such as inefficient performance and file fragmentation, and could potentially lead to system errors. You also need to ensure that you have free space equivalent to the virtual memory.
The best way to gain some storage space without deleting essential files is by using the Disk Cleanup utility.
Here is how you can use this Windows utility to free up some space –
- Press the Windows+S key to trigger the Windows Search function.
- Type Disk Cleanup and open the utility.

- It will ask you to select the drive that you want to clean. Simply select the system drive, which is C in most cases, and click on the OK button.
- Make sure you check all the checkboxes listed under the Files to delete option and then click on the OK button.
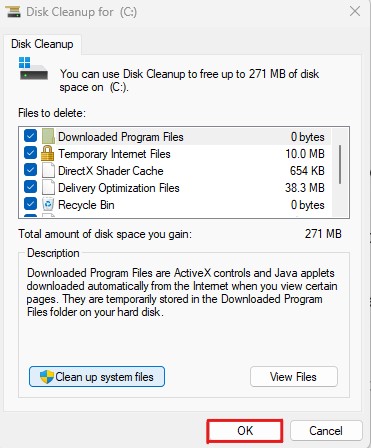
- A Disk Cleanup prompt will appear, asking you to confirm your decision. Click on the Delete files button to confirm.
The entire cleanup process may take a few minutes, depending on the file size. After that, check how much free space you have on your C drive.
In general, it is recommended to keep around 20% free space. This 20% free space should be apart from the virtual memory you configured.
Reinstall/Remove Problematic Software
Third-party software can also be the culprit behind Windows errors and could trigger the Event ID 1001 error log. This mainly happens when installed software gets corrupted or infected with malware. Besides that, software with overlapping functionalities could also lead to Windows errors.
Here is a quick guide that you can follow to remove or reinstall problematic software –
- First of all, launch the Run dialog box by pressing the Win+R key.
- Type
appwiz.cplin the text field and hit the Enter key. This will launch the Programs and Features and take you to the Uninstall or change a program settings.
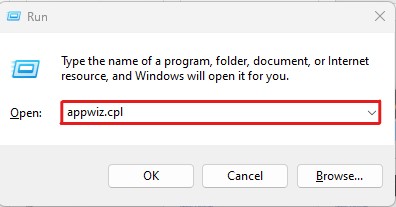
- Locate the apps that may be causing this error. Primarily look for apps that are either outdated, boast functionalities that could overlap with other system apps, or are from unreliable publishers.
- Right-click on these apps and click on the Uninstall option.

- The uninstallation process could vary from app to app, and therefore, follow the on-screen instructions to finish the uninstallation process.
- Once the apps are uninstalled, reboot your PC.
Now check whether your PC is booted with the error message. If you see no error logs, then it’s clear that the uninstalled apps are the culprit. That said, you can reinstall the apps. But make sure to download their latest version from the official website only.
Turn off Cloud-delivered Protection on Windows Defender
If you have an antivirus program installed on your PC and uninstalling the program in the aforementioned workaround fixes the issue, then turning off cloud-delivered protection could help you.
Cloud-delivered protection used by Windows Defender could overlap with the similar functionality offered by your antivirus program. As a result, it could cause the Event ID 1001 Windows error.
Here is how you can turn off the cloud-delivered protection on your PC –
- Press the Windows+S key to trigger the Windows Search function.
- Type Windows Security and open the app.
- Select the Virus & threat protection tab.
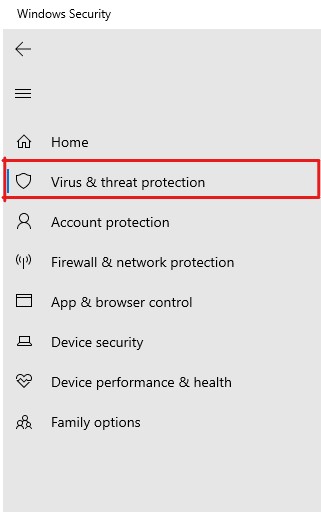
- Click on the Manage Settings option.
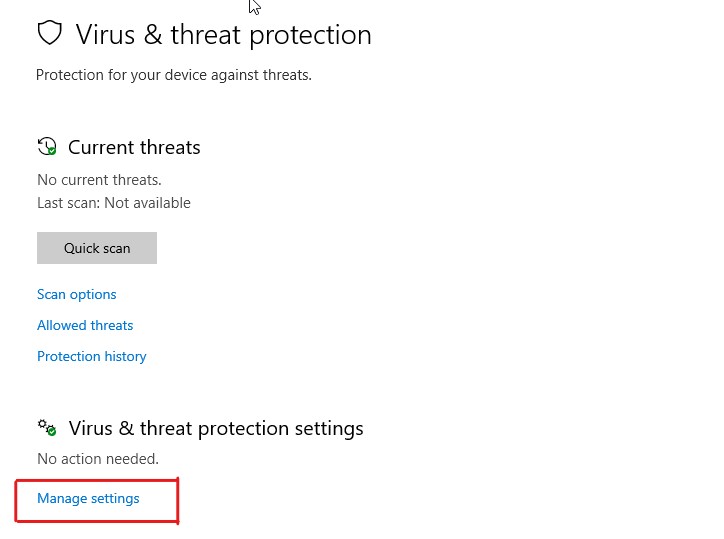
- Here, disable the Cloud-delivered protection option along with disabling the Automatic sample submission option.
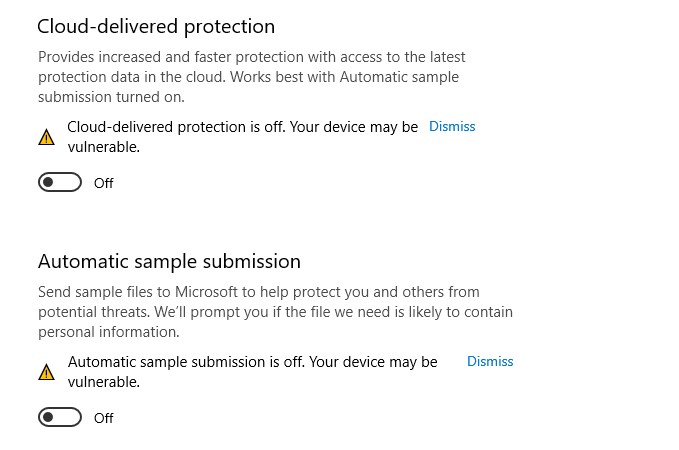
- Reboot your PC.
Disabling cloud-delivered protection could make your device vulnerable to common virus and malware-related threats. Therefore, only disable it if you have any antivirus program installed on your PC.
Run a Memory Test
Memory-related issues are one of the most common causes that trigger this Event Viewer error log. Therefore, diagnosing the RAM could be a great method to verify whether it is the main culprit.
To diagnose your RAM, you can use the Memory Diagnostic Tool, a built-in Windows utility. This utility is designed to identify the problems related to system memory that might result in system crashes, freezes, and other stability problems, eventually causing the Event ID 1001 error log.
You can follow these steps to use the Memory Diagnostic Tool –
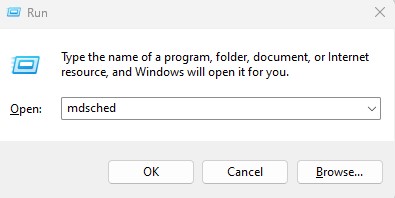
- First of all, launch the Run dialog box by pressing the Win+R key.
- Type
mdschedand hit the Enter key to launch the Windows Memory Diagnostic.
- It will show you two options to choose from – Restart now and check for problems (Recommended) and Check for problems the next time I restart my computer. Select the first one to initiate the memory diagnosing process instantly.
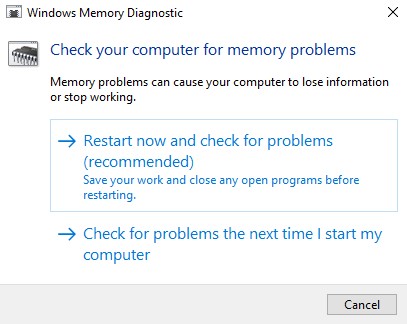
- Selecting the first option will restart your computer instantly and begin the memory test.
- During the test, you will see a blue screen with a progress bar stating the test status, detected errors, and more. This entire process would take some time.

- After completing the test, your PC will restart automatically.
You need to use the Event Viewer utility to check the memory test results.
You can follow these steps to check the memory test results –
- Launch the Event Viewer app.
- When the app launches, click on the Windows Logs to expand the folder and then select the System folder to see system logs.
- Click on the Find option from the right pane and type MemoryDiagnostics-Results.

- Look for the event that contains Event ID 1201 and click on it.
- Read the information provided in the General and Details tab to determine the memory test result.
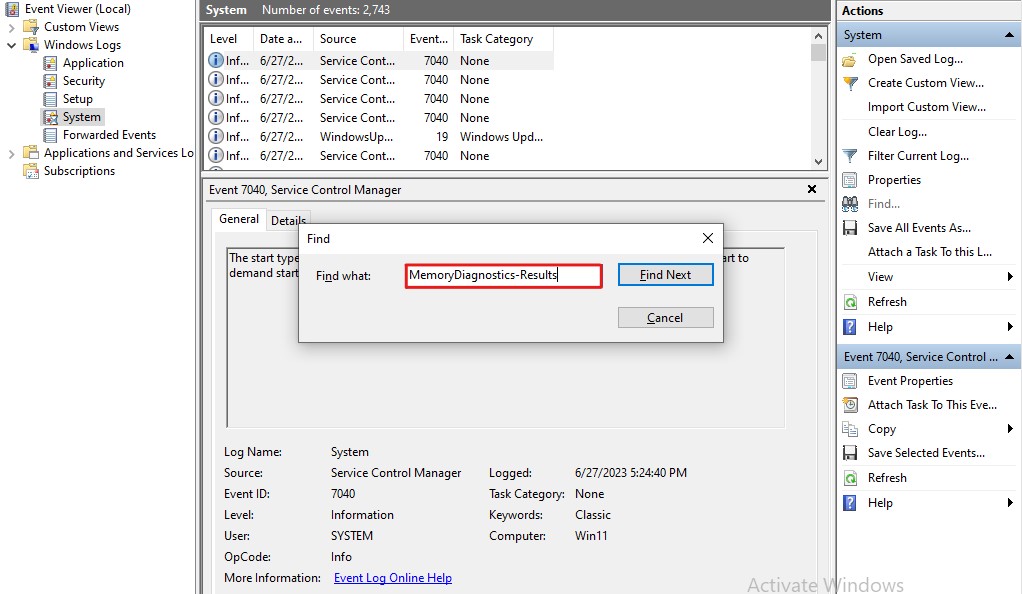
This test result will help you understand if any RAM-related issue exists on your PC. If so, it will also provide details so you can take appropriate actions to fix the issues.
Computer heating is very common. It occurs when you use your machine for a prolonged time or run intensive tasks.
While computer heating is normal to some extent, overheating can be troublesome and affect the performance, stability, and, most importantly, lifespan of components. Overheating can further lead to several Windows errors, hardware damage, system crashes, unexpected shutdowns, as well as data loss.
Therefore, fixing your PC has heating issues could give you optimal performance, stability, and longevity, along with fixing various Windows errors, including the Event ID 1001 error log.
Here is how you can identify and fix overheating-related issues on your PC –
- First of all, install a temperature monitoring tool. For this tutorial, I am going to use HWMonitor.
- Launch the tool and monitor the CPU and GPU temperature.
You can position your CPU and GPU temperature in these three categories –
Normal – If your PC is idle, the temperature ranging between 45-55 degrees Celsius is considered normal.
Average – While performing CPU and GPU-intensive tasks, such as playing games, editing or rendering videos or graphics, etc., the temperature between 70-80 degrees Celsius is considered average.
High or Overheating – If your computer temperature stays within the range of 80-100 degrees while performing high-intensive tasks, this temperature is considered high and falls in the range of overheating.
Identify the cause of overheating and fix it –
- Clean your PC – With time, the inside of your computer starts accumulating dust and debris that causes issues with the airflow and functions of the cooling system. This could cause overheating, and therefore, you should clean your PC parts using compressed air or a soft brush.
- Ensure Proper Ventilation – Ensure your PC is in a well-ventilated and cold environment. If there are any obstructions blocking air vents, remove or fix them. Also, improve the overall airflow around your system and maintain a low temperature so your PC can effectively dissipate heat.
- Consider Thermal Paste Replacement – If you haven’t changed thermal paste in years, consider replacing it. The thermal paste could dry out with time, reducing its effectiveness of heat transfer. As a thumb rule, one should replace thermal paste once every three years.
- Don’t Overclock – Overclocking CPU and GPU can improve system performance significantly. However, overclocking also comes with several drawbacks, one of which includes overheating. Therefore, avoid overclocking until and unless you have an efficient cooling solution.
- Upgrade Cooling Solution – Upgrading your cooling solution is another efficient way to reduce overheating. For laptops, you can use a cooling pad, whereas you can add additional case fans or install an aftermarket CPU cooler on desktops.
Fixing the overheating issue could fix this Event Viewer error log. Therefore, check if the error still persists.
Disclaimer – If you are not techy or don’t have any experience opening PC cabinets or laptops, avoid doing it yourself and seek the help of a professional.
It is essential to handle hardware components with gentle care and proper technique. Also, identifying and fixing hardware-related issues can be complicated, so I wouldn’t recommend fixing them alone.
Even though the Device Manager utility on Windows could help you identify the cause, I would recommend consulting a professional.
Final Words
There you have it – a detailed article covering how to fix the Event ID 1001 error on Windows.
The Event ID 1001 is one of the most annoying Windows errors. The worst thing about this error is that if you leave it unresolved, it could silently cause severe damage to your Windows machine over time. Therefore, fixing this error becomes a necessity.
Thankfully, you can easily fix this error by following the workarounds mentioned in this article.
Next, check out the detailed introduction guide on Windows Event Log.

