For gaming optimally on your PC, there is just so much Windows Settings or the Control Panel can provide. If you want to take complete control, you should use some Windows Registry hacks to improve gaming.
Windows Registry is like a digital filing cabinet for your PC where Windows records all the Windows settings and changes. Unlike the UI-based Settings, Windows doesn’t police the Registry to ensure users don’t mess up anything. So it has no limit on how you can modify the system.
Any changes you make to it are done at your own risk. If you are willing to take the risk, you can take full advantage of this freedom and fully optimize your PC resources and network to get the best gaming experience.
In this post, I’ll share some Windows Registry hacks that will ensure your PC gives the best gaming experience that it is capable of. And don’t worry, I’ll provide all the instructions you need to safely apply these hacks.
Managing Windows Registry
Before I tell you how to apply these hacks, you must know how to properly access and manage the Registry. An incorrect change in the registry can negatively impact Windows or even fully corrupt it, and it can be quite difficult to fix a broken Registry.
Below I am going to tell you how to access, backup, and navigate Windows Registry. Make sure you follow the instructions as is to avoid any issues.
Access Windows Registry
The easiest way to open the Windows Registry is to search for registry in Windows Search and open the Registry Editor app. However, a more reliable method would be to use the Run command instead since Windows Search can be disabled. Just press the Windows+R keys and type regedit in the Run dialog to open the Registry.
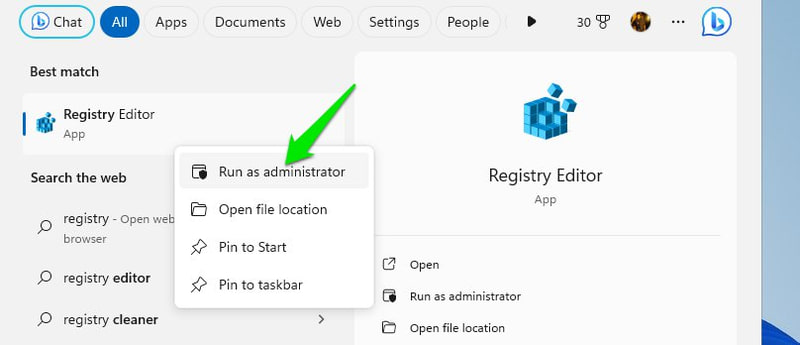
You may also open the Registry as administrator by right-clicking the app and selecting Run as administrator. This will ensure you can edit all the entries and don’t face any restrictions while editing. However, it isn’t necessary as Windows can just ask you to give administrator permissions when an entry requires it.
Backup Windows Registry
Before making any edits, it’s crucial to back up the Registry to ensure you can fix it in case of an incorrect entry. Thankfully, it’s really easy to do that. Once the Registry opens, click on the File menu and select Export from it. Save this file somewhere safe so you can access it later.
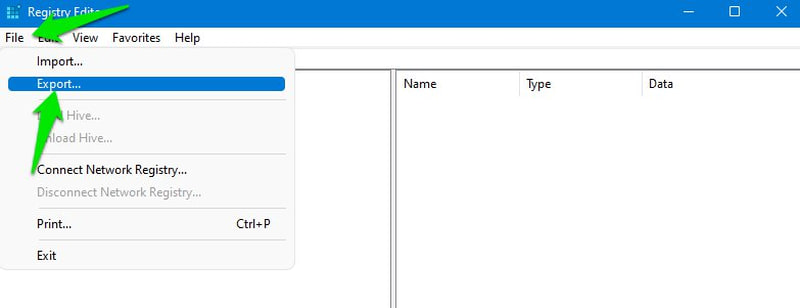
When you need to restore the Registry, click on the File menu again and select Import to import this saved file. You can also use a Registry cleaner app as most have backup and restore features.
Navigating Windows Registry
Windows Registry is organized like a hierarchical tree using keys, subkeys, and values. There are five main keys and many subkeys with their own values. You can create new keys and values as required.
To access a specific key, you’ll have to open all the parent keys to reach it. You can either do this manually by clicking on each key or copy/paste the key location in the search bar at the top.
To make things easier for you, I’ll give you the exact location of the keys that you need to edit for each hack. You can just copy/paste it in the search bar right where Computer\ is written and the Registry will open the exact location.

And if you need to create a new key here, right-click on the key and select New > Key. If you want to create a new DWORD value instead, then right-click on the key and select New >DWORD (32-bit) Value.
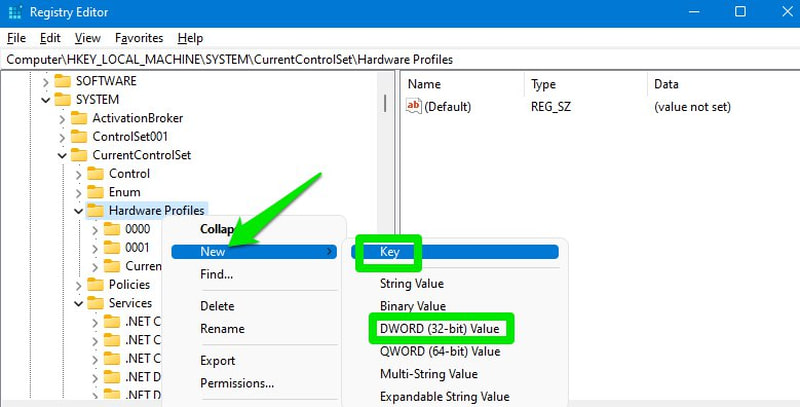
When changes are made, most of them are applied immediately. However, many require you to restart the PC or at least logoff and then log on again. I’ll recommend you restart your PC after applying the below hacks.
Disable Power Throttling
Windows throttles CPU power in different situations to save power. Even though you should be more concerned about this if you are optimizing gaming on a laptop, it can happen to desktop users too, depending on power settings. This can be really bad for games as not only does it affect the CPU performance, but the GPU too.
Since it can lead to the GPU running faster than the CPU, it can create a bottleneck situation where overall performance is negatively affected. To avoid this, you can disable power throttling in the registry. Here’s how:
In the Registry, move to the below-mentioned location.
HKEY_LOCAL_MACHINE\SYSTEM\CurrentControlSet\Control\Power\PowerThrottling
In the PowerThrottling key, there will be a PowerThrottlingOff entry in the right panel. Open it and change its value to 1.
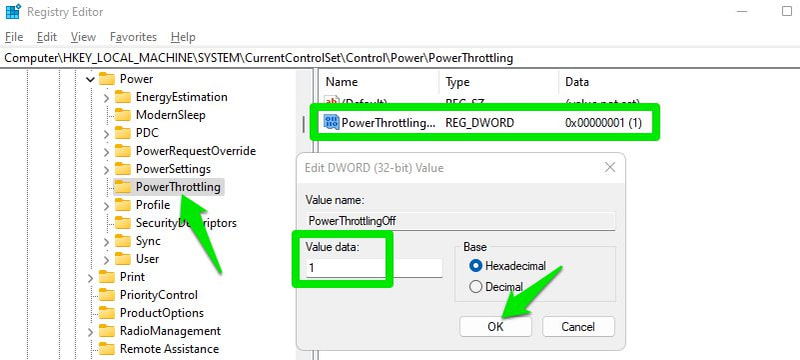
If the entry isn’t there, then create a new DWORD (32-bit) Value entry under PowerThrottling and name it PowerThrottlingOff. Once created, change its value to 1.
Turn Off Network Throttling
Windows has a default mechanism to throttle the network under certain circumstances; it mainly affects non-media content. However, depending on your network speed and usage, it can also affect gameplay and lead to high ping and spikes. It’s better to just disable this feature to avoid a chance of it messing up your gameplay.
To do so, move to this location in the Registry:
HKEY_LOCAL_MACHINE\SOFTWARE\Microsoft\Windows NT\CurrentVersion\Multimedia\SystemProfile
Here double-click on NetworkThrottlingIndex and set its value to ffffffff.
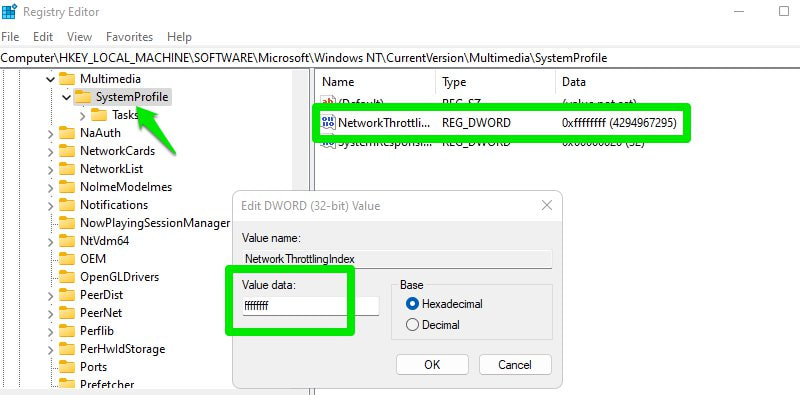
If you notice problems with network usage of background processes after this change, you can always change this value back to 10.
Optimize TCP
Transmission Control Protocol (TCP) is a protocol that governs how computers establish connections and reliably exchange data over networks, ensuring data arrives correctly and in the right order. Optimizing TCP directly improves your connection bandwidth usage, lowers latency, and stabilizes the connection.
For gaming, this means improved ping (especially to servers far away), and a lower chance of ping spikes, lag, and disconnections. If you are still using the default Windows TCP settings, then there are a bunch of TCP optimizations you can make to improve your online gaming experience.
First, open the below location in the Registry:
HKEY_LOCAL_MACHINE\SYSTEM\CurrentControlSet\Services\Tcpip\Parameters
Here in the right column, there are multiple entries that you can adjust to optimize TCP. Below I am listing all of them with the optimized values that you should apply. Just double-click on an entry, select Decimal, and then change the value to the optimum one.
DefaultTTL > 64
GlobalMaxTcpWindowSize > 65535
MaxUserPort > 65534
Tcp1323Opts > 1
TcpMaxDupAcks > 2
TCPTimedWaitDelay > 30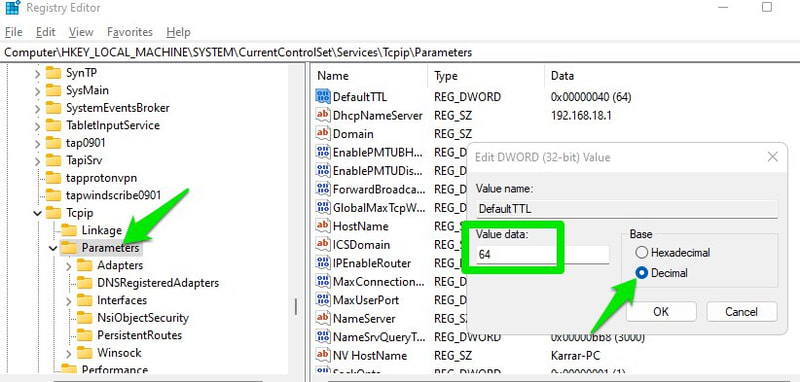
Disable CPU Core Parking
When there is less load on the CPU, Windows can turn off CPU cores to conserve power and minimize heat. If you are looking for the best gaming experience, turning off this feature can slightly improve performance.
However, you should only do this when even slightly smoother experience matters to you. Windows, by default, is really good at handling the cores, so it won’t affect your gameplay significantly. Below are some possible issues core parking introduces:
- The parking and unparking process adds slight latency, which is noticeable in fast-paced games.
- Before disabling a core, Windows may migrate its processes to another core, which can introduce slight latency.
- The game FPS may fluctuate.
- It can create a bottleneck situation for games that depend on the CPU, as the GPU runs at a higher power than the CPU.
- Many games that utilize multiple cores may not be optimized to work well with core parking. They may not use full CPU power even though they can.
If heat and power efficiency aren’t a problem for you, then you may disable core parking from the Registry.
Move to the below-mentioned location:
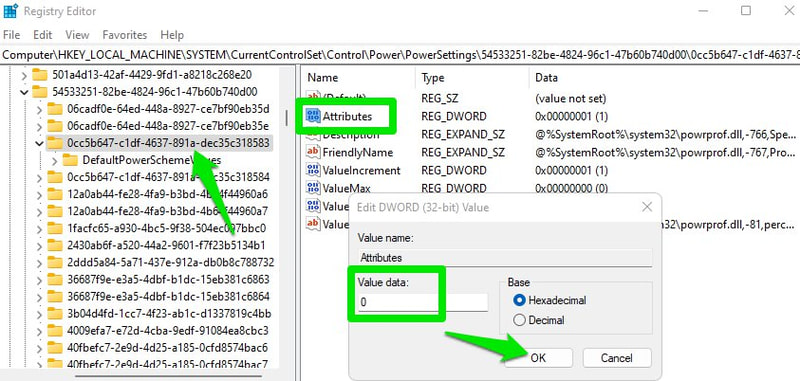
HKEY_LOCAL_MACHINE\SYSTEM\CurrentControlSet\Control\Power\PowerSettings\54533251-82be-4824-96c1-47b60b740d00\0cc5b647-c1df-4637-891a-dec35c318583
Here change the value of Attributes entry to 0.
Prioritize Games
In the Registry, you can tell Windows to prioritize games when allocating CPU and GPU resources. This will not only ensure stable performance with minimum stutters but could also improve overall game performance if other processes were affecting it.
Open up this location:
HKEY_LOCAL_MACHINE\SOFTWARE\Microsoft\Windows NT\CurrentVersion\Multimedia\SystemProfile\Tasks\Games
Here, you need to change the value of multiple entries, as I list below:
Affinity > f
Background Only > False
Background Priority > 1
GPU Priority > 8
Priority > 6
Scheduling Category > High
SFIO Priority > High
SFIO Rate > 4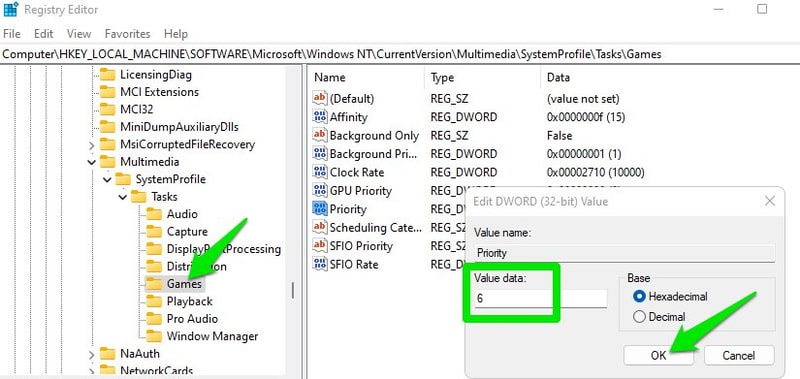
If Background Priority and SFIO Rate are not available here, then create two new DWORD Value entries and add the names and values, respectively.
Decrease Maximum Pre-rendered Frames
If your CPU is good enough to handle your gaming needs, then you can decrease maximum pre-rendered frames to reduce input latency. By default, the GPU renders some frames in advance before showing them on the screen. This ensures that games don’t stutter in case the CPU has to perform a different task that could delay the frame.
If you know your CPU can handle both the game and secondary tasks without a problem, then you can decrease this number to decrease the slight latency this introduces.
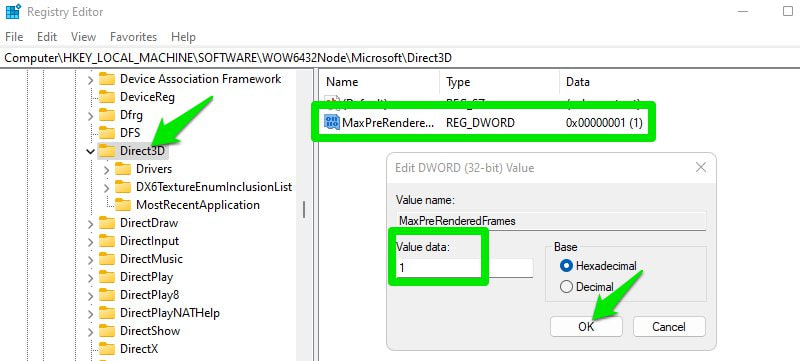
Go to this location in the Registry:
HKEY_LOCAL_MACHINE\SOFTWARE\WOW6432Node\Microsoft\Direct3D
Here, create a new DWORD (32-bit) Value entry and name it MaxPreRenderedFrames. Once created, change its value to 1, which will mean that only 1 frame is pre-rendered.
Increase System Responsiveness
Another option that creates a balance between foreground (games) and background tasks. By default, Windows makes sure that 20% of CPU resources are reserved for low-priority tasks.
You can further decrease this to 10% to free up more resources for foreground processes like games. However, it could affect background tasks if the game utilizes all the resources, and 10% isn’t enough, so be careful.
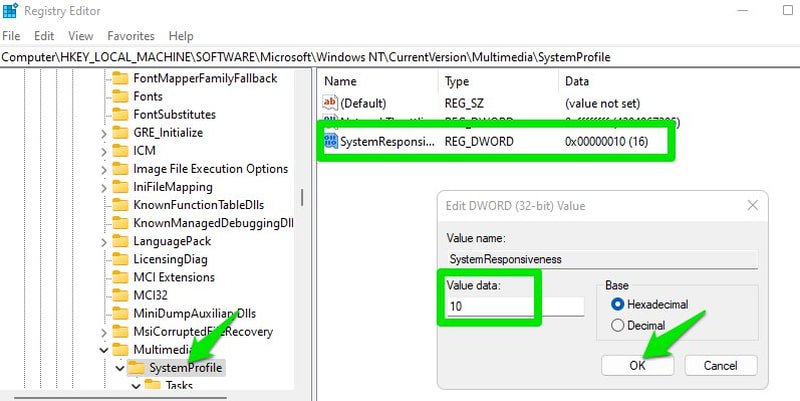
Move to this location in the Registry:
HKEY_LOCAL_MACHINE\SOFTWARE\Microsoft\Windows NT\CurrentVersion\Multimedia\SystemProfile
Here change the value of SystemResponsiveness to 10.
Turn Off Nagle’s Algorithm
By default, Windows uses Nagle’s Algorithm that ensures network efficiency by storing small packets and sending them as large packets instead. This saves bandwidth and prevents network congestion. However, in online gaming, this behavior also introduces latency as the network waits for sufficient packets to accumulate before sending them.
I will recommend you experiment with this to see if it actually improves your in-game ping or not. If it doesn’t, you should keep it enabled to ensure your network stays efficient.
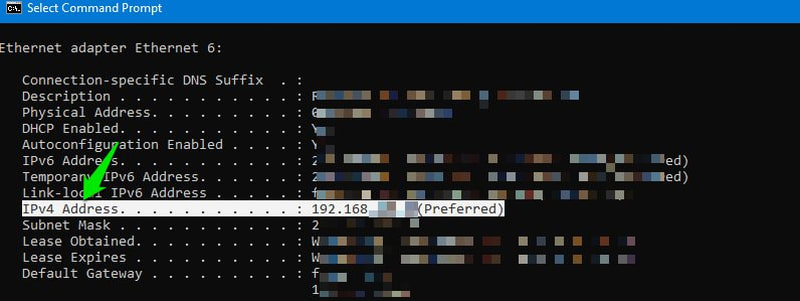
To disable Nagle’s Algorithm, you need to know your IPv4 address first. To find out, press the Windows+R keys and type cmd in the Run dialog to open the Command Prompt. Here use the ipconfig/all Command Prompt command. This will show lots of information about the network. Take note of the IPv4 Address here.
Afterward, open the below-mentioned location in the Windows Registry:
HKEY_LOCAL_MACHINE\SYSTEM\CurrentControlSet\Services\Tcpip\Parameters\Interfaces
There will be a bunch of interface keys. Open each one and look at the DhcpIPAddress value of each. You need to find the one that has the DhcpIPAddress value the same as your IPv4 address.
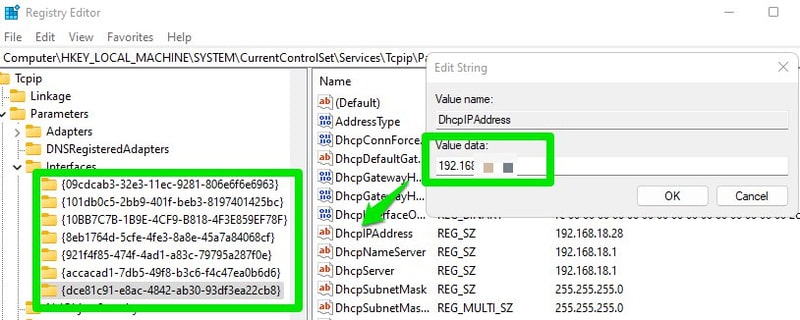
Once found, create two DWORD (32-bit) Value entries inside that interface key and then name them TcpNoDelay and TcpAckFrequency. Afterward, change the value of each to 1 to disable Nagle’s Algorithm.
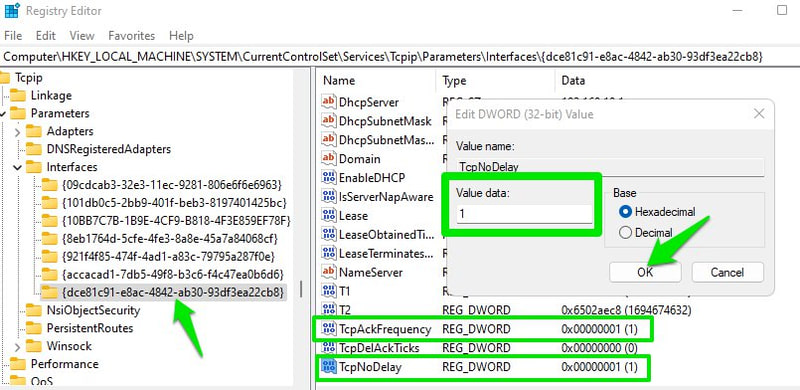
If this doesn’t improve your in-game ping, make sure you delete both of these new entries to enable Nagle’s Algorithm.
Ending Words
I have personally applied all of these hacks, and I can see a noticeable improvement in both the in-game ping and performance. Talking about performance, I didn’t achieve any noticeably higher FPS, probably because I have already optimized Windows Settings to boost performance. Although I suddenly see no stutters in games that used to stutter when heavy VFX was used.

