A practical guide to hardening and secure Apache Tomcat Server with the best practices.
Tomcat is one of the most popular Servlet and JSP Container servers. It’s used by some of following high traffic websites:
- LinkedIn.com
- Dailymail.co.uk
- Comcast.net
- Wallmart.com
- Reuters.com
- Meetup.com
- Webs.com
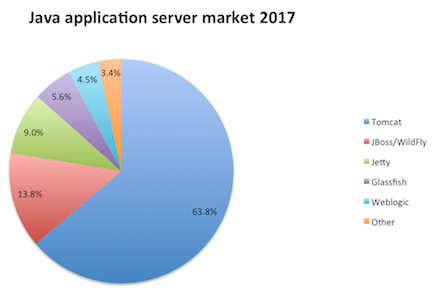
Below chart shows the market position of Tomcat in the Java application server.

Technically, you can use Tomcat as a front-end server to serve site requests directly. However, in a production environment, you may want to use some web servers like Apache, Nginx as front-end to route the requests to the Tomcat.
Using a web server to handle the requests gives performance and security benefits. If you are using Apache HTTP as a front-end web server, then you must consider securing that as well.
Having default Tomcat configuration may expose sensitive information, which helps hacker to prepare for an attack on the application.
Following are tested on Tomcat 7.x, UNIX environment.
Audience
This is designed for Middleware Administrator, Application Support, System Analyst, or anyone working or eager to learn Tomcat Hardening and Security.
Good knowledge of Tomcat & UNIX command is mandatory.
Notes
We require some tool to examine HTTP Headers for verification. There are two ways you can do this.
If testing Internet-facing application, then you may use the following HTTP Header tools to verify the implementation.
And for an Intranet application, you may use Google Chrome, Firefox developer tools.
As a best practice, you must take a backup of any file you are about to modify.
We will call Tomcat Installation folder as $tomcat throughout this guidelines.
Let’s go through the hardening & securing procedures.
Removing Server Banner from HTTP Header is one of the first things to do as hardening.
Having a server banner expose the product and version you are using and leads to information leakage vulnerability.
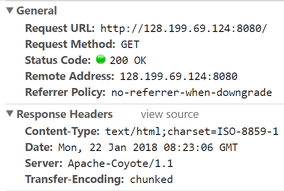
By default, a page served by Tomcat will show like this.

Let’s hide the product and version details from the Server header.
- Go to $tomcat/conf folder
- Modify server.xml by using vi
- Add following to
Connector port
Server =” “Ex: –
<Connector port="8080" protocol="HTTP/1.1"
connectionTimeout="20000"
Server =" "
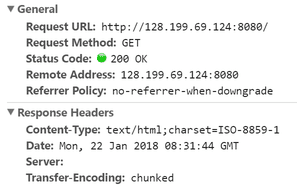
redirectPort="8443" />- Save the file and restart the Tomcat. Now, when you access an application, you should see a blank value for the Server header.

Starting Tomcat with a Security Manager
Security Manager protects you from an untrusted applet running in your browser.
Running Tomcat with a security manager is better than running without one. Tomcat has excellent documentation on Tomcat Security Manager.
The good thing about this is you don’t need to change any configuration file. It’s just the way you execute startup.sh file.
All you got to do is to start tomcat with –security argument.
[root@geekflare bin]# ./startup.sh -security
Using CATALINA_BASE: /opt/tomcat
Using CATALINA_HOME: /opt/tomcat
Using CATALINA_TMPDIR: /opt/tomcat/temp
Using JRE_HOME: /usr
Using CLASSPATH: /opt/tomcat/bin/bootstrap.jar:/opt/tomcat/bin/tomcat-juli.jar
Using Security Manager
Tomcat started.
[root@geekflare bin]#
Enable SSL/TLS
Serving web requests over HTTPS is essential to protect data between client and Tomcat. In order to make your web application accessible through HTTPS, you need to implement SSL certificate.
Assuming, you already have keystore ready with the certificate, you can add below line in server.xml file under Connector port section.
SSLEnabled="true" scheme="https" keystoreFile="ssl/bloggerflare.jks" keystorePass="chandan" clientAuth="false" sslProtocol="TLS"Change the Keystore file name and password with yours.
If you need help with the keystore & CSR process, then refer to this guide.
Enforce HTTPS
This is only applicable when you’ve SSL enabled. If not, it will break the application.
Once you’ve enabled SSL, it would be good to force redirect all HTTP requests to HTTPS for secure communication between user to Tomcat application server.
- Go to $tomcat/conf folder
- Modify
web.xmlby usingvi - Add following before
</web-app>syntax
<security-constraint>
<web-resource-collection>
<web-resource-name>Protected Context</web-resource-name>
<url-pattern>/*</url-pattern>
</web-resource-collection>
<user-data-constraint>
<transport-guarantee>CONFIDENTIAL</transport-guarantee>
</user-data-constraint>
</security-constraint>- Save the file and restart the Tomcat
It is possible to steal or manipulate web application session and cookies without having a secure cookie. It’s a flag which is injected in the response header.
This is done by adding below the line in session-config section of the web.xml file
<cookie-config>
<http-only>true</http-only>
<secure>true</secure>
</cookie-config>
Configuration screenshot:

Save the file and restart Tomcat to examine the HTTP response header.
Run Tomcat from non-privileged Account
It’s good to use a separate non-privileged user for Tomcat. The idea here is to protect other services running in case of any of account get compromised.
- Create a UNIX user, let’s say tomcat
useradd tomcat- Stop the Tomcat if running
- Change $tomcat ownership to user tomcat
chown -R tomcat:tomcat tomcat/Start the Tomcat and ensure it’s running with tomcat user
Remove default/unwanted Applications
By default, Tomcat comes with following web applications, which may or not be required in a production environment.
You can delete them to keep it clean and avoid any known security risk with Tomcat default application.
- ROOT – Default welcome page
- Docs – Tomcat documentation
- Examples – JSP and servlets for demonstration
- Manager, host-manager – Tomcat administration
They are available under $tomcat/webapps folder
[root@geekflare webapps]# ls -lt
drwxr-xr-x 14 tomcat tomcat 4096 Sep 29 15:26 docs
drwxr-xr-x 7 tomcat tomcat 4096 Sep 29 15:26 examples
drwxr-xr-x 5 tomcat tomcat 4096 Sep 29 15:26 host-manager
drwxr-xr-x 5 tomcat tomcat 4096 Sep 29 15:26 manager
drwxr-xr-x 3 tomcat tomcat 4096 Sep 29 15:26 ROOT
[root@geekflare webapps]#
Change SHUTDOWN port and Command
By default, tomcat is configured to be shutdown on 8005 port.
Do you know you can shutdown tomcat instance by doing a telnet to IP: port and issuing SHUTDOWN command?
Chandans # telnet localhost 8005
Trying ::1... telnet:
connect to address ::1:
Connection refused Trying 127.0.0.1...
Connected to localhost.
Escape character is '^]'.
SHUTDOWN Connection closed by foreign host.
Chandans #
Dangerous!
You see, having default configuration leads to high-security risk.
It’s recommended to change tomcat shutdown port and default command to something unpredictable.
- Modify the following in server.xml
<Server port="8005" shutdown="SHUTDOWN">8005 – Change to some other unused port
SHUTDOWN – Change to something complicated
Ex-
<Server port="8867" shutdown="NOTGONNAGUESS">Replace default 404, 403, 500 page
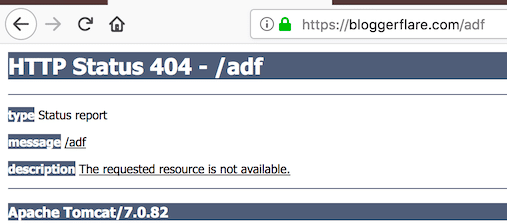
Having default page for not found, forbidden, server error exposes version details.
Let’s look at the default 404 page.

To mitigate, you can first create a general error page and configure web.xml to redirect to a general error page.
- Go to $tomcat/webapps/$application
- Create an error.jsp file using
vieditor
<html>
<head>
<title>Error Page</title>
</head>
<body> That's an error! </body>
</html>
- Go to $tomcat/conf folder
- Add the following in the web.xml file. Ensure you add before
</web-app>syntax
<error-page>
<error-code>404</error-code>
<location>/error.jsp</location>
</error-page>
<error-page>
<error-code>403</error-code>
<location>/error.jsp</location>
</error-page>
<error-page>
<error-code>500</error-code>
<location>/error.jsp</location>
</error-page>
- Restart tomcat server to test it

Much better!
You can do this for java.lang.Exception as well. This will help in not exposing tomcat version information if any java lang exception.
Just add following in web.xml and restart tomcat server.
<error-page>
<exception-type>java.lang.Exception</exception-type>
<location>/error.jsp</location>
</error-page>
I hope the above guide gives you an idea of securing Tomcat. If you are looking to learn more about Tomcat administration, then check out this online course.

