Windows computers are reliable but can still run into errors that disrupt your workflow and slow down your system. These errors often display as codes, each pointing to a specific problem in the Windows system.
Some common Windows error codes, such as 0x8007045d, 0xc0000005, 0x800f0922, and 0x8004010f, may arise due to hardware malfunctions, corrupted files, software conflicts, or misconfigured settings.
In this guide, we’ll explain why they occur and how to fix them. By following these simple ways, you can quickly solve these Windows error codes and keep your Windows system running well.
- How to Fix 0x8004010F Error
- How to Fix 0x80004005 Error
- How to Fix 0x800F0922 Error
- How to Fix 0xc0000005 Error
How to Fix 0x8004010F Error
Error code 0x8004010F is an Outlook error that occurs when there is a problem with your Outlook profile or Outlook data file (OST or PST). This error can disrupt email functionality, preventing you from sending or receiving messages, and may lead to missing or corrupted emails.
We have explained 5 working ways to fix error code 0x8004010F. Try them out, and find which one works for you.
#1. Locate The Outlook Data File
Before troubleshooting error code 0x8004010F, it’s crucial to identify the default data file location in MS Outlook. Without this step, other fixes may not work effectively. Follow these steps to locate it:
Step 1. Go to Start and search Control Panel.
Step 2. Under Adjust your Computer Settings, choose User Account.
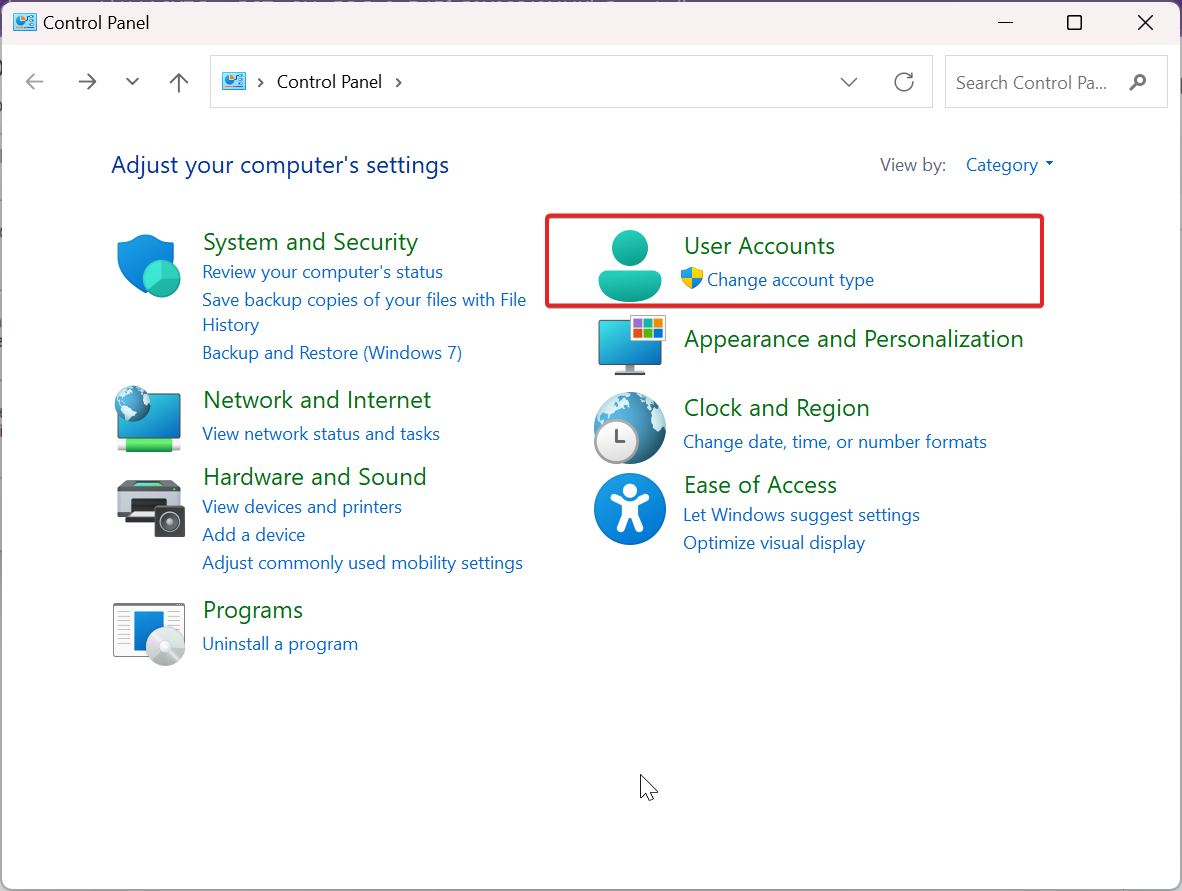
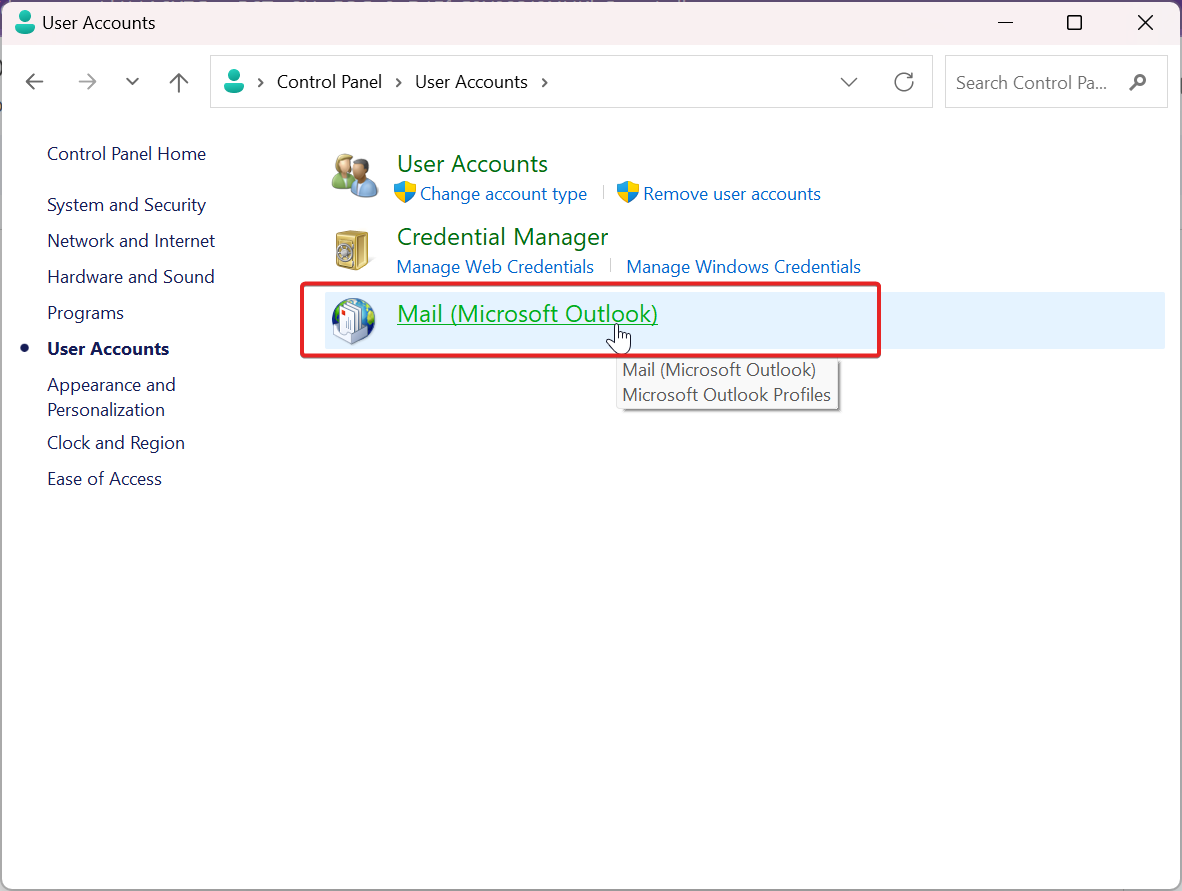
Step 3. Choose Mail (Microsoft Outlook).
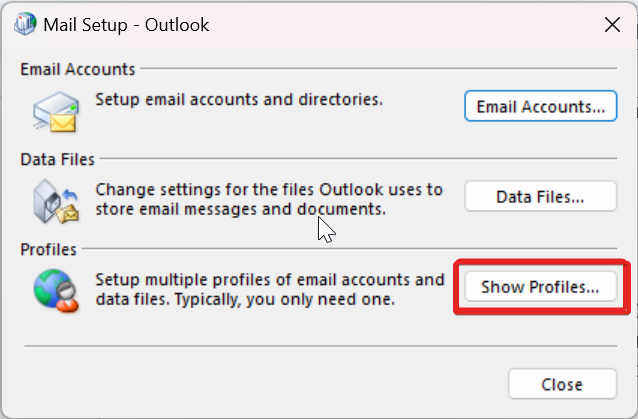
Step 4. Under Mail Setup, click on Show Profiles.
Step 5. Under the Mail window, choose Properties.

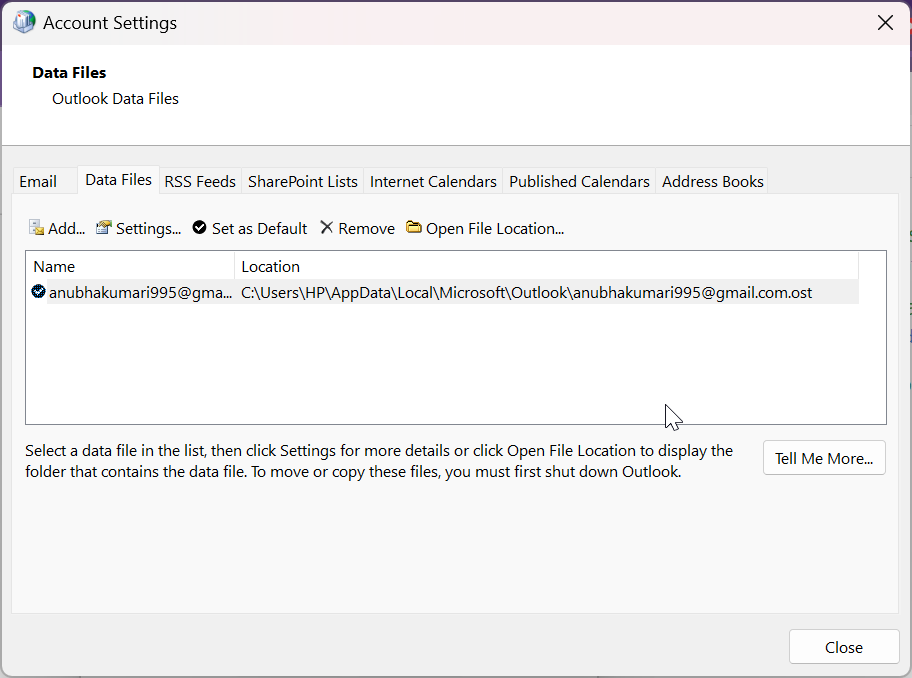
Step 6. Now, under the Mail setup-Outlook, click on Data Files and note down your Outlook Profile name and the location.
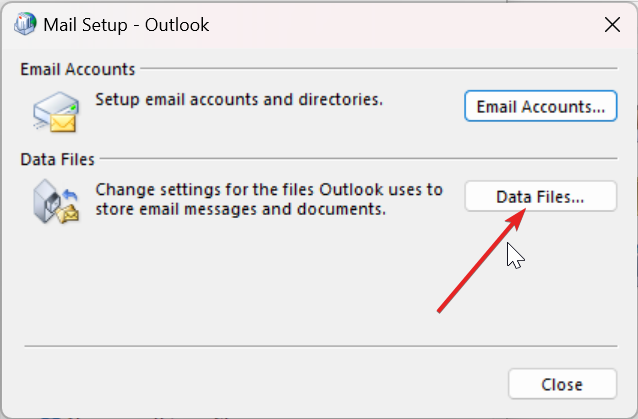
Step 7. Make sure the box is check marked, and then click Close.
#2. Auto-setup Method (IMAP/POP3)
The auto-setup method is a way to set up an email account in Outlook by automatically detecting the settings for the account. This method is supported for IMAP and POP3 accounts. To do so, follow the below steps.
Step 1. Go to Start and search Control Panel.
Step 2. Under Adjust your Computer Settings, choose User Account.

Step 3. Choose Mail (Microsoft Outlook).
Step 4. Under Mail Setup, click on Show Profiles.

Step 5. Click on Add to create your new Outlook Profile.

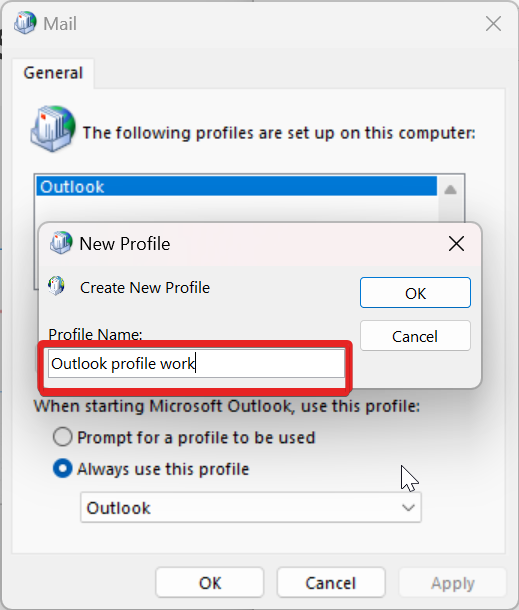
Step 6. Under New Profile, write your Profile Name and Click ok.
Step 7. Under the Add Account window, Enter the following details and click Next.
- Your Name
- Your Email Adress
- Password
- Re-type password

Manual Method (IMAP/POP3):
If the automatic method fails, you can manually create an Outlook profile. This approach involves manually entering email settings and is compatible with IMAP and POP3 accounts. While more complex than auto-setup, it offers greater control, allowing you to configure server port numbers, authentication types, and default folders for incoming messages.
Step 1. Go to Start and search Control Panel.
Step 2. Under Adjust your Computer Settings, choose User Account.

Step 3. Choose Mail (Microsoft Outlook).

Step 4. Under Mail Setup, click on Show Profiles.

Step 5. Click on Add to create your new Outlook Profile.

Step 6. Under New Profile, write your Profile Name and Click ok.
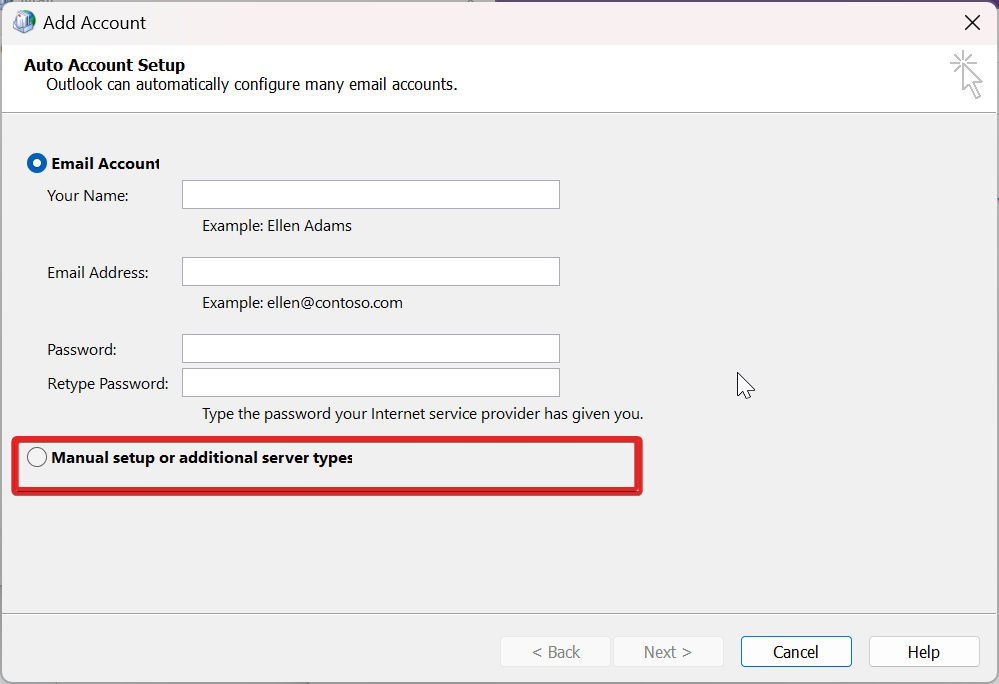
Step 7. Under Add Account window, choose Manual setup or additional server types and click Next.
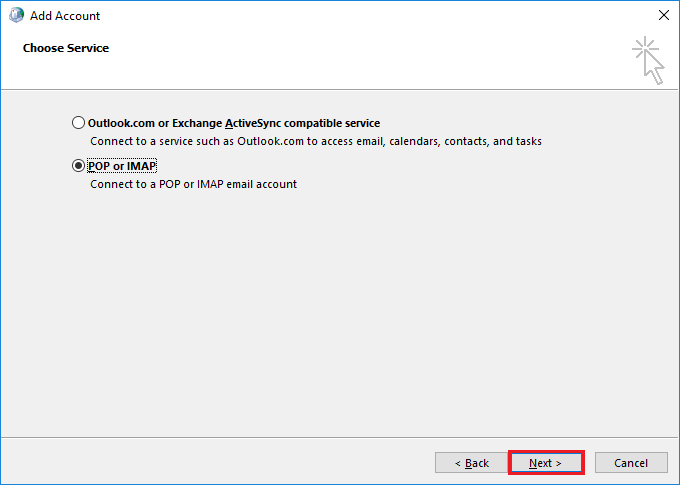
Step 8. Under Choose Service, select POP or IMAP to connect to a POP or IMAP account, and click Next.
Step 9. Under POP and IMAP Account Settings, put your account details, and under Deliver messages, select Existing Outlook Data File.
Step 10. Now Click Browse to select the Outlook data file of your previous account, click OK and click Next.

Step 11. In the Test Account Settings Window, click Close and then Finish.
#3. Set The New Outlook Profile as a Default
Setting a new Outlook profile as the default can surely evict the error code 0x8004010F for Microsoft Outlook. When a new account is created, the default settings are eventually reset to configure the profile, including the Settings and the data file. Here’s how to make the newly created Outlook profile the default one.
Step 1. Go to Start and search Control Panel.
Step 2. Under Adjust your Computer Settings, choose User Account.
Step 3. Under the Mail Set-up window, choose Show Profiles.
Step 4. Choose Properties under the Mail window.
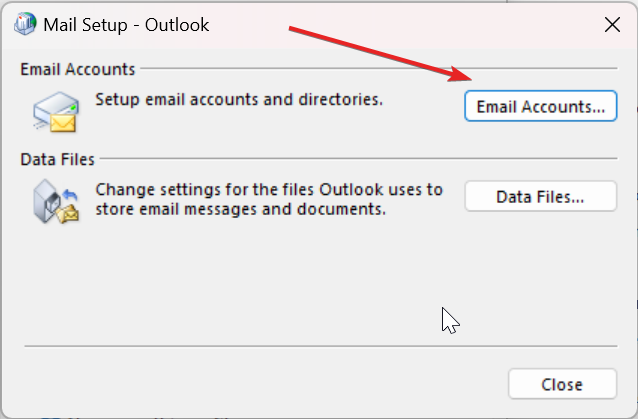
Step 5. Choose Email Accounts Under the Mail Setup window.
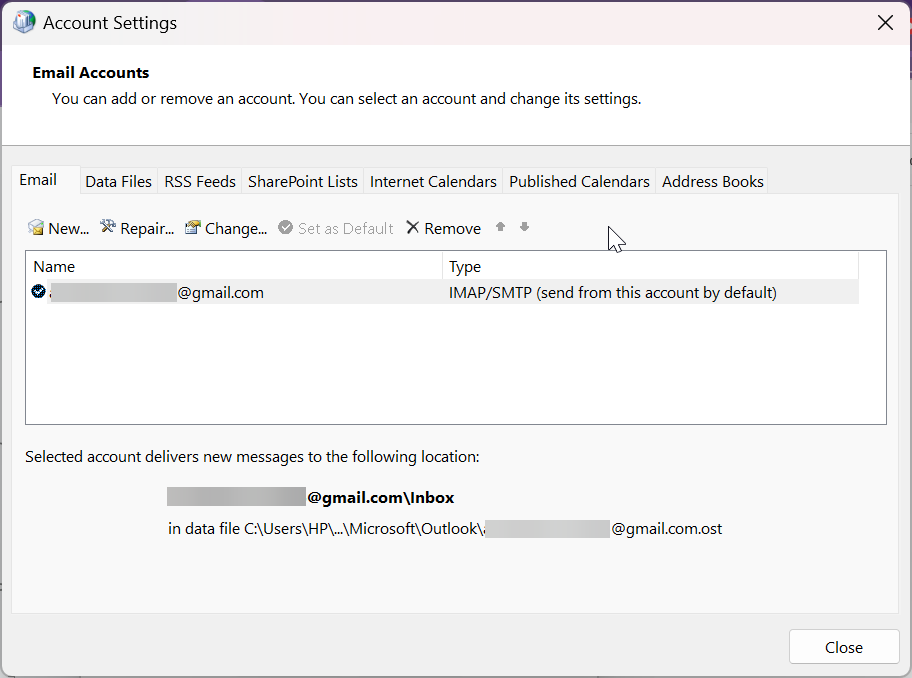
Step 6. In the Account Settings window, navigate to Data File and click Set as Default, and click Close.
#4. Disable Active Antivirus Software
To partially address the error code 0x8004010F, consider temporarily disabling any antivirus software running in the background. Such software often disrupts the operations of Microsoft Outlook and may incorrectly flag essential data files as threats.
Consequently, this interference negatively impacts the server environment and restricts access and synchronization between the data files. Therefore, temporarily disabling your antivirus software might resolve the error code. Please verify if this solution resolves the issue.
#5. Disable Windows Defender Firewalls
To address Outlook error code 0x8004010F, which may be caused by Windows Defender Firewall blocking network access, follow these steps to disable the firewall temporarily:
Open Windows Defender Firewall Settings:
- Press the
Windows + Skeys simultaneously to open the search bar. - Type
firewallinto the search box. - Select Windows Defender Firewall from the search results.
Disable Windows Defender Firewall:
- In the Windows Defender Firewall window, click on Turn Windows Defender Firewall on or off located on the left sidebar.
- Under both Private network settings and Public network settings, select Turn off Windows Defender Firewall.
- Click OK to apply the changes.
After completing these steps, restart Outlook to determine if the error is resolved. If Outlook functions correctly without the firewall, consider adjusting the firewall settings to allow Outlook access rather than keeping the firewall disabled, as turning off the firewall can expose your system to security risks.
How to Fix 0x80004005 Error
Error code 0x80004005 is a common issue in Windows 10 and 11, often resulting from various factors such as Windows Update complications, corrupted system files, or incompatible drivers. To resolve this error, consider the following troubleshooting methods:
#1. Restart Your System
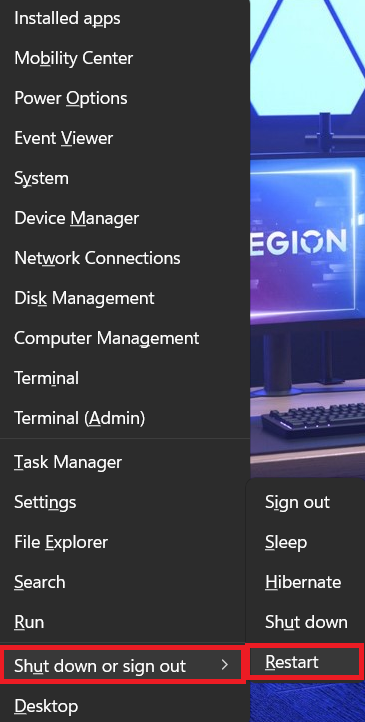
Encountering error code 0x8007045d on your Windows system can be addressed by restarting your computer. This simple action often resolves minor glitches and errors. To restart your system:
- Press the Windows key + X.
- Select Shut down or sign out.
- Click Restart.
If the error persists after restarting, consider running the System File Checker (SFC) tool to scan for and repair corrupted system files. For detailed instructions on using SFC, refer to Microsoft’s official guide.
#2. Update Windows to The Latest Version
To resolve the error 0x80004005 in Windows 10/11, updating your Windows operating system to the latest version can be an effective solution. Windows updates often include bug fixes and security patches that can address various system issues, including error codes 0x80004005. To update Windows your Windows computer, follow the below steps:
Step 1. Press Windows + I to open Settings.
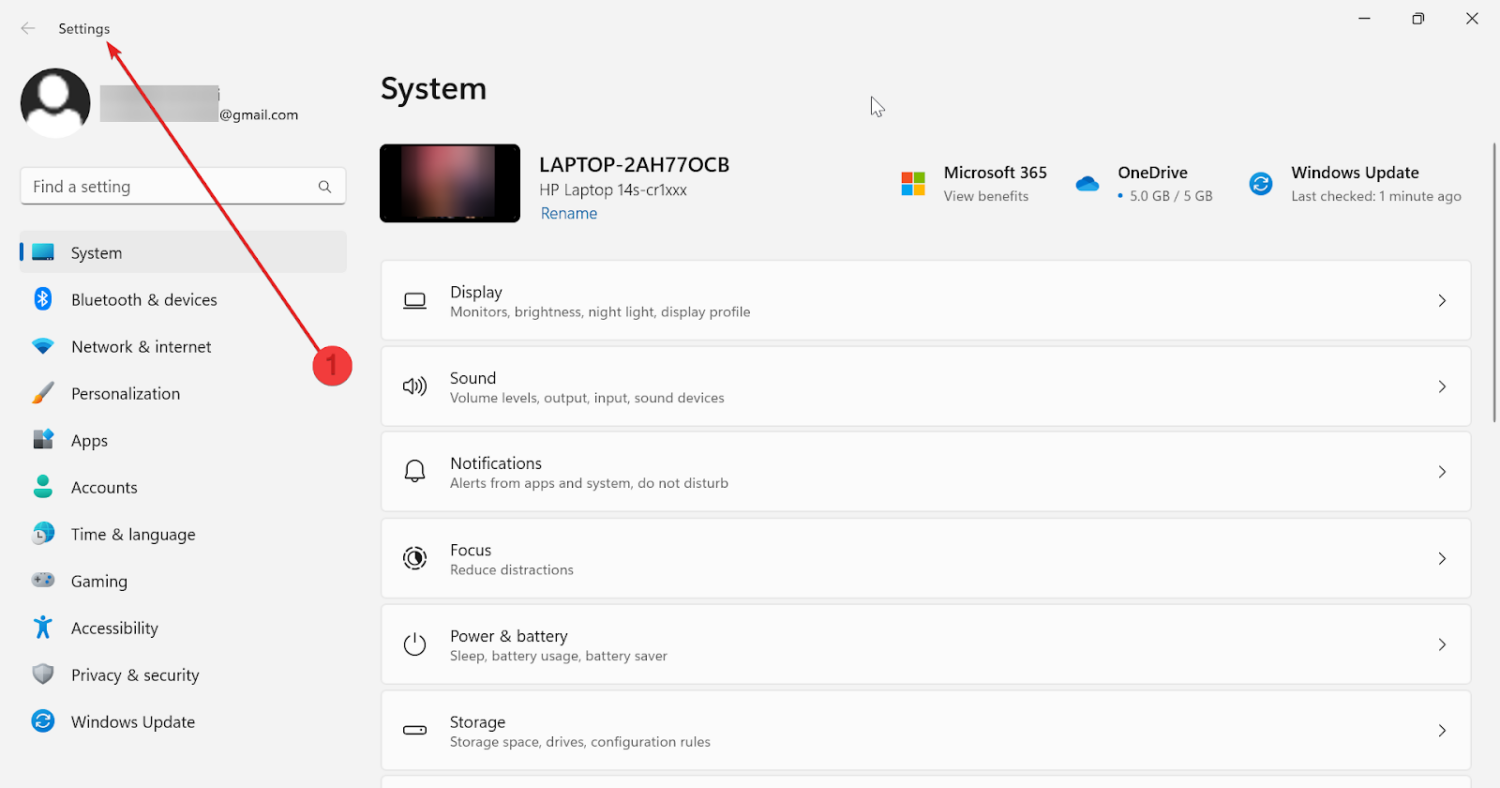
Step 2. Navigate to Windows Update.
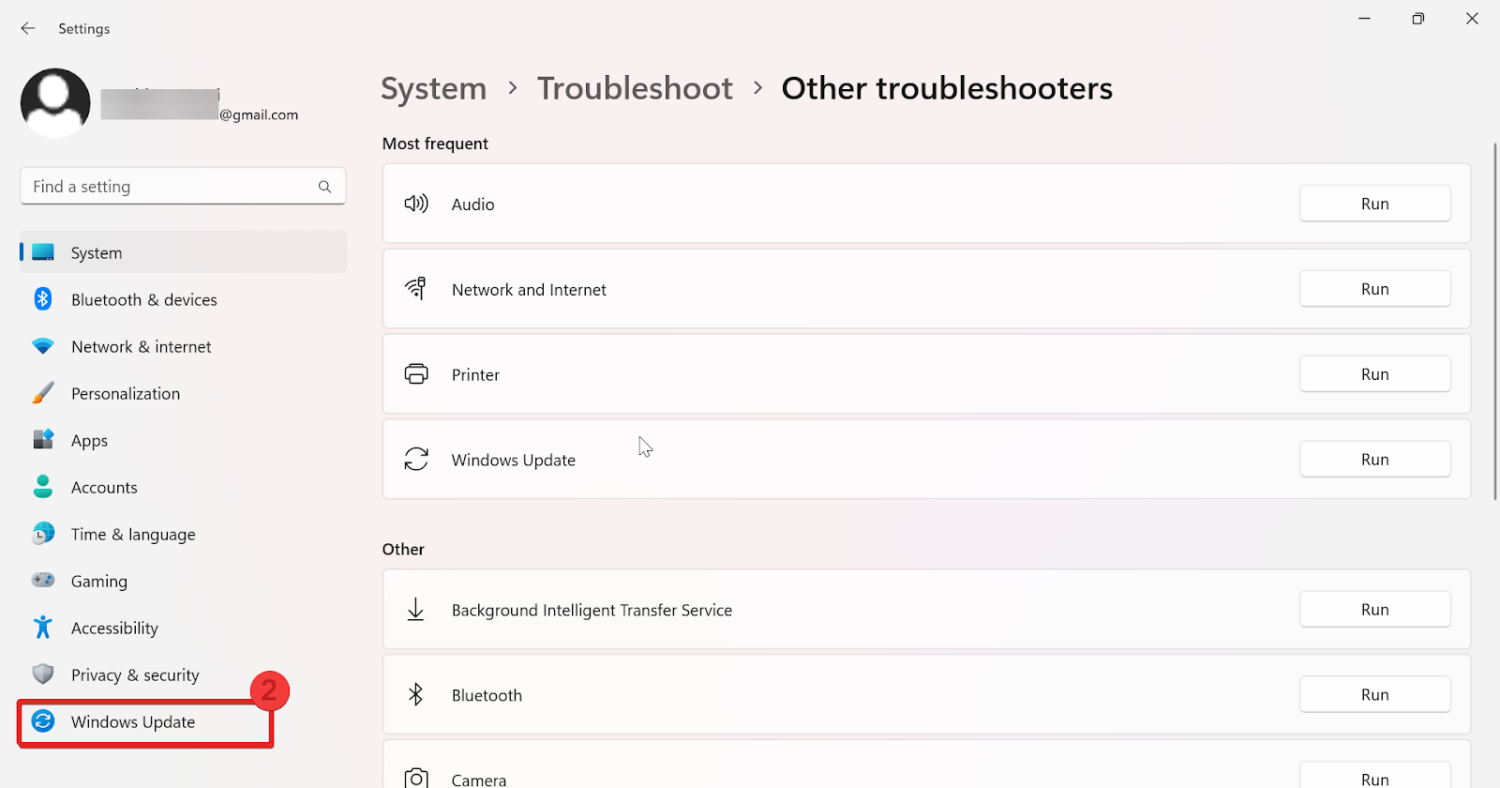
Step 3. Click Check for updates in the right corner. This will enable the system to start searching for any available updates for your window.
Step 4. Click on Download & Install to start the installation if updates are detected. It may prompt you to restart your system for installation.
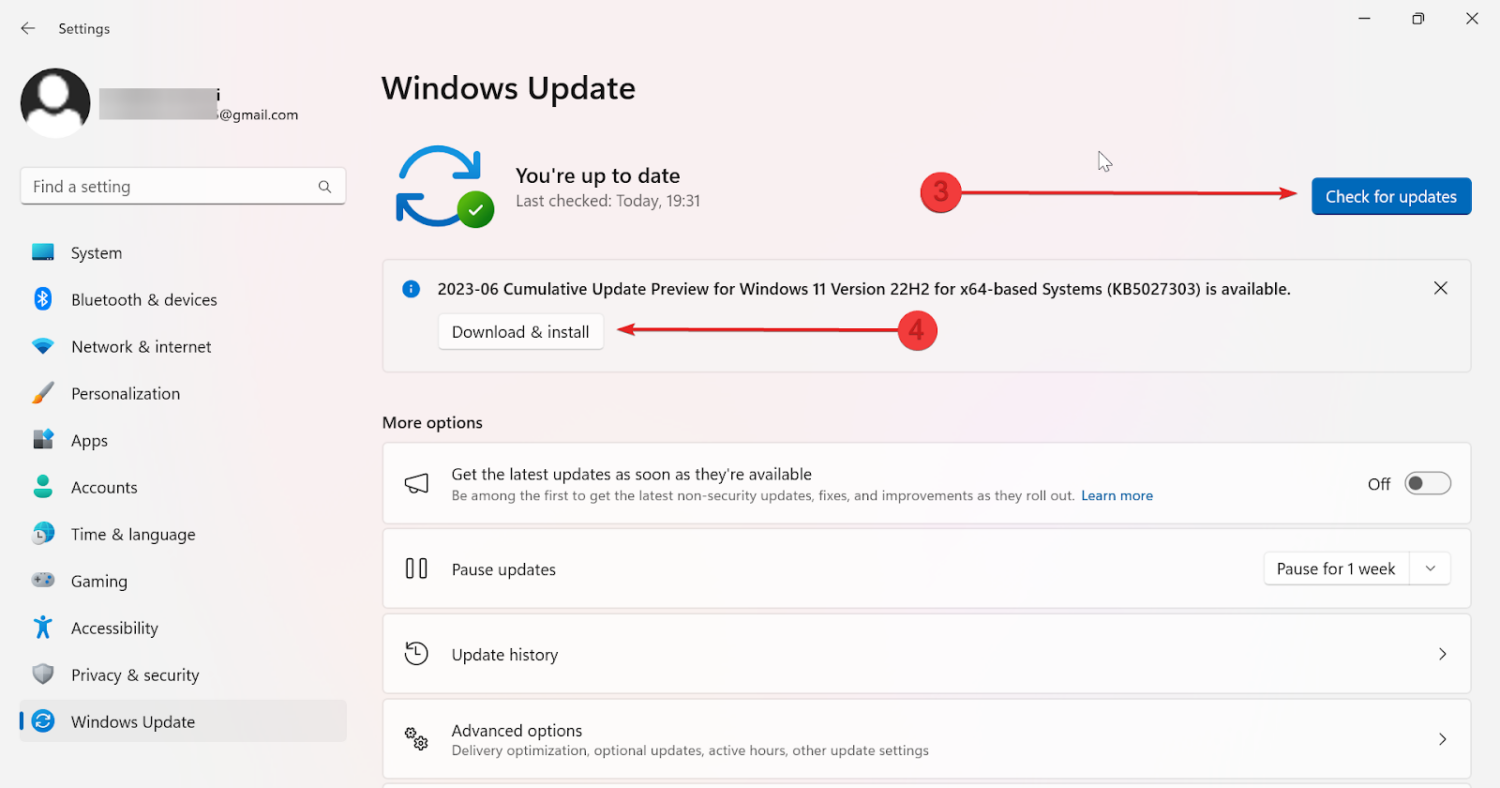
Windows will download and install important updates and security fixes in the background. If you want the system to install all the detected updates on its own automatically, then you can enable it from the Settings menu.
#3. Run Check Disk Scan
Error 0x80004005 is a Windows error code that can occur when there are problems with the file system on your hard drive. One way to fix this error is to run a check disk scan.
Check disk (CHKDSK) is a Windows utility that can scan your hard drive for errors and fix them. Follow the below steps to run a check disk scan.
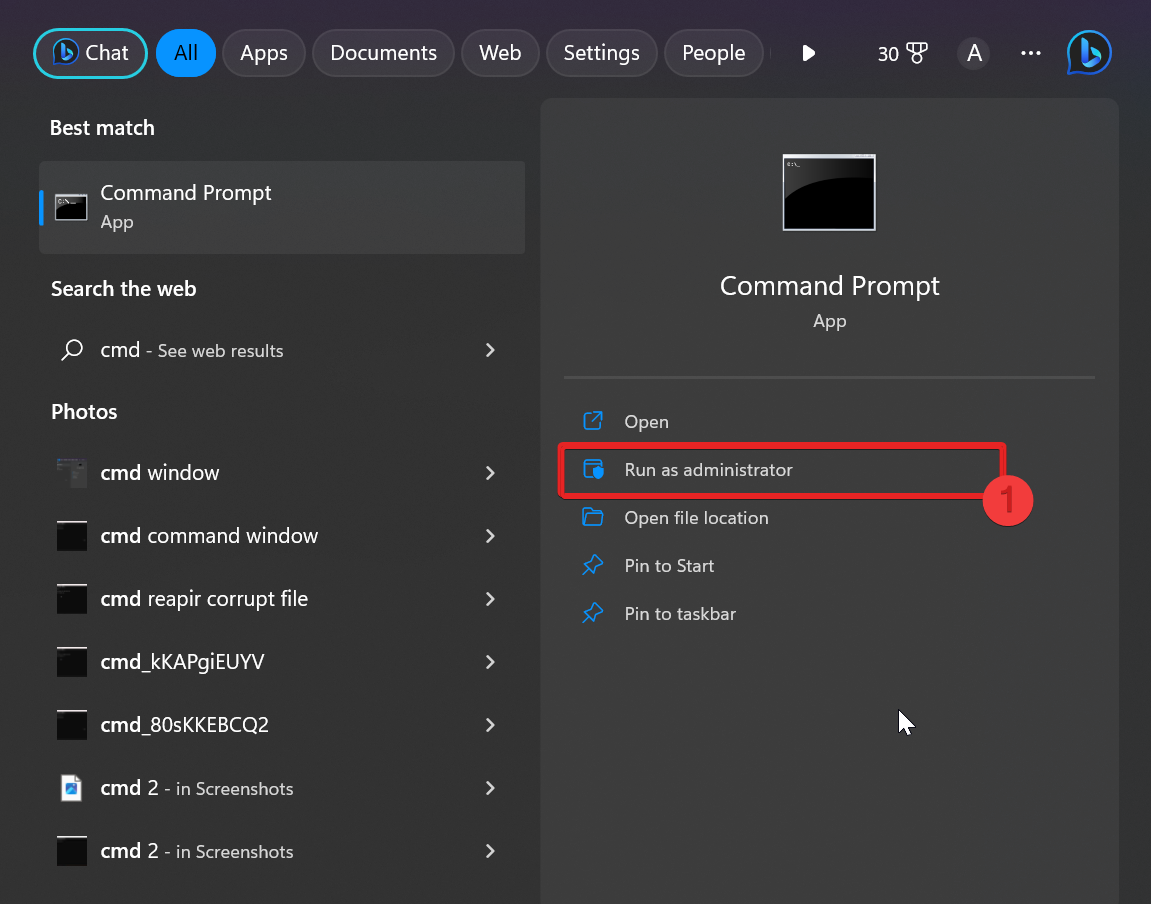
Step 1. Search cmd in the Search bar, and click on Run as Administrator.
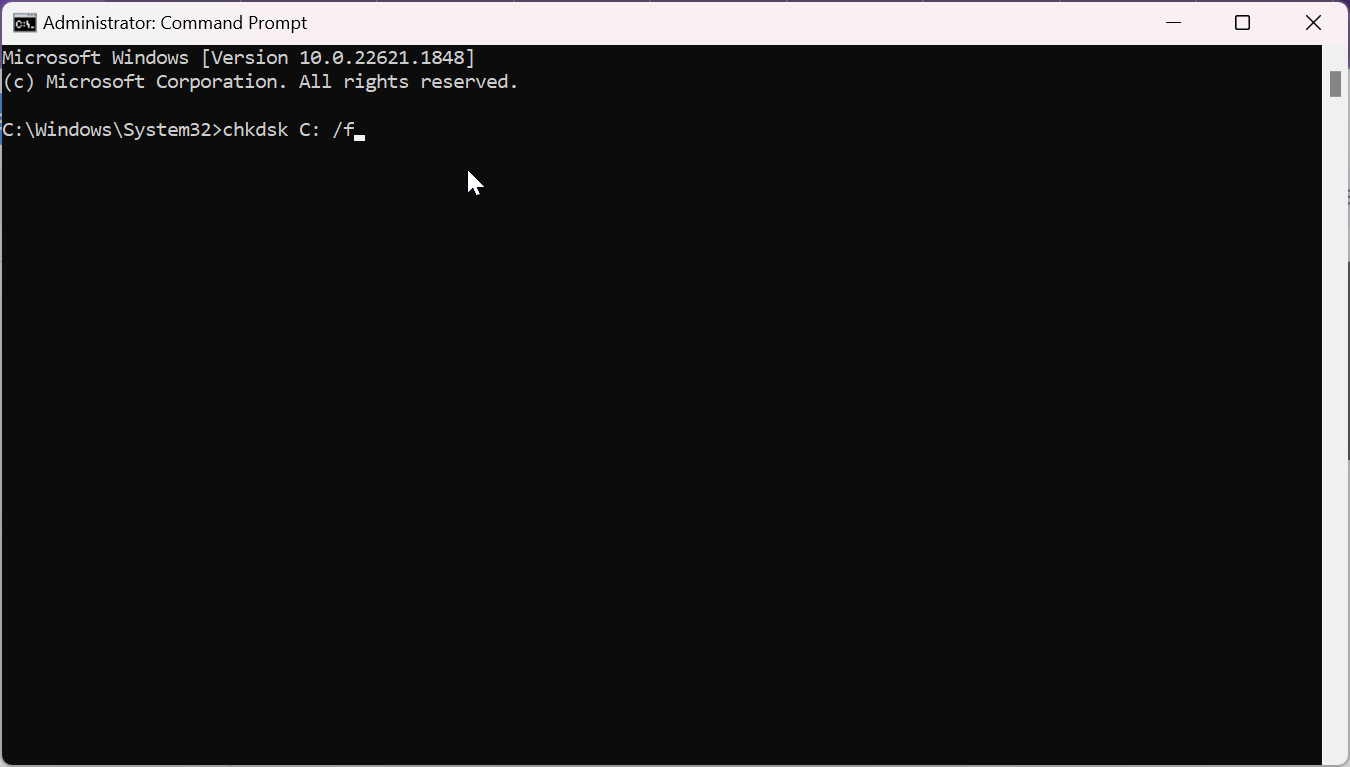
Step 2. Type the chkdsk C: /f command in the cmd window and hit Enter.
Step 3. Press Y to run a disk check after you restart the PC, and it will be checked before the window loads.
Step 4. Repeat the same steps to run the disk check of all drives.
Step 5. When the scan is complete, your system will restart normally, and you can log in to your Windows.
The chkdsk scan checks the specified drive for issues and attempts to repair any problems it discovers. It will maintain the file system’s integrity and can aid in resolving disk-related issues.
#4. Deactivate Antivirus/Firewalls
As stated earlier, Antivirus and firewall protection could cause the error 0x8007045d. While trying to read or write data, it may prevent data processing, and thus, you must deactivate these programs before performing any data transfer activity on your Windows. Follow the below steps to do so.
Step 1. Go to start, and type Windows Security.
Step 2. Select Firewall and network protection under security at a glance.
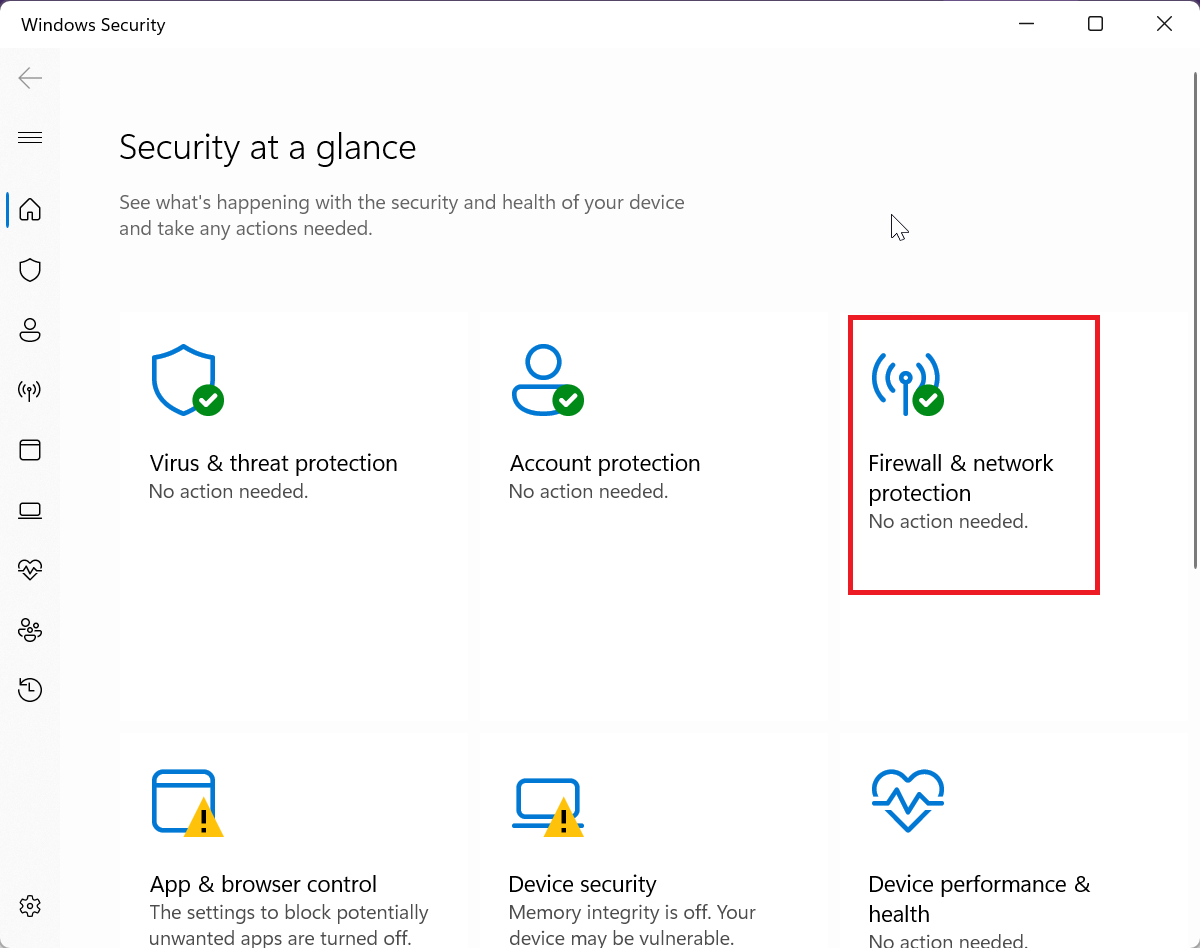
Step 3. Select Private Network or Public Network to disable it.

Step 4. Under Private/ Public Network, switch off the toggle for the Microsoft Defender Firewall.
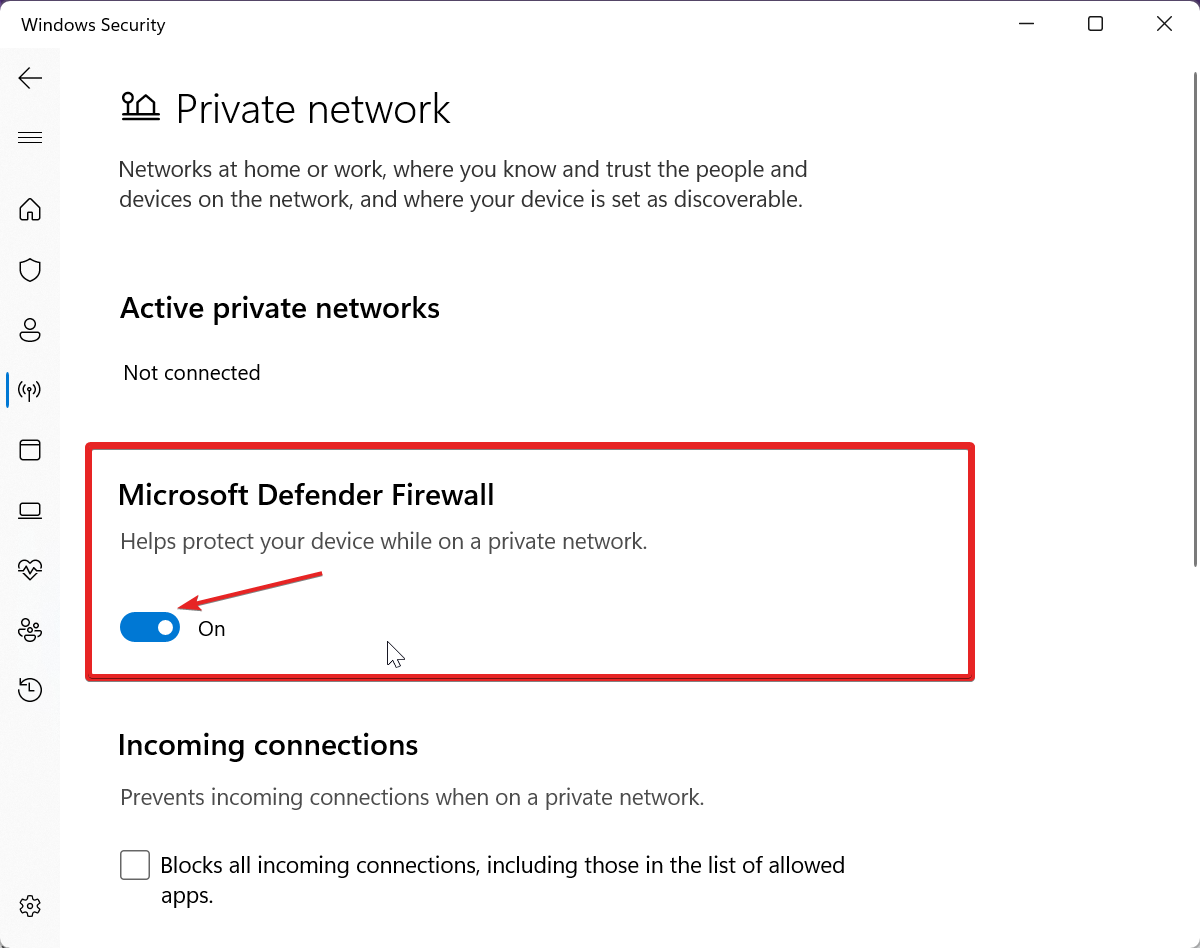
Step 5. Lastly, restart your window to see if this fixes the issue.
#5. Repair Corrupted System Files
Sometimes, a faulty File system operation or registry flaws may cause the error code 0x8007045d on your Windows. For that reason, the corrupt system files need to be repaired.
Follow the instructions below to repair your corrupted system files and resolve the issue 0x8007054d.
Step 1. Search cmd in the Search bar, and click on Run as Administrator.

Step 2. Type the sfc /scannow command in the cmd window and hit Enter.
Step 3. The system file checker will now repair system files. Wait till SFC scanning is complete.
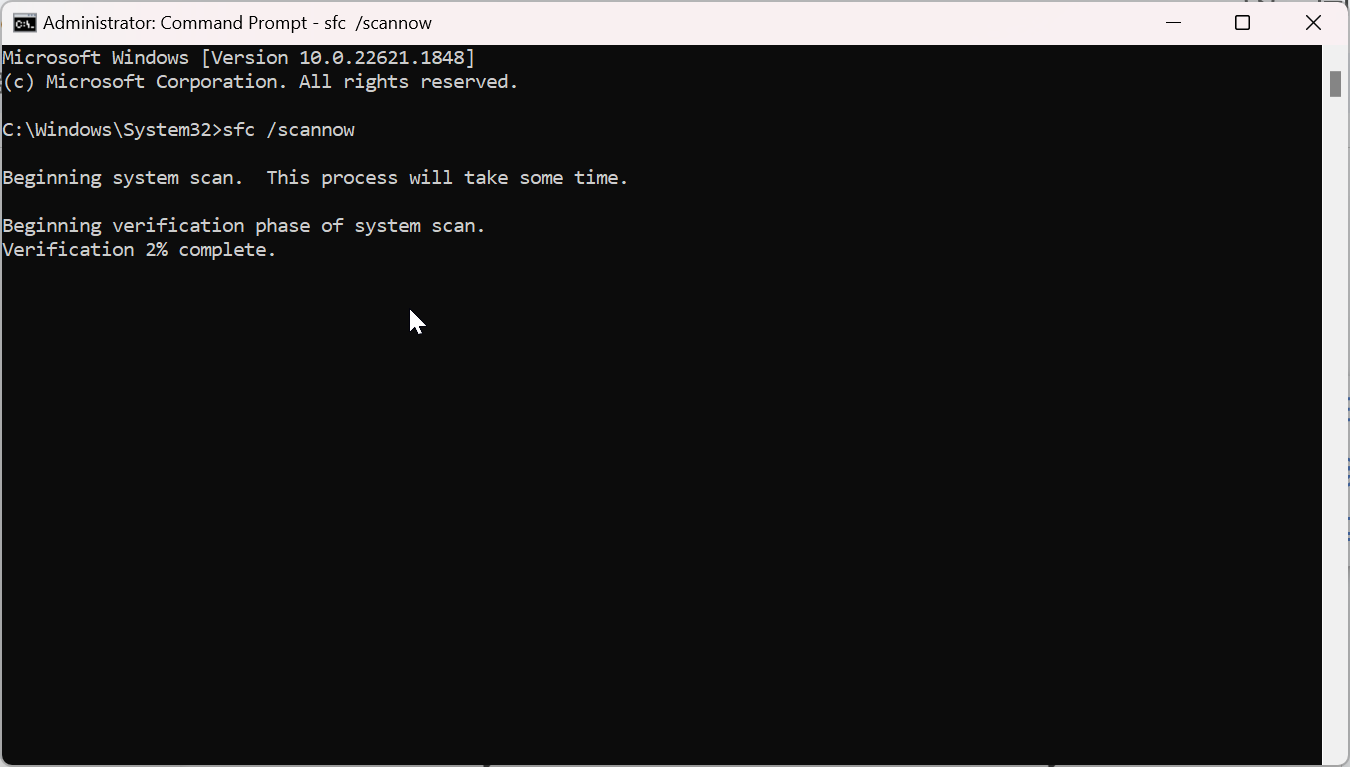
Step 4. Lastly, Restart your system once the verification is done.
#6. Run System Restore
If the error began after recent updates or installations, try performing a system restore to restore your computer’s settings to a previous working configuration. This may help get rid of this error 0x8007045d. Here’s how you do it.
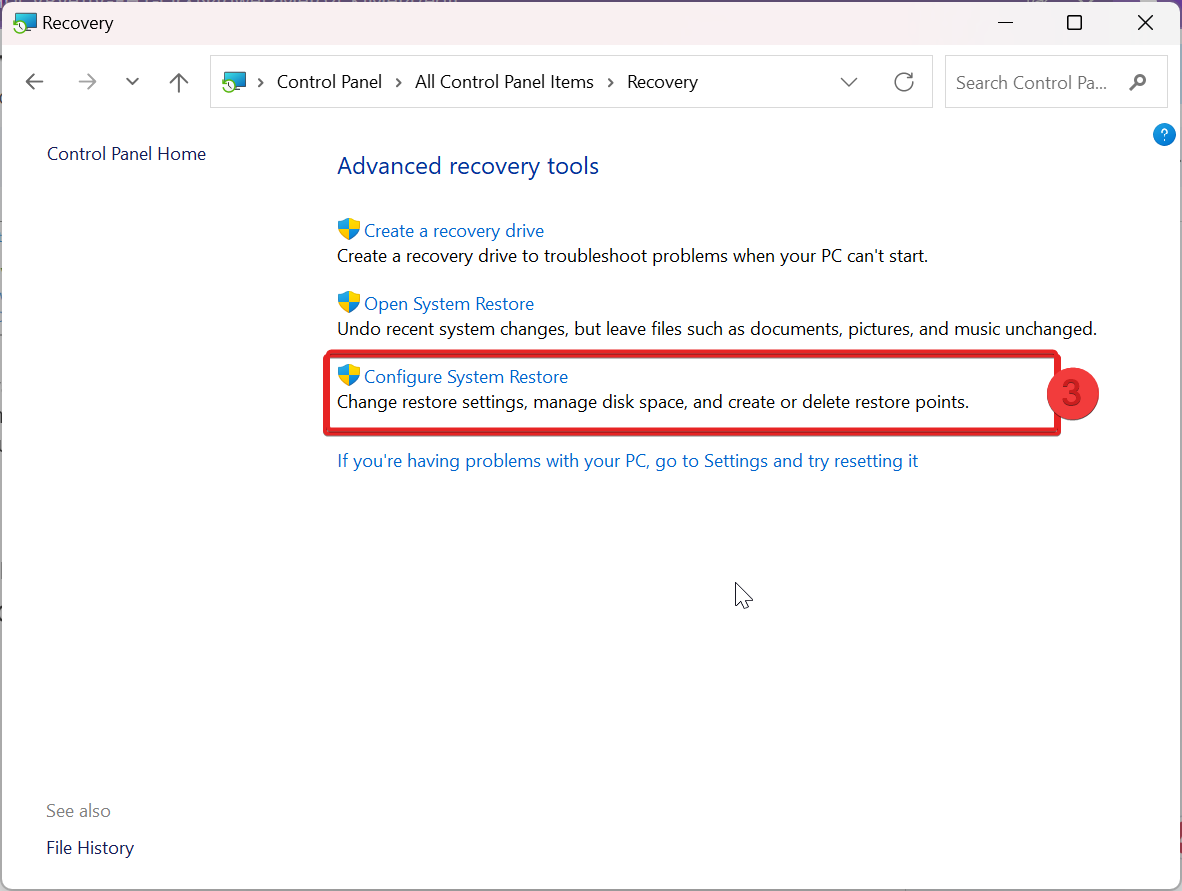
Step 1. Go to Start, type the control panel, and hit Enter.

Step 2. Type Recovery in the search bar and Choose Recovery.
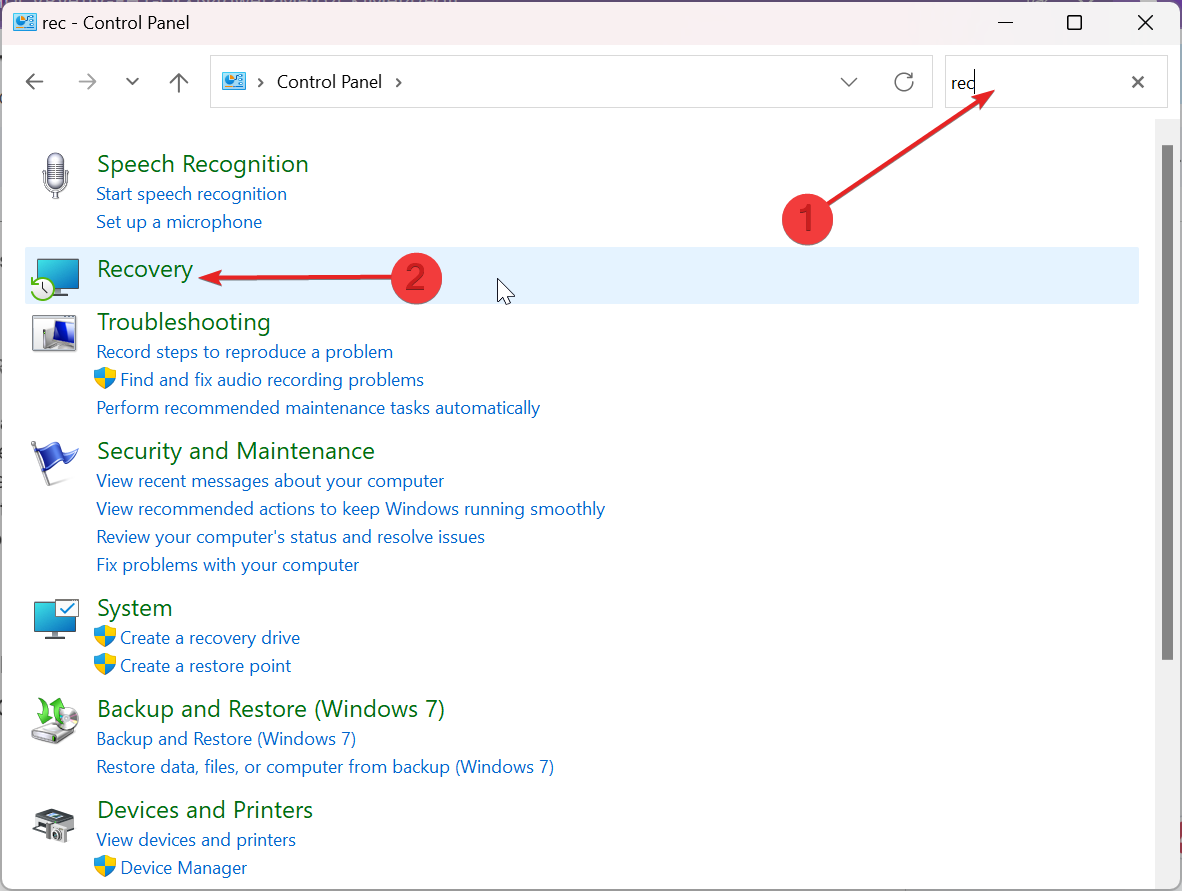
Step 3. Under Advanced Recover Tools, click on Configure System Restore.
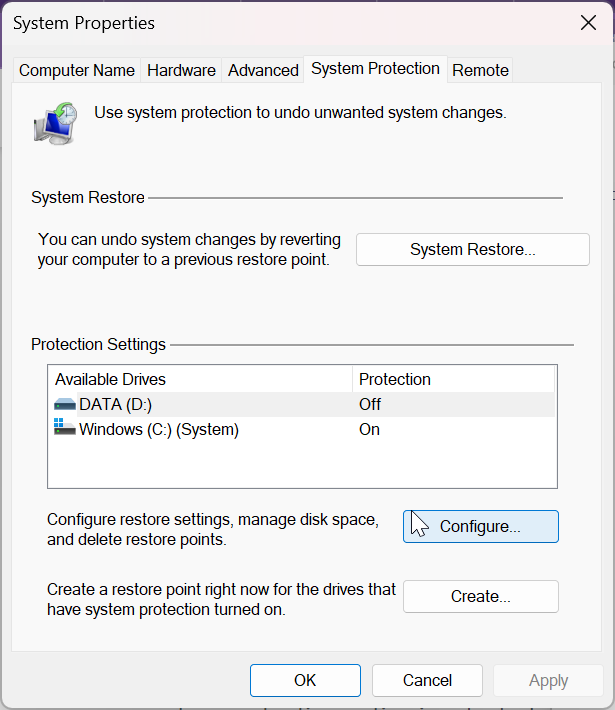
Step 4. The system Properties Window will appear. Click OK to Configure… your system and restart your Windows.
How to Fix 0x800F0922 Error
The 0x800F0922 error in Windows occurs during updates due to various issues, including insufficient space in the system-reserved partition (less than 500 MB), unstable networks, or lack of administrative privileges. Connectivity issues, .NET Framework installation errors, restrictive Group Policies, third-party software interference (like antivirus), and language pack problems are also common causes.
To resolve this, ensure enough partition space, disable interfering software, check network stability, and address policy restrictions or file corruptions. Follow the step-by-step solutions to resolve the issue and get your Windows updates working.
#1. Check Partition Size
One of the primary reasons for this error is the insufficient free space in the system reserved partition. To resolve it, check the size of your system’s reserved partition and ensure it has enough space to accommodate the Windows update. Here’s how you can check the partition size.
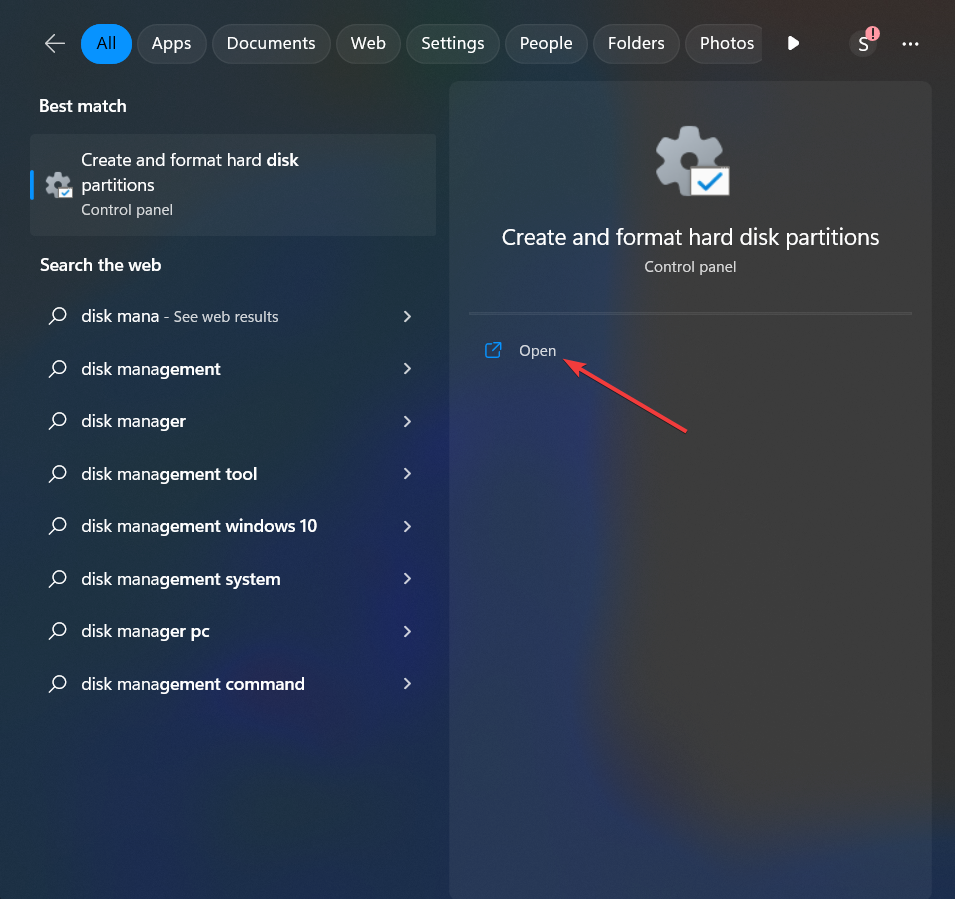
Step 1. Press the Windows key + S button and type Disk Management in the search box.
Step 2. Click Create and format hard disk partitions from the appearing options.
Step 3. Now, the Disk Management window will open.
Step 4. In the Free Space tab, check the amount of free space in every existing volume.
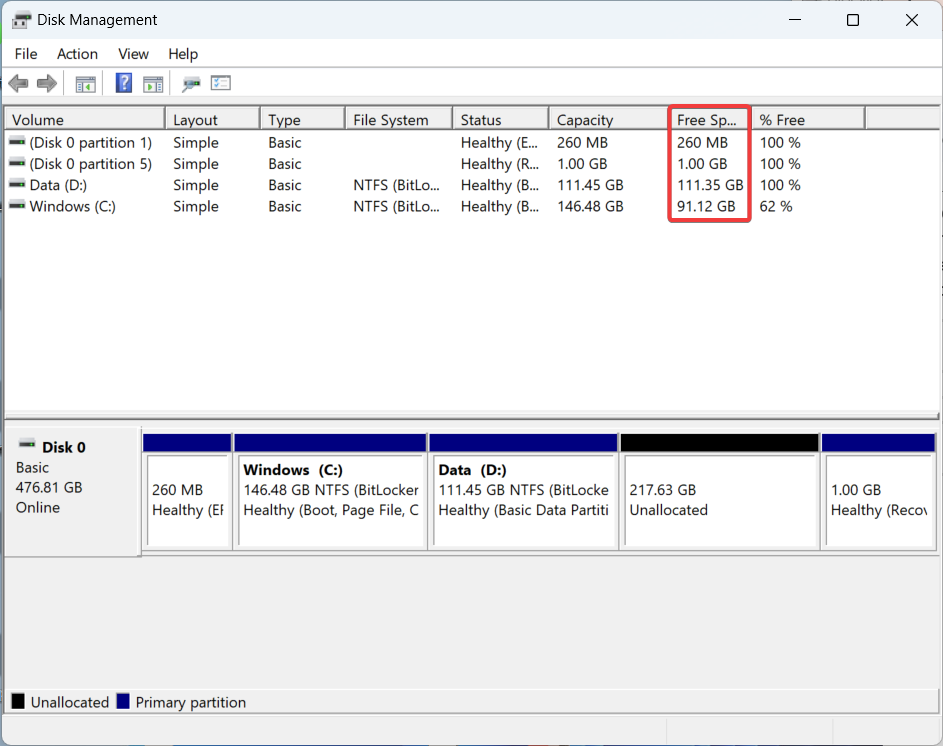
Step 5. If the system-reserved partition is indeed less than 500 MB, here’s what you can do:
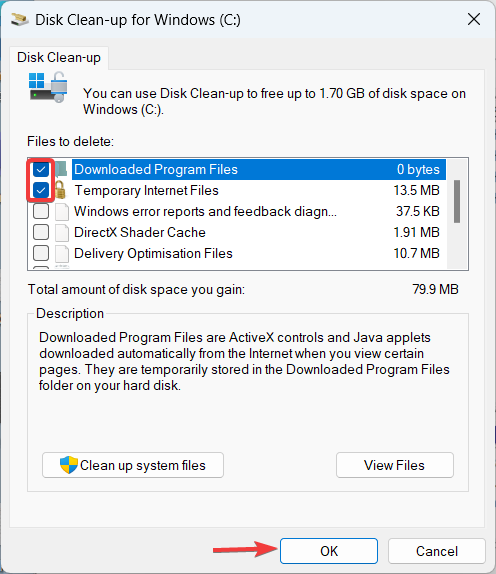
Perform Disk Clean-up
- Open Disk Clean-up from Windows search and select the Driver.
- Click OK to start the clean-up process.
- At the end of it, select your preferred files and folders and delete them.
Create Disk Space
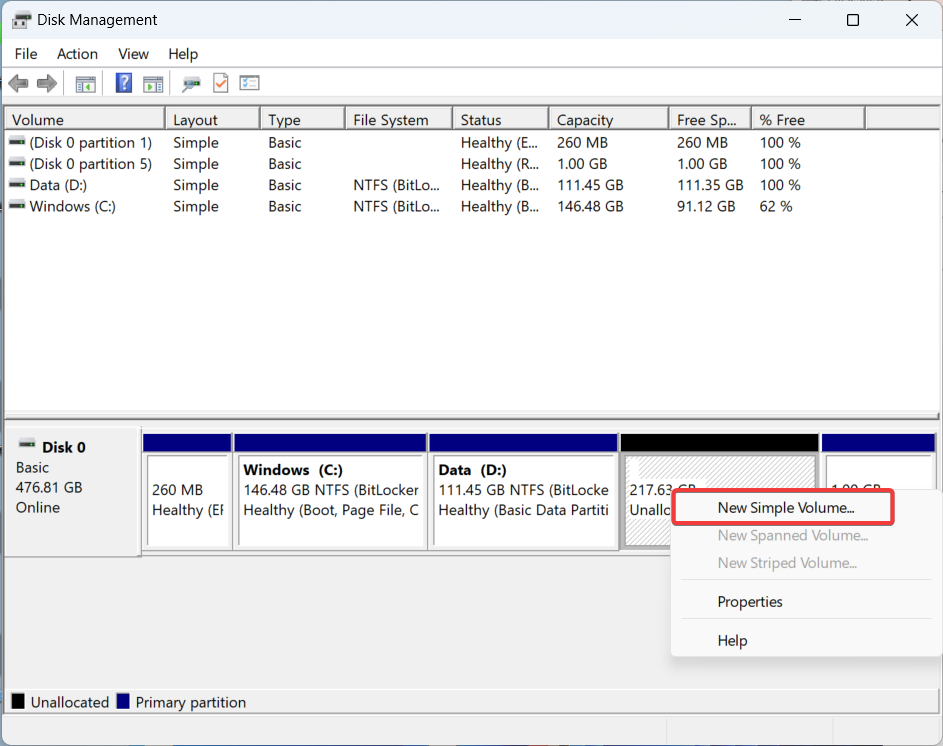
- In the Disk Management window, find the volume with unallocated disk space.
- Next, right-click on it and choose New Simple Volume.
- Now, the wizard will start. You have to follow the on-screen instructions, including allocating space and finishing the partition to use the unallocated disk space.
Step 6. Once done, try to install the Windows update again.
#3. Use an Administrator Account
Using an administrator account is crucial because certain update operations and changes to the system require elevated privileges. When you attempt to install updates or features without sufficient permissions, Windows may halt the process and trigger the 0x800F0922 error.
Switching to an administrator account or contacting your system administrator ensures you have the required rights to successfully carry out the update task. Follow the below steps for the same.
Step 1. Press the Windows logo key + I button to open the Settings app.
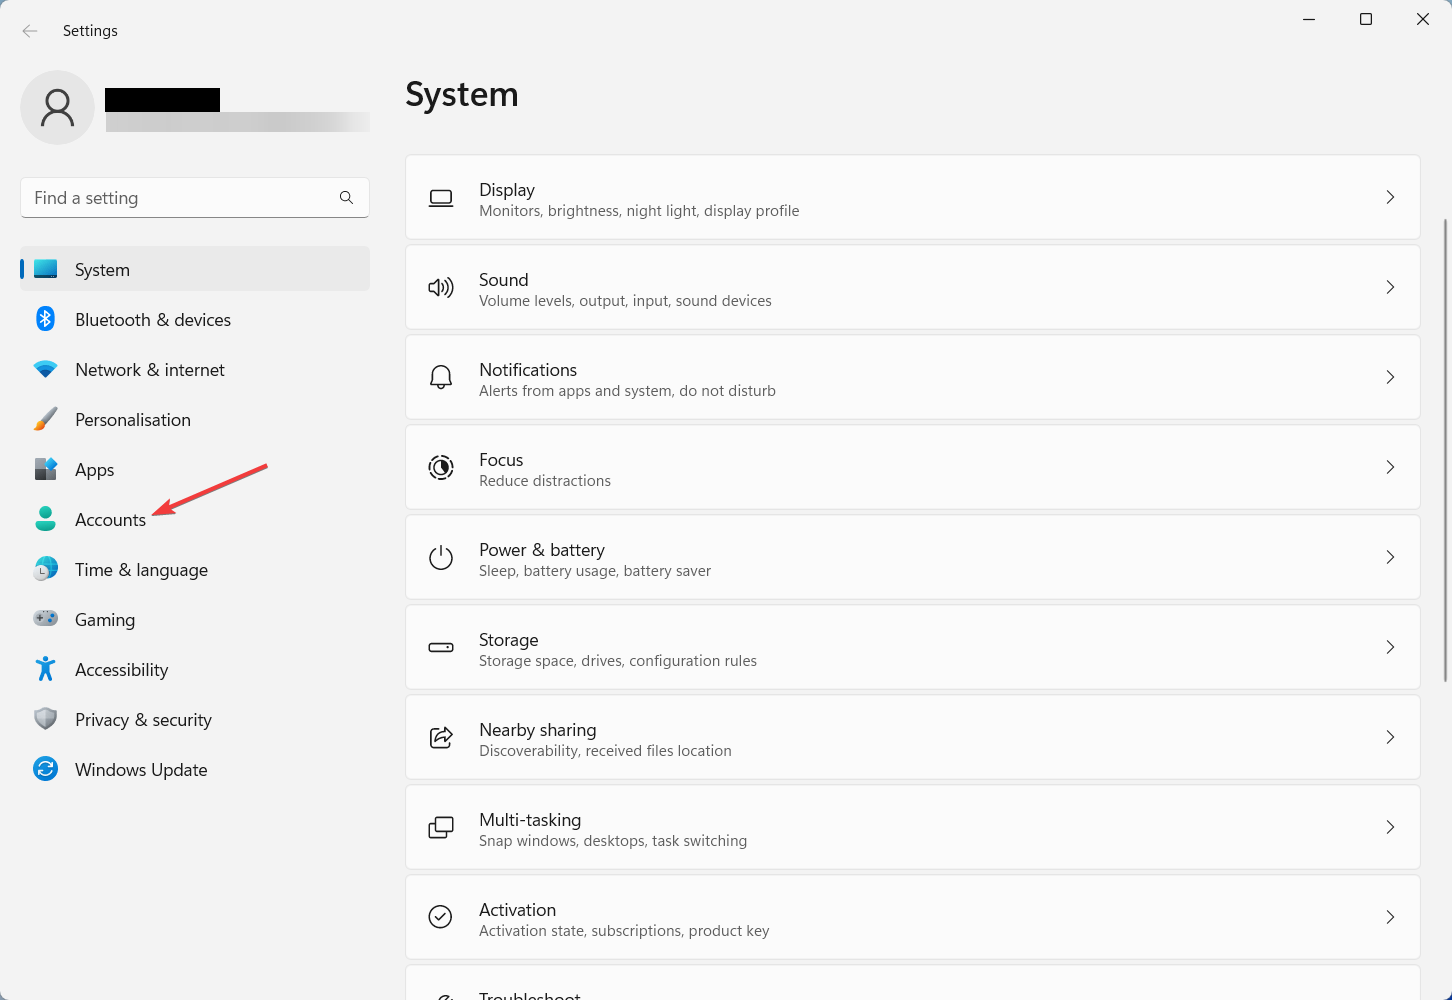
Step 2. In the Settings window, click on Accounts on the left sidebar.
Step 3. Now, choose Your info from the right-side tab.
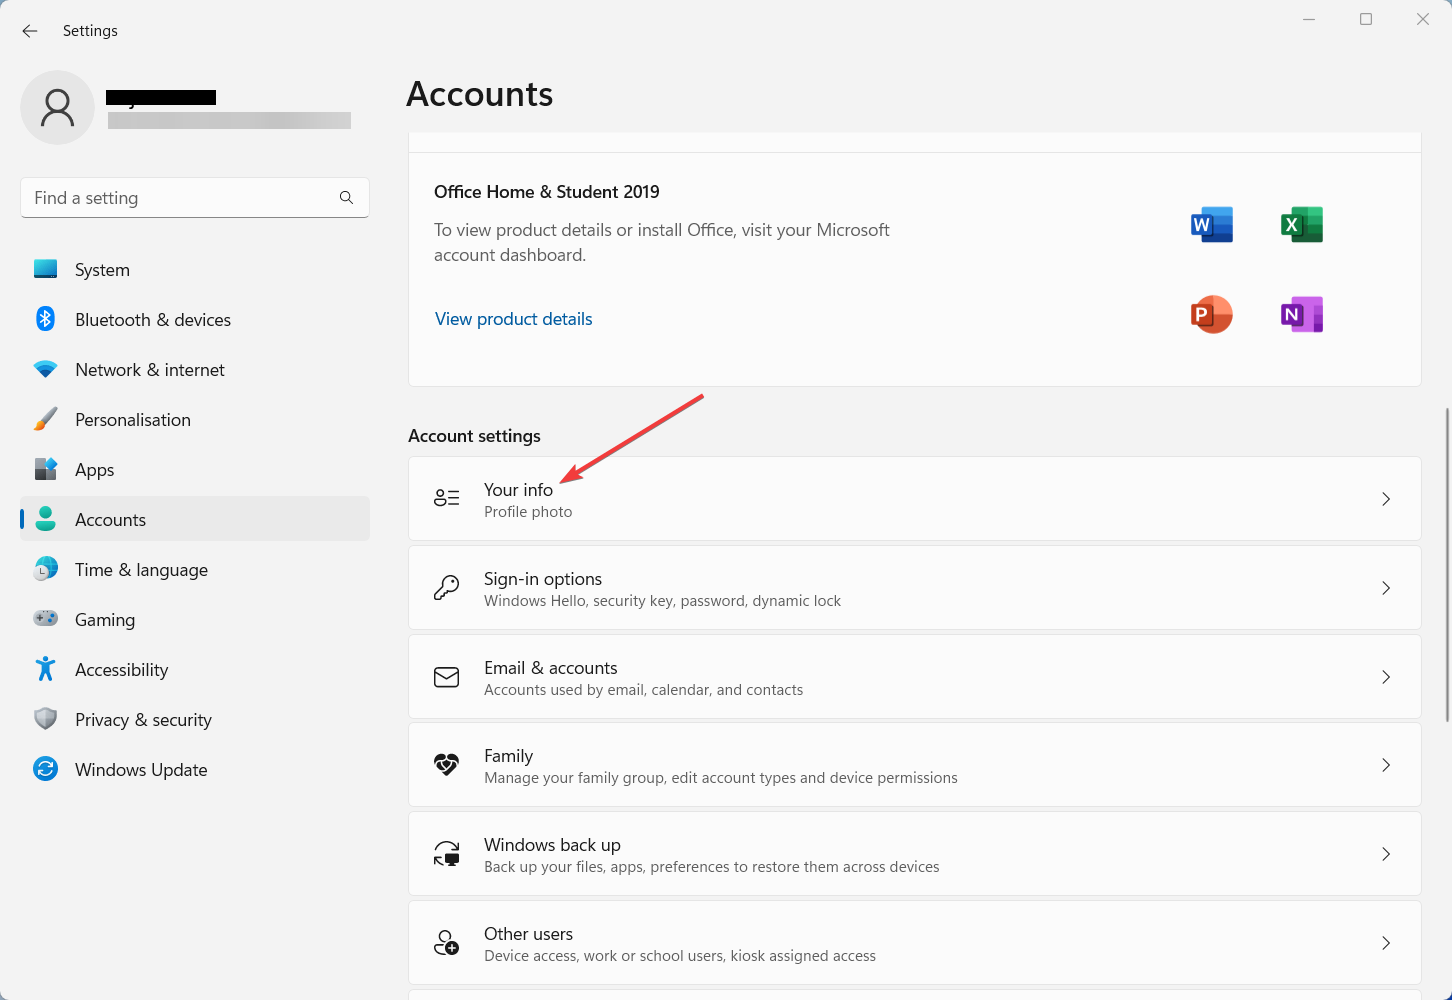
Step 4. From here, check if your account is listed as Administrator.
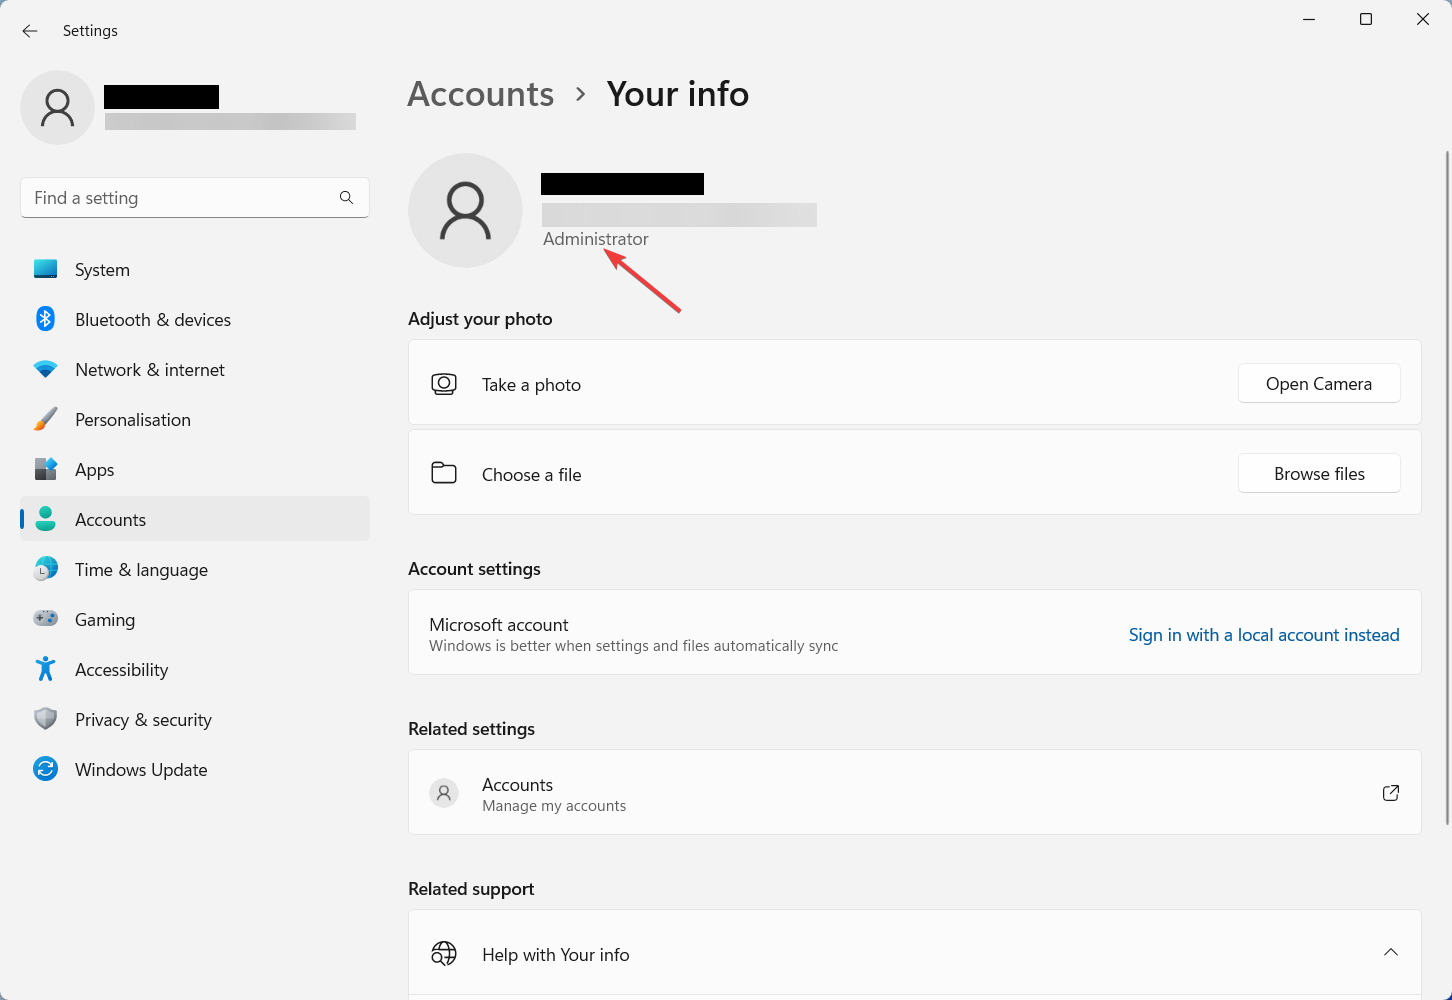
Step 5. If not, go back to the previous page and click Family from the right pane.
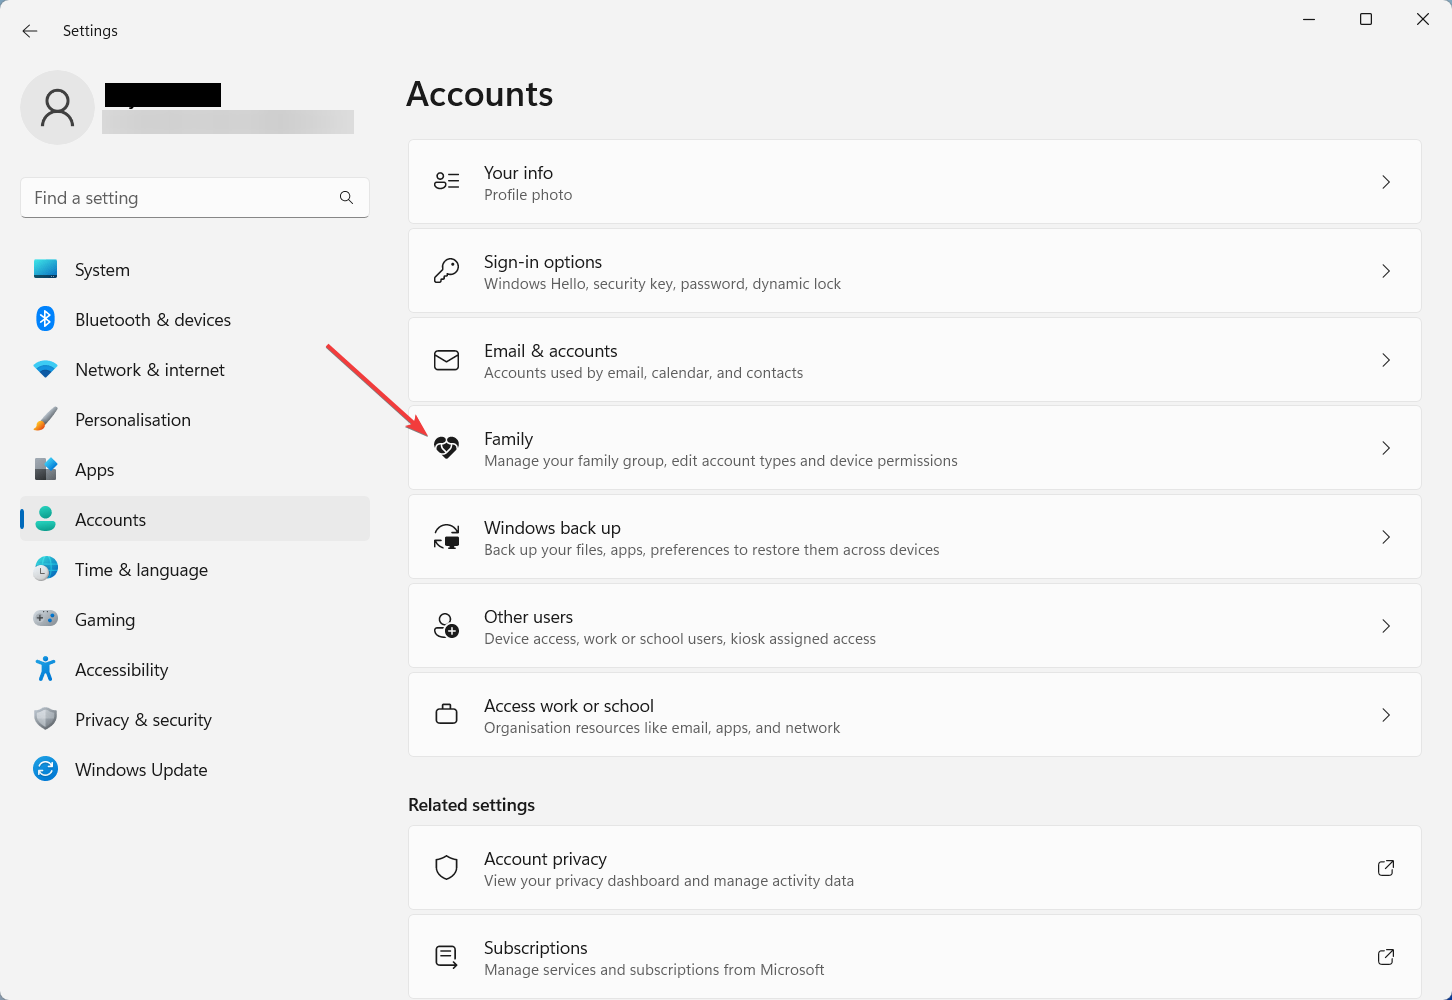
Step 6. Under the Your family option, click on the account you want to change to an administrator account.
Step 7. Under Change account type, choose Administrator and click OK.
Step 8. If prompted, enter your administrator password or PIN to confirm the changes.
#4. Disable Group Policy Restrictions
Group Policy settings can control different aspects of your Windows system. If restrictive policies are in place, they may prevent the update process. Follow the below steps to disable such policies.
Note: If you are using Windows Home edition and Group Policy Editor is not pre-installed, skip this step.
Step 1. Press the Windows key + R to open the Run dialog box.
Step 2. Type “gpedit.msc” and hit Enter to open the Local Group Policy Editor.

Step 3. In the left pane, navigate to Computer Configuration > Administrative Templates > System.
Step 4. Look for Specify settings for optional component installation and component repair in the right pane and double-click on it.
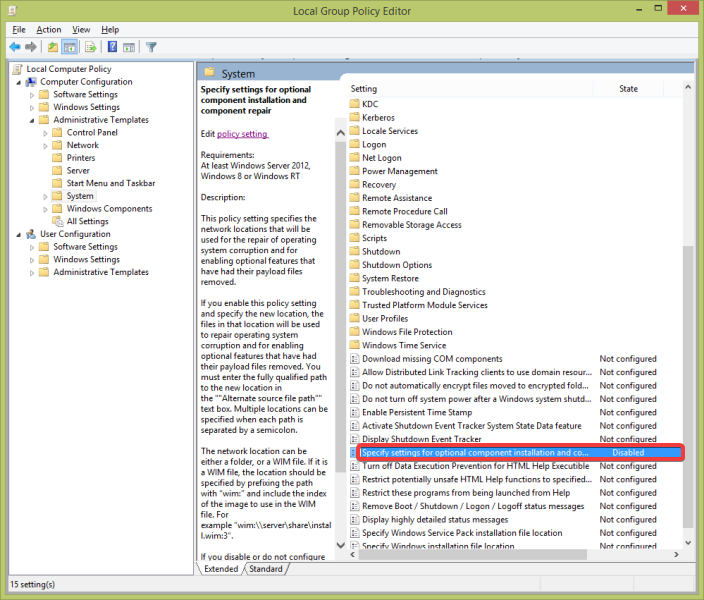
Step 5. Select Disabled, click Apply, and click OK to save the changes.
#5. Reset Windows Update Components
Resetting Windows Update components helps you to resolve issues related to corrupted files and settings. With this method, Windows Update gets a fresh start, eliminating any underlying problems causing the error. Here are the steps.
Step 1. Press the Windows key + R to open the Run dialog box.
Step 2. Type “cmd” and click OK.
Step 3. In the Command Prompt window, type the following commands one by one and press Enter after each-
net stop wuauserv
net stop cryptsvc
net stop bits
net stop msiserver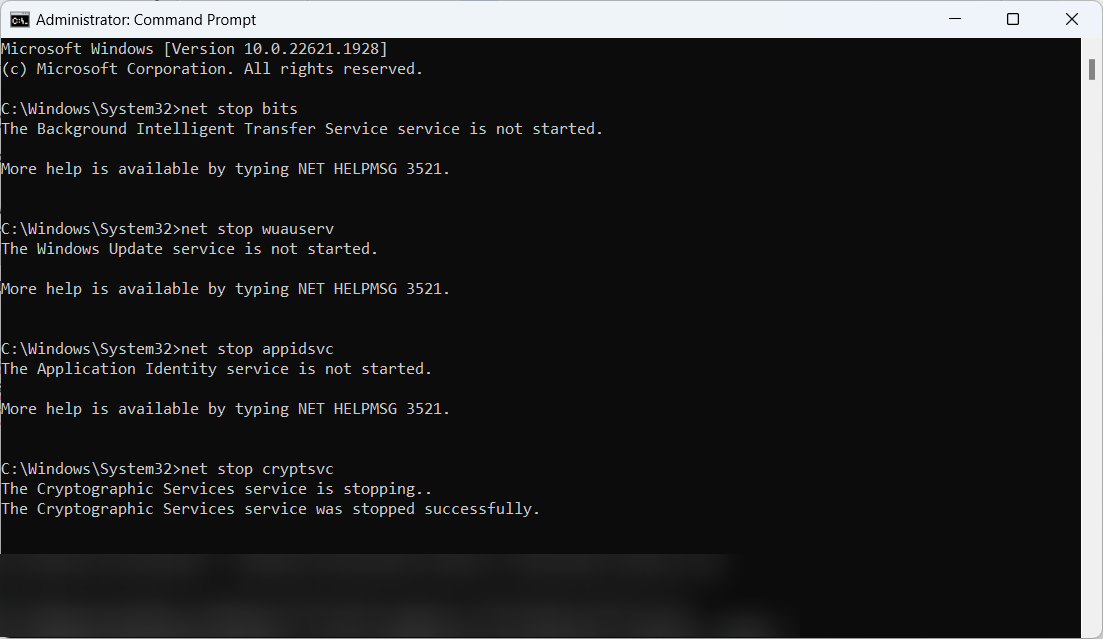
Step 4. Now, type the following commands to rename the SoftwareDistribution and Catroot2 folders:
- ren C:\Windows\SoftwareDistribution SoftwareDistribution.old
- ren C:\Windows\System32\catroot2 Catroot2.old
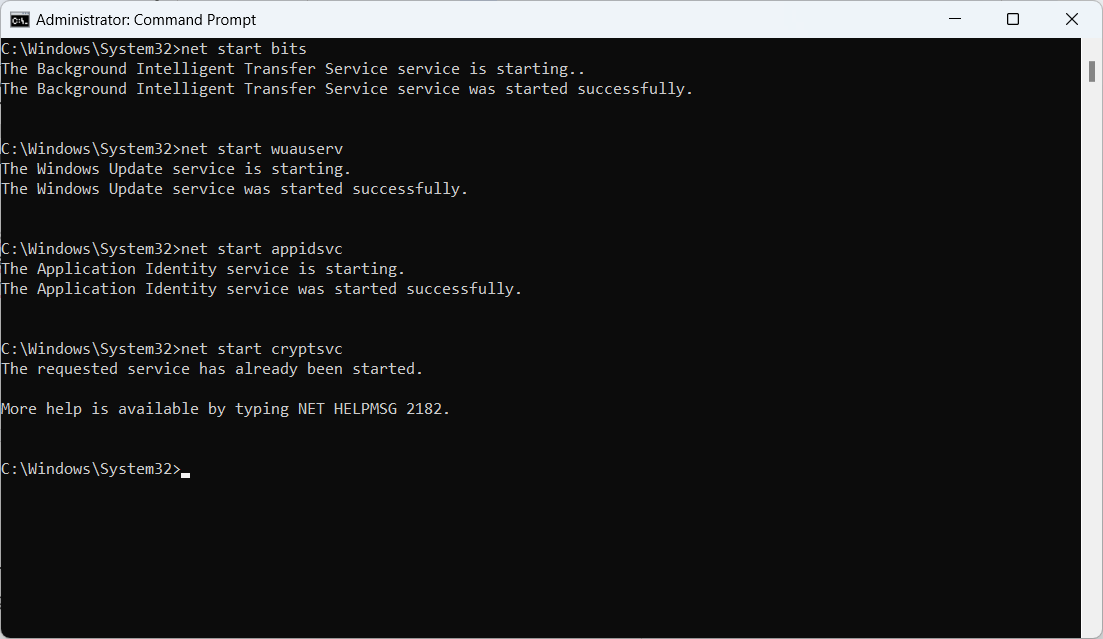
Step 5. After renaming the folders, restart the Windows Update services with the following commands–
- net start wuauserv
- net start cryptsvc
- net start bits
- net start msiserver
6. Close the Command Prompt window.
#6. Disable Third-Party Software
Third-party firewalls or antivirus software can sometimes interfere with the Windows update process. Disabling them temporarily may resolve conflicts. Here’s how:
- Locate the antivirus or firewall icon in the system tray (bottom-right corner).
- Right-click the icon and select the option to temporarily disable or turn off the program.
- Follow any on-screen prompts to confirm.
- Retry the Windows update.
#7. Check Language Pack Availability
Language packs are essential for working with Windows in your native or multiple languages. Conflicts can occur during the update process if language packs are pending download or installation. Ensure all language packs are installed and up-to-date to fix the 0x800F0922 error. Here is how to do that.
Step 1. Press the Windows key + I to open the Settings app.
Step 2. Click on Time & Language and select Language & region from the right tab.
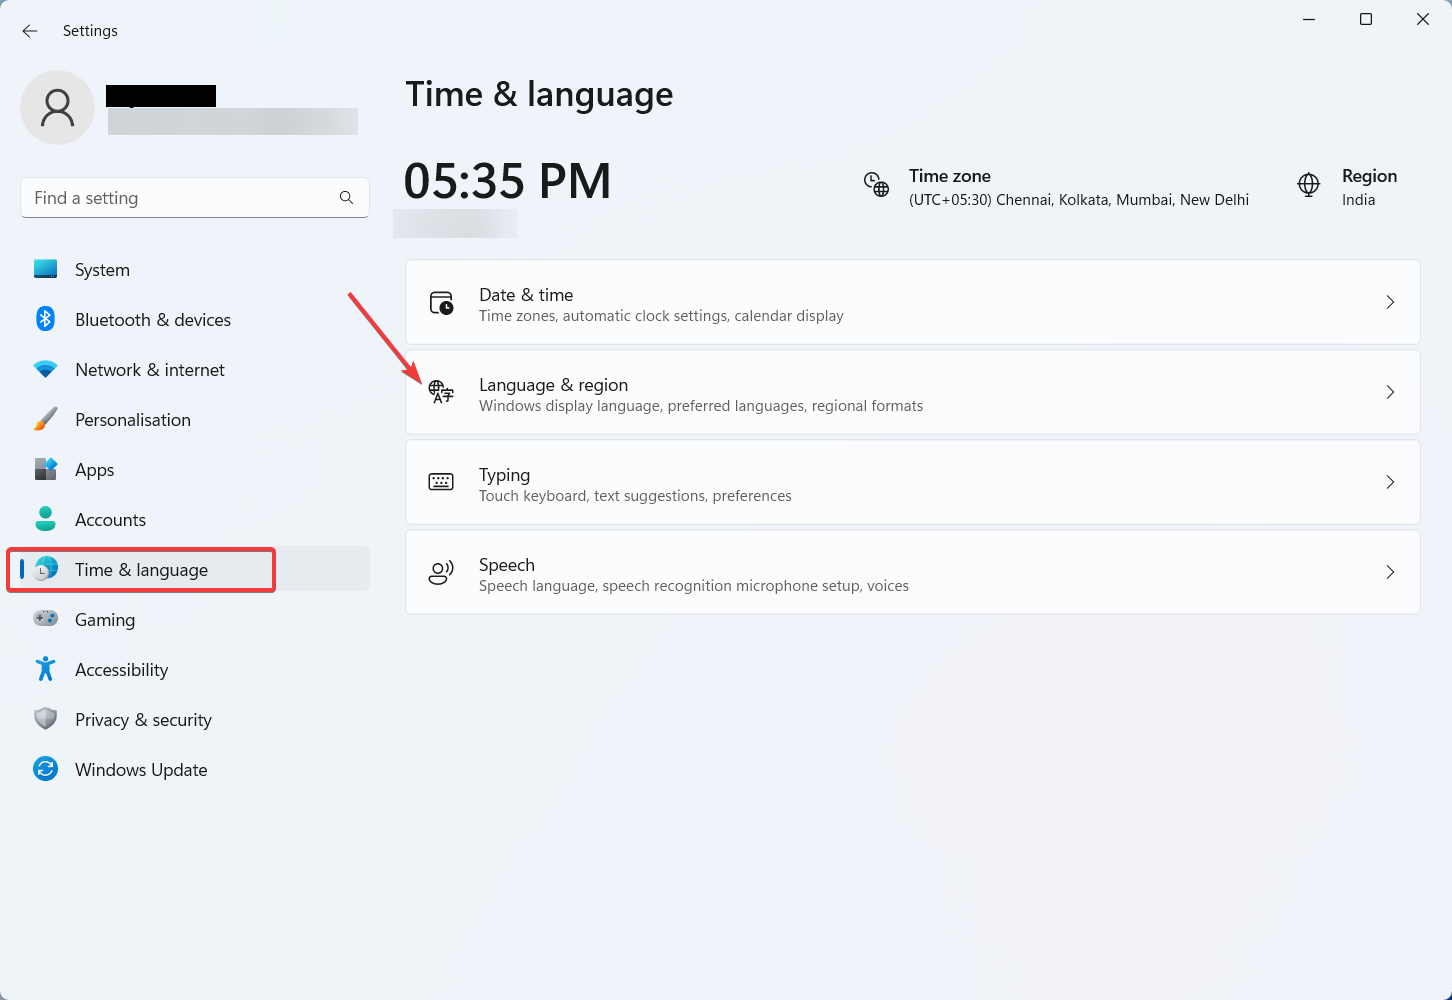
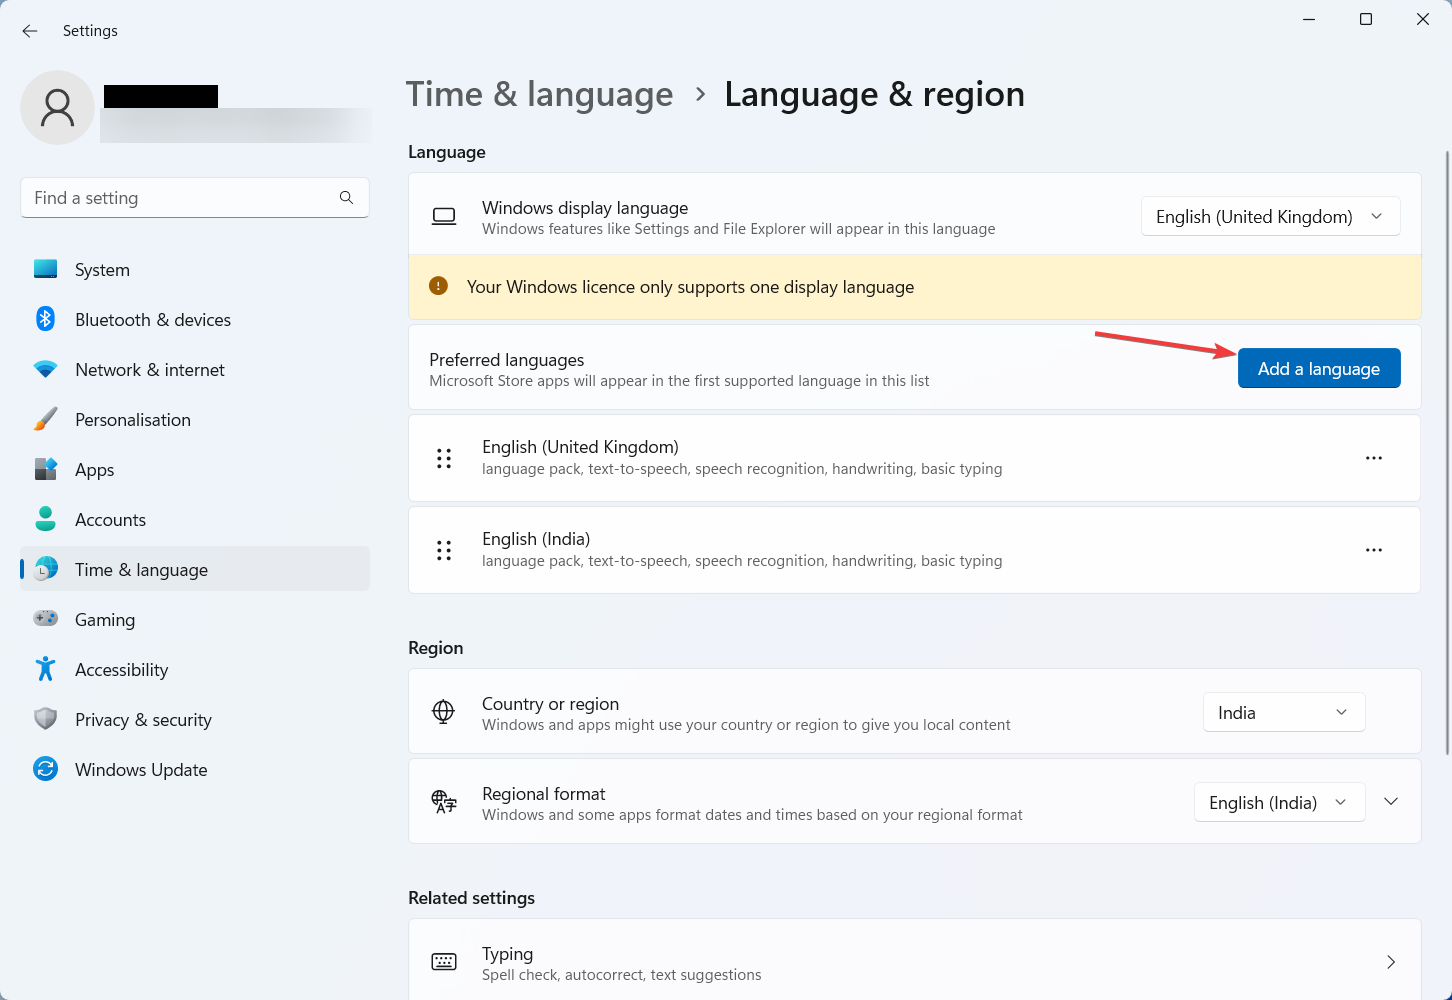
Step 3. Under the Preferred Language section, check if all language packs are installed and up-to-date.
Step 4. If not, click on Add a Language and follow the prompts to install any missing language packs.
#8. Use DISM Tool
The Deployment Image Service and Management tool (DISM) is a powerful command-line tool that fixes corruption and other issues in the Windows system image. Running the DISM tool can repair any damaged or missing files existing in your system. Here is how to run the DISM tool.
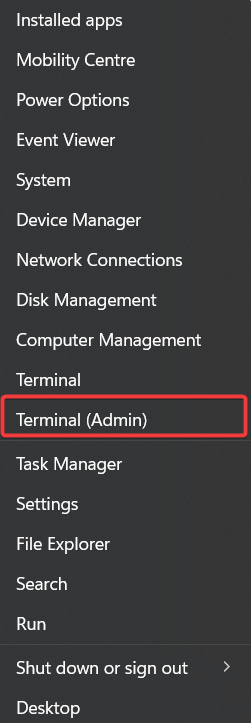
Step 1. Press the Windows key + X and select Terminal (Admin) from the menu.
Step 2. Alternatively, right-click on the Start button and choose Terminal (Admin).
Step 3. In the elevated command prompt, type the following command and press Enter-
DISM /Online /Cleanup-Image /RestoreHealth
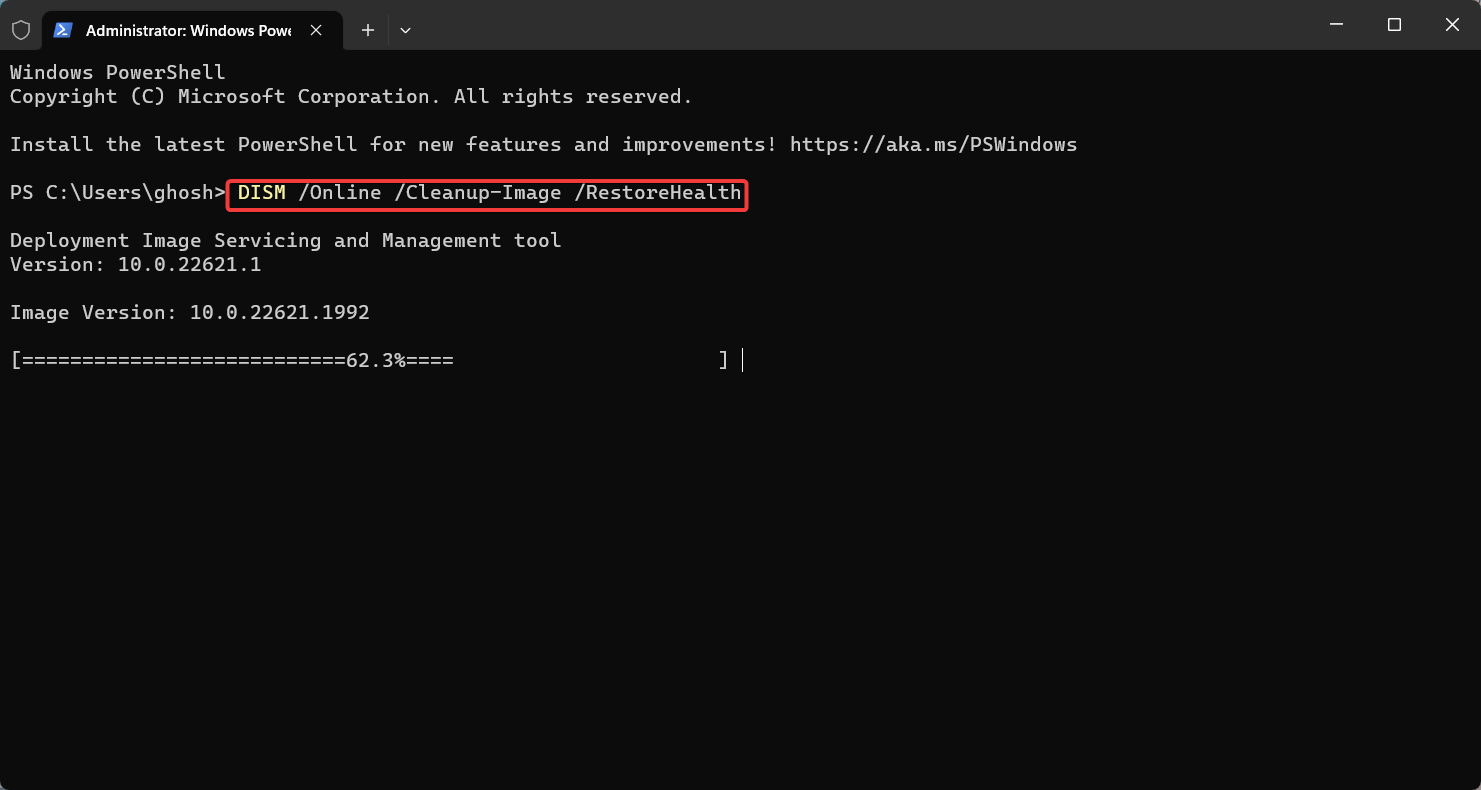
Step 4. Wait for the DISM tool to complete the scan and repair process. This may take some time.
Step 5. Once the process is finished, restart your computer.
#9. Perform a System File Check
The System File Checker (SFC) is another essential tool for identifying and repairing corrupted system files. Running the SFC scan can help fix any issues that are affecting the proper functioning of Windows Update. Here is how you can ensure a healthy system file structure.
Step 1. Press the Windows key + X and select Terminal (Admin) from the menu.

Step 2. In the elevated command prompt, type the following command and press Enter-
sfc /scannow
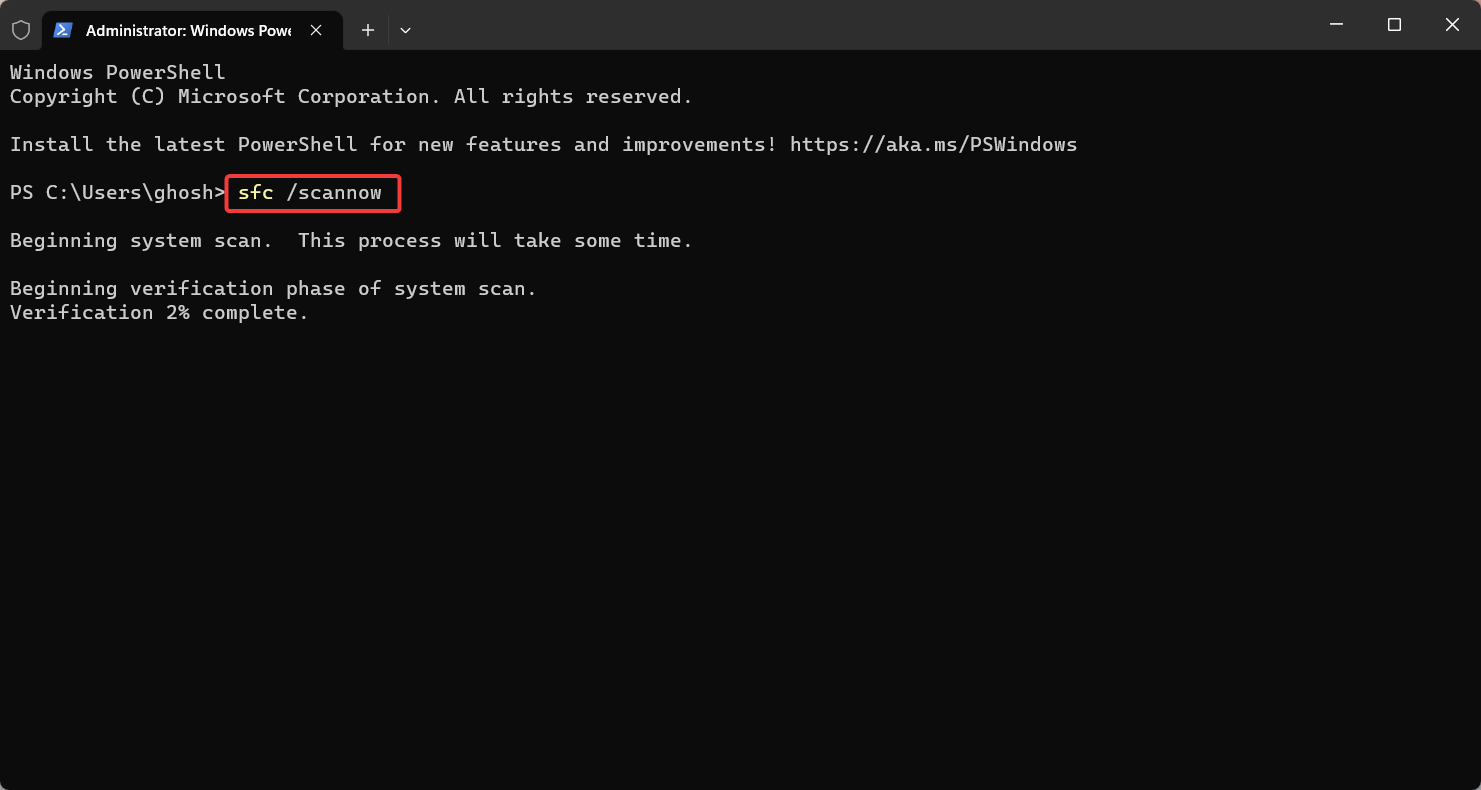
Step 3. Wait for the System File Checker to complete the scan and repair process. This may take some time.
Step 4. Once the process is finished, restart your computer.
#10. Install .NET Framework 3.5
Some updates or features in Windows may depend on the .NET Framework 3.5. If this framework is not installed, it can lead to the 0x800F0922 error. Enabling the .NET Framework 3.5 ensures that all components required for specific updates are in place, allowing the update process to proceed without errors.
Step 1. Press the Windows key + I to open the Settings app.
Step 2. Click on Apps and then select Optional Features from the right pane.
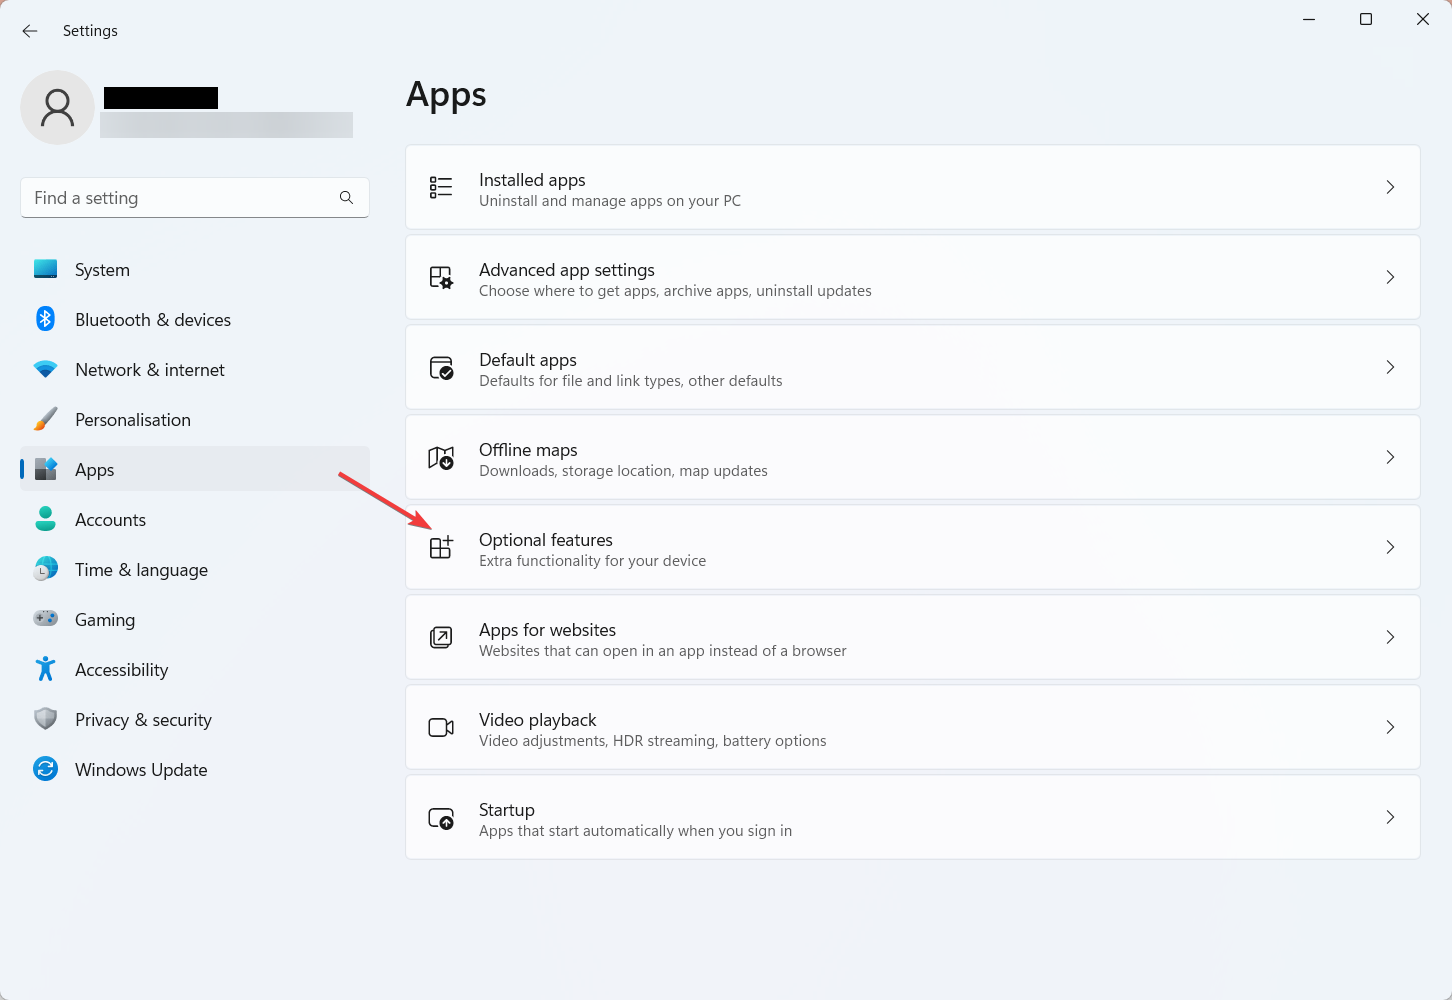
Step 3. Next, scroll down and click More Windows features.
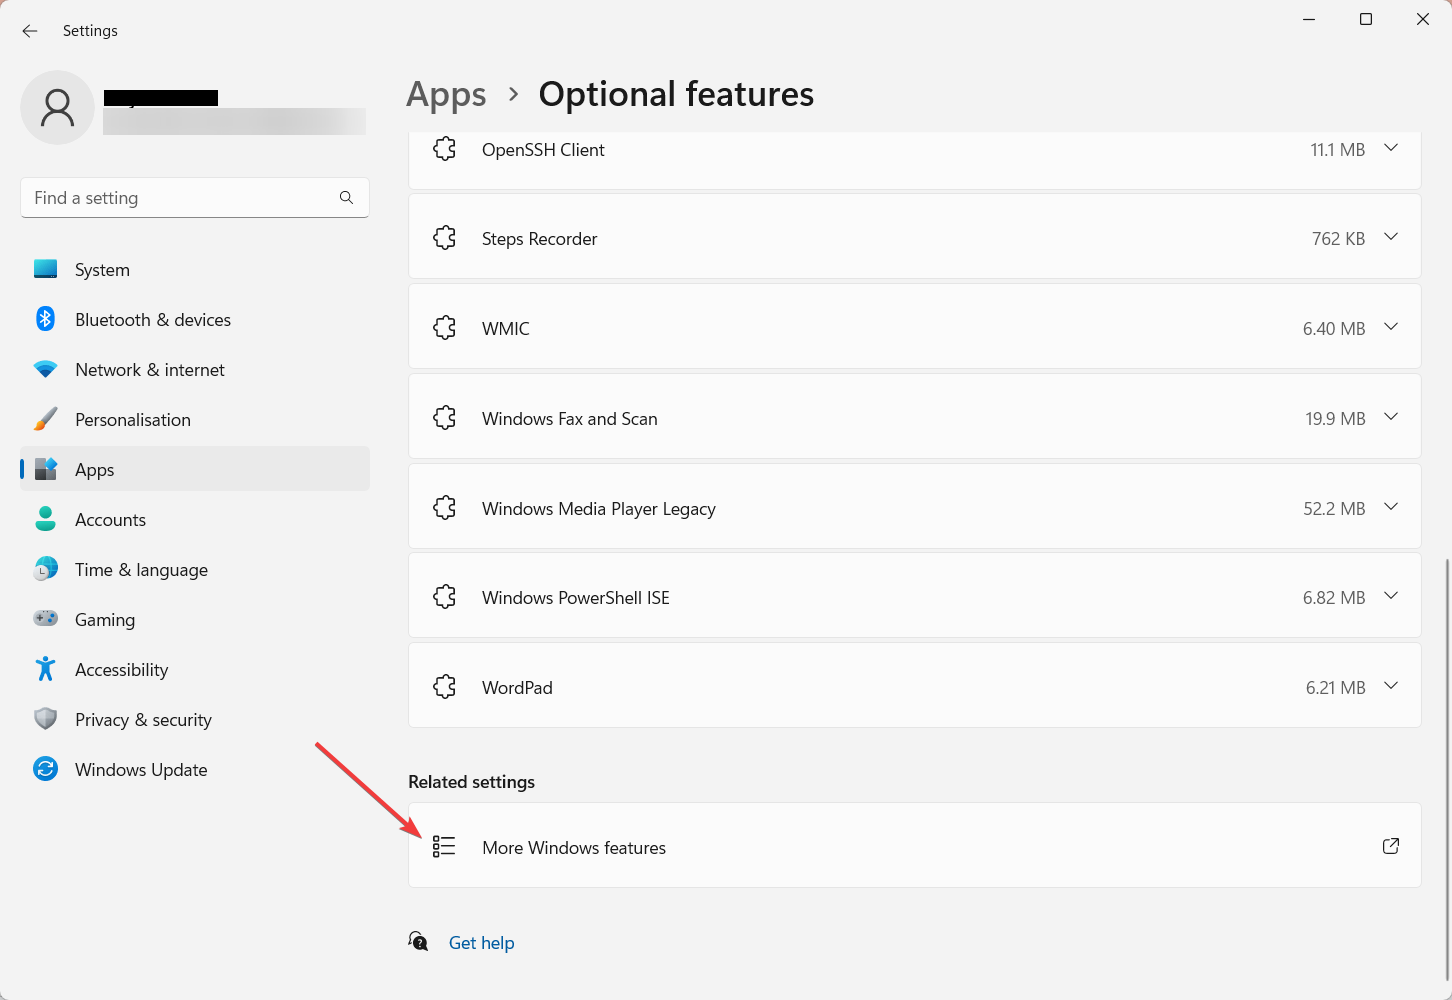
Step 4. A new window will open. Locate .NET Framework 3.5 (includes .NET 2.0 and 3.0) in the list.
Step 5. Click on the “+” icon to expand the option.
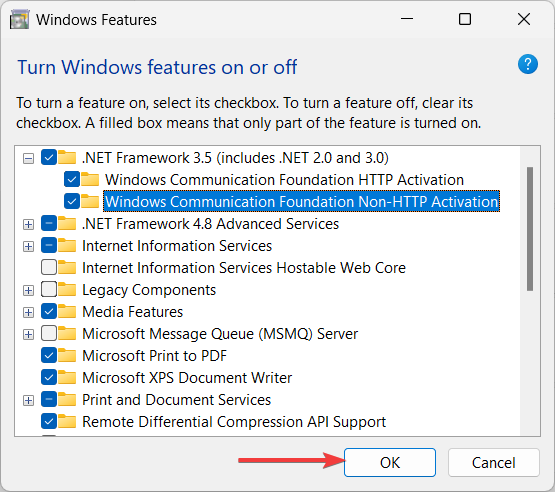
Step 6. Check the options listed and click OK to continue the installation.
#11. Perform a System Restore
If the 0x800F0922 error occurred after recent changes, a system restore can help. This reverts your PC to a previous, error-free state, undoing the changes that caused the issue. Follow these steps to perform a system restore:
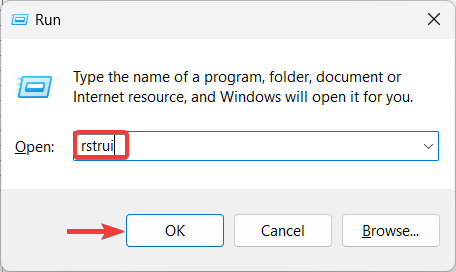
Step 1. Press the Windows key + R to open the Run dialog box.
Step 2. Type “rstrui” and press Enter to open the System Restore window.
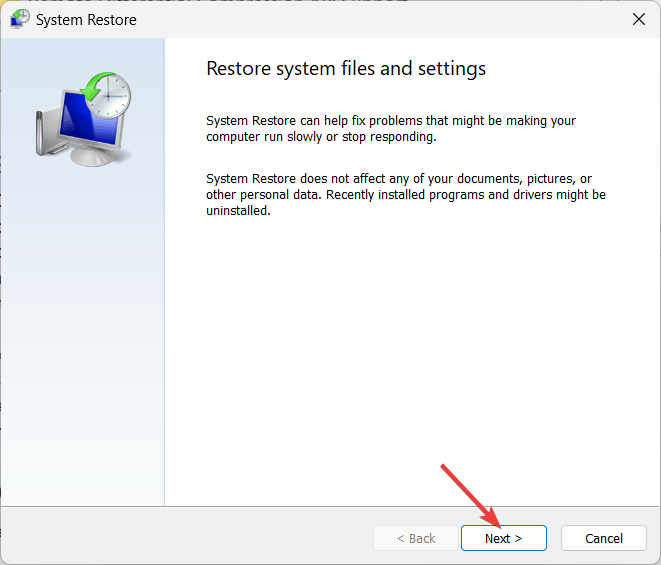
Step 3. Click on Next to view the available restore points.
Step 4. Choose a restore point before the 0x800F0922 error occurred and click Next.
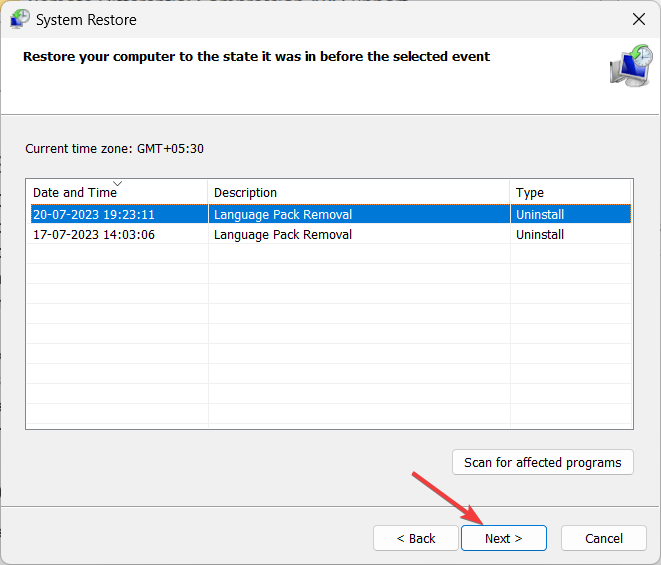
Step 5. Review the restore point details and click Finish to start the restoration process.
Step 6. Confirm your choice, and your PC will restart.
How to Fix 0xc0000005 Error
The “0xc0000005” error, or Access Violation error, occurs when a program tries to access unauthorized memory, causing applications to fail or systems to become unstable.
Common causes include corrupted system files, faulty RAM, malware, driver conflicts, installation errors, and registry issues. It may occur during app launches, Windows startup/shutdown, or software installations. This error signals potential system issues that require immediate attention, such as diagnostics, file repairs, or reinstallation of components.
To resolve the 0xc0000005 error, consider the following troubleshooting methods:
#1. Reinstall the Application or Program
If you encounter error 0xc0000005 while launching an application, it may indicate incompatibility with your OS or a faulty installation. To resolve this, uninstall the program and reinstall it.
#2. Check issues with RAM
Error 0xc0000005 can occur due to low or corrupted RAM, preventing processes from running or accessing files. This may result from insufficient RAM or attempts to access corrupted memory.
To detect RAM errors:
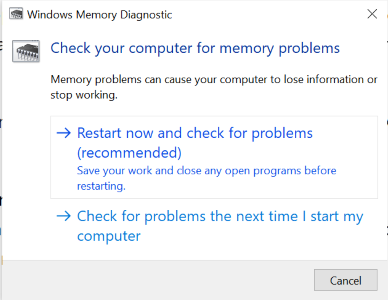
- Open Windows Memory Diagnostic via the search bar.
- Click Restart now and check for problems (recommended). Save your work beforehand, as this will close all running tasks.
- The system will restart, scan the RAM, and display the results.
Follow any provided instructions to resolve detected memory errors.
#3. Scan for Malware
Viruses in your system can cause programs to access unauthorized memory locations, leading to the 0xc0000005 error. Malware can also create additional serious issues if left unchecked.
If an antivirus scan doesn’t resolve the 0xc0000005 error, it can protect you from other threats. Running a malware check is always beneficial. You can either use your preferred antivirus software or follow the steps below to use Windows’ built-in virus detection tool.
Step 1: Search for Windows Security in the Windows search bar.
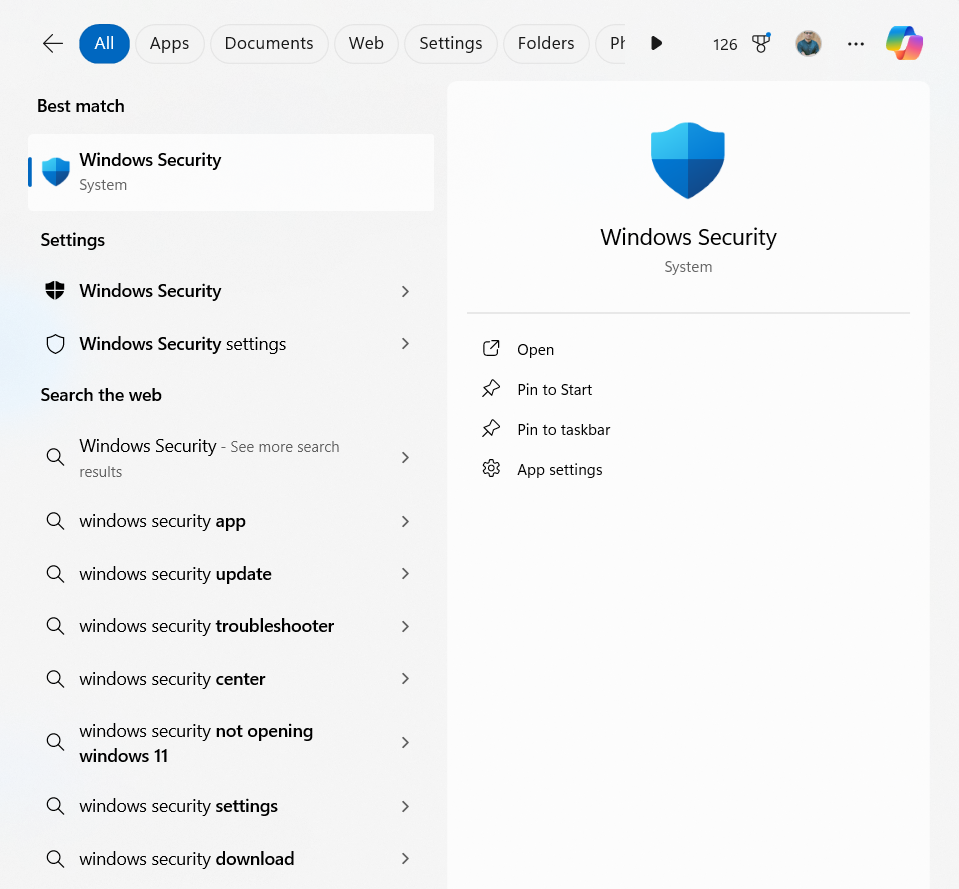
Step 2: Select Virus and Threat Protection in the new window.
Step 3: Scroll for scan options and click on it.
Step 4: Choose Microsoft Defender Offline scan and initiate the scan by clicking on the Scan Now button.
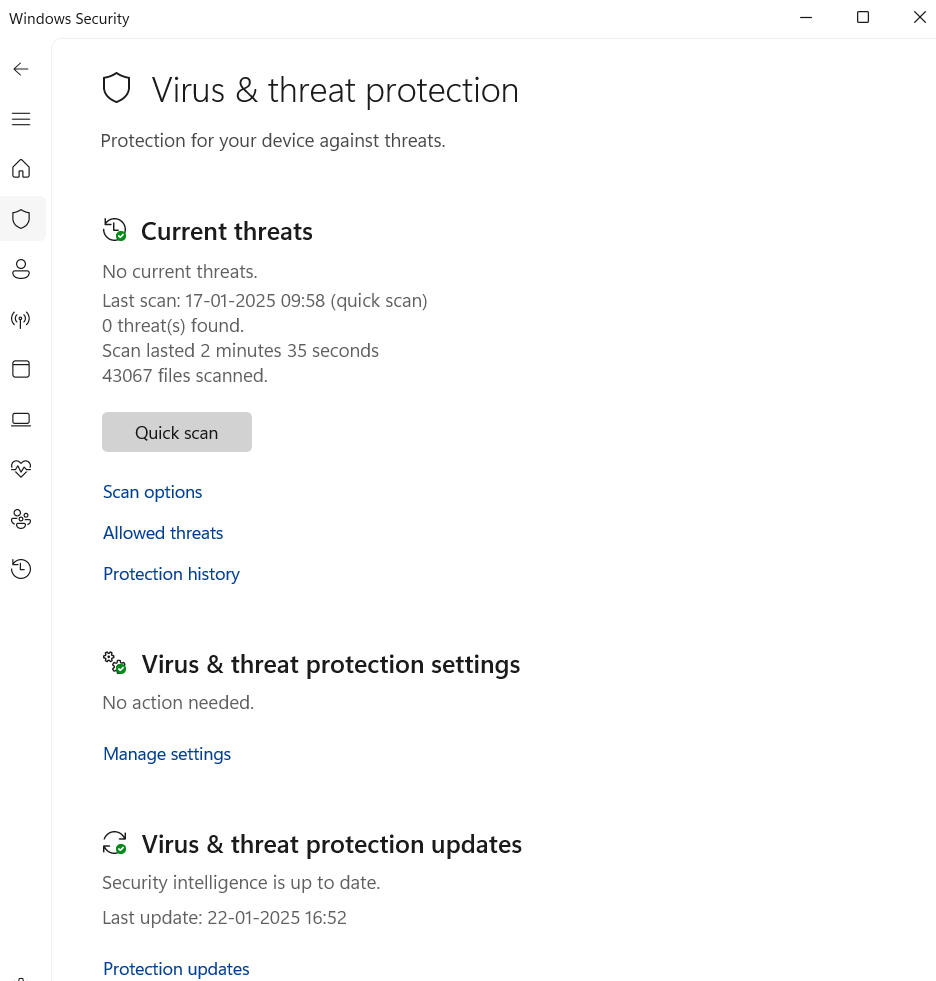
If malware is detected, click Start Actions in the results report to remove it. If no malware is found, proceed with the next fix.
#4. Turn Off DEP
DEP (Data Execution Prevention) is a Windows security feature that marks specific memory areas as non-executable, preventing malware from running in these locations.
If a program is incompatible with DEP, it can cause the error 0xc0000005. To resolve this, disable DEP for the affected program and check if it resolves the issue.
Step 1: Hold the Windows button and press r to open the Run dialog box.
Step 2: Type ‘sysdm.cpl’ and click ok to open System Properties.
Step 3: Switch to the Advanced tab and click on the settings button.
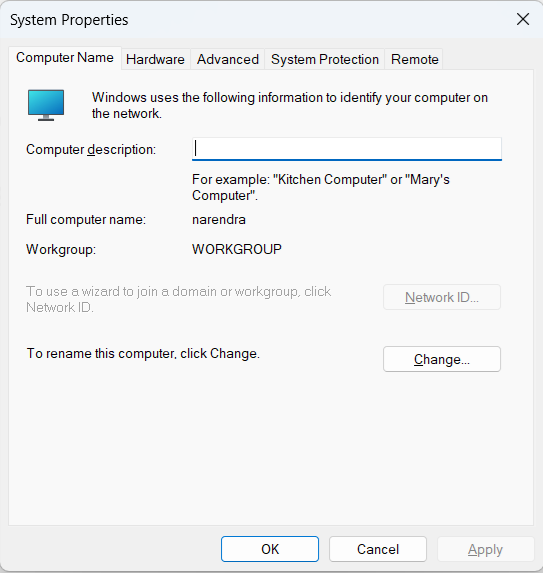
Step 4: Navigate to the Data Execution Prevention tab in the new prompt of Performance Options.
Step 5: Choose Turn on DEP for all programs and services except those I select:
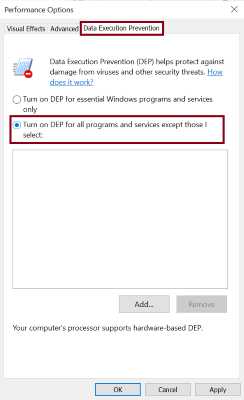
Step 6: Click on the Add button and enter the executable file name of the program you wish to disable DEP for.
Step 7: Click Apply and then OK to save the changes.
#6. Run SFC
Error 0xc0000005 can occur due to corrupted, damaged, or missing system files. Running an SFC check can detect and replace faulty files.
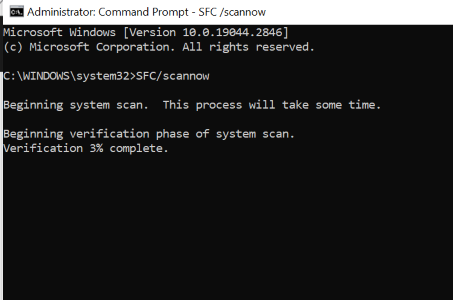
- Open Command Prompt as an administrator By searching for “Command Prompt” in the Windows Search bar, right-click and select Run as administrator.
- If prompted, select Yes to allow changes.
- Type
SFC/scannowand press Enter. - Restart your system and check if the error persists.
#7. Update Device Drivers
Corrupted, Outdated, or incompatible drivers in your device may lead to the error 0xc0000005. So, let’s fix them with this method.
- Open Device Manager by searching it in the Windows search bar.
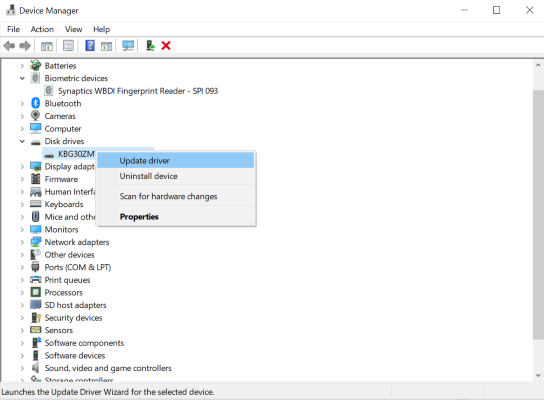
- Expand Disk drivers to see a list of available drivers in the drop-down menu.
- Right-click on each of them and select Update driver.
Do this for all the drivers you suspect may be causing this error. If you’re unsure, try updating all of them. If you find it time-consuming, employ a driver updating software to do this for you. Check out these best driver updaters to pick the right one.
#8. Modify Registry Files
Back up your registry files before attempting this fix.
Step 1: Press Windows+r and input regedit to the dialog box.
Step 2: Fix the path to HKEY_LOCAL_MACHINE\SOFTWARE\Microsoft\Windows NT\CurrentVersion\Windows

Step 3: Double-click on LoadAppInit_DLLs and change the value from 1 to 0.
Step 4: Click OK to apply the changes.
System Restore
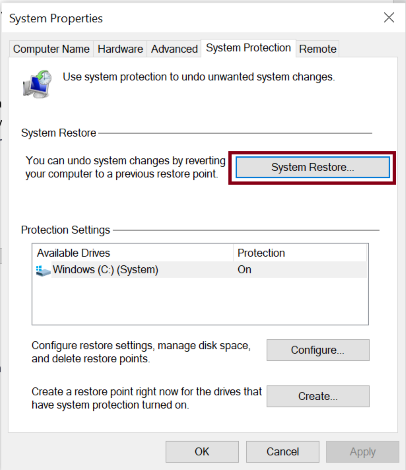
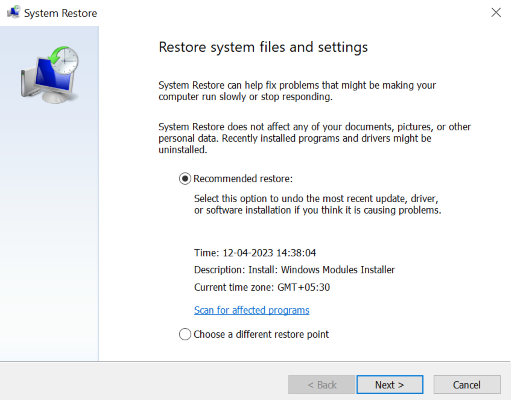
If you’re unsure of the faulty software you’ve installed or improper changes you’ve made to the settings, restoring your system is a great way to overcome the error 0xc0000005, but remember, it only works if you’ve created a system restore point earlier.
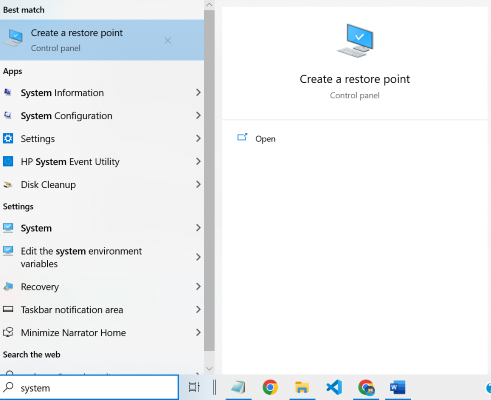
Step 1: Type system restore in the Windows search bar and click on Create a restore point.
Step 2: Click on the System Restore button.
Step 3: Choose Recommended Restore, click next, and then finish.
Common Causes for the Windows Error
Here are the common causes of Windows error codes 0x8007045d, 0xc0000005, 0x800f0922, and 0x8004010f:
- Corrupted or Damaged System Files: Errors such as 0x8004010F and 0x8007045D can occur due to corrupted system files or data files, which hinder the proper functioning of applications like Outlook or the execution of system processes.
- Insufficient Disk Space: A lack of adequate storage, especially in critical partitions like the System Reserved partition, can hinder processes such as Windows updates, triggering errors like 0x800F0922.
- Faulty or Incompatible Hardware: Faulty hardware components, such as malfunctioning RAM or storage devices, can lead to errors like 0xc0000005, often associated with access violations due to hardware faults.
- Antivirus or Firewall Interference: Overly restrictive antivirus or firewall settings can block necessary system operations or application functionalities, contributing to errors like 0x8004010F.
- Driver Issues: Outdated, incompatible, or corrupt device drivers can cause errors like the Blue Screen of Death (BSOD). Ensuring drivers are up-to-date and compatible with your system is crucial.
- Incorrect Configuration Settings: Misconfigured system settings or application profiles can result in errors. For instance, improper Outlook profile settings can lead to the 0x8004010F error.
- Malware or Virus Infections: Malicious software can corrupt system files or alter system settings, leading to errors such as 0xC0000005.
What’s Next
-
 EditorNarendra Mohan Mittal is a senior editor & writer at Geekflare. He is an experienced content manager with extensive experience in digital branding strategies.


