Filmora 12 from Wondershare is quick and efficient. While Filmora has always been about speed and performance, let’s check out this update.
A big chunk of present-day content creators appreciates the value of video. It’s a big supplement to text and sometimes exclusively crucial.
However, not every one of us is out there to make Hollywood movies, right? And we want something slick without burning a hole in our pockets.
So we have…
Wondershare Filmora
Filmora has been the go-to program for many trying video editing. This comes with a simple yet powerful interface allowing you to induce professional effects with a click or two.
Some key features include
- Multiple Platform Support
- More Keyboard Shortcut Presets
- NVIDIA-support
- Efficient drag-and-drop interface
- AI-powered effects
- Gigantic library of stock media
- Templates for fast editing
- Pocket-friendly price tag
We’ll discuss more in the following sections, with our primary focus being the recent update: Wondershare Filmora 12.
User Interface
The first impression of Wondershare Filmora had on me was–I can do this!
The center is host to all the action. Besides, the top menu (with icons) is from where one can easily import media or use their own.
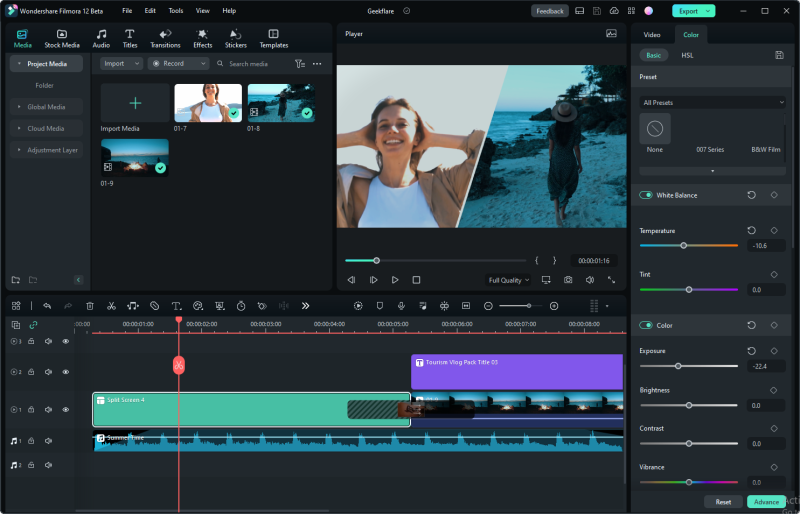
The timeline shows you the audio-video elements, where you can click any subject to apply filters and effects from the right.
Additional settings for each object can be checked by a simple right click.
It’s only my second video editor and was my first interaction with Filmora. Even so, I was able to find my way quickly, and not to mention the community videos on YouTube were helpful.
Overall, it felt right at home.
Multi-Platform Support
With Filmora, you aren’t bound to a single device or platform. Instead, you can enjoy a seamless video editing experience on multiple platforms like Windows, Mac, Android, iOS, and iPadOS.
This will have you dabble between devices without getting stuck on any one.
In addition, the Filmora Cloud Workspace (discussed in Backup and Collaboration) is for the central online storage you can use on many devices simultaneously.
Keyboard Presets
Keyboard Presets help you to get things done quickly. While beginners rarely use them, these shortcuts are handy for seasoned video editing professionals.
However, it becomes super annoying to work between different video editors, and each having presets of their own. And the developers at Wondershare Filmora seem to understand this facet of video editing.
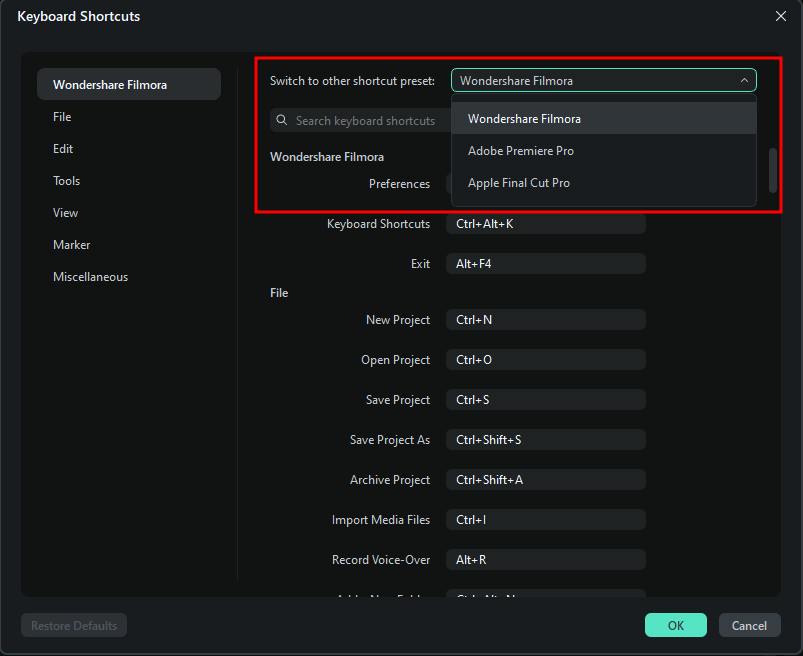
So, now you have the option to switch to the keyboard shortcuts of Filmora’s own competition (how generous and thoughtful 🙂).
This will have you switch between these applications without breaking a sweat.
NVIDIA-Friendly
H.264 is the popular video encoding format currently, with the industry gradually moving to the more performant AV1. This gives you superior compression ratios and higher fidelity with the same bitrate.
Put simply, the outputs will use less data while maintaining similar quality. As a matter of fact, Google and Netflix have planned to use this latest codec which is substantially efficient over H.264 and even its upgrade, H.265.
Walking on a similar tune, Filmora 12 supports the latest and the greatest NVIDIA GeForce RTX 40 series GPUs supporting the AV1 dual encoders. While this codec has many benefits as stated above, you will notice up to 2x video exporting speeds.
Backup and Collaboration
The biggest problem while video editing is losing changes.
Filmora has this sorted with its automatic backups, for which you can easily adjust the frequency from 1 minute to 30 minutes.
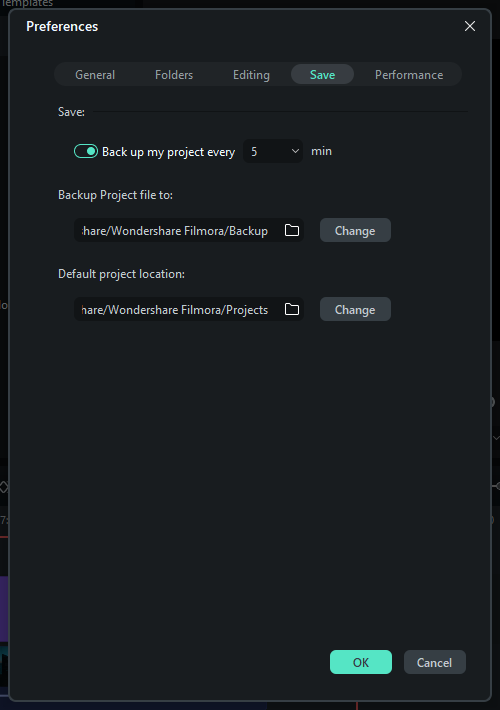
One can go even further and download Google Drive to add the back directory for universal availability.
In addition, Filmora gives you 1 GB of free cloud storage you can use for saving media. One can use this space for storing favorite elements for repeated use.
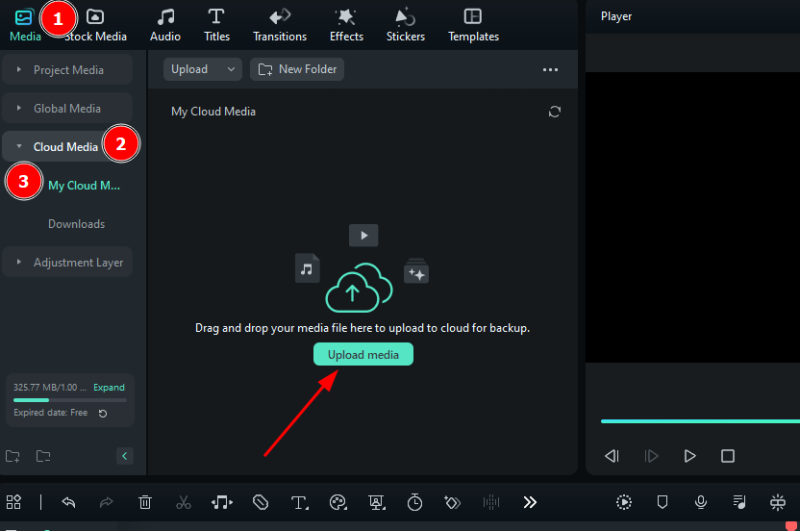
This is similar to using any cloud storage like Google Drive; however, it’s integrated inside the dashboard for simplicity.
Collaboration is another feature best suited for teams. It’s done using Wondershare Filmora Workspace, where you can upload, download, share, and make time-coded comments on shared projects.
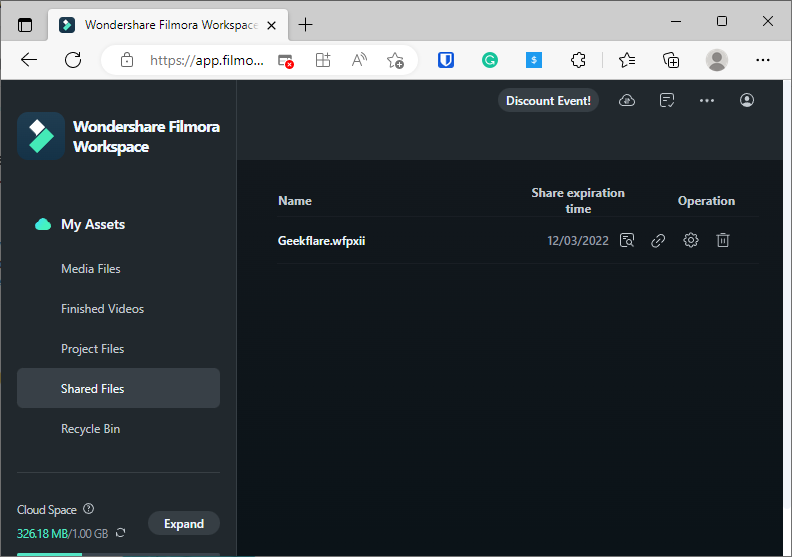
Moreover, one can set passwords and expiration times for the sharing links. However, the 1GB cloud space can get filled up quickly. In that case, one can buy more space separately.
Workspace Layouts
Not every one of us has dual screens or big displays to fit everything in.
And while huge monitors are definitely a big plus for video editing, Filmora tries to compensate for the lesser real estate with its flexible layouts.
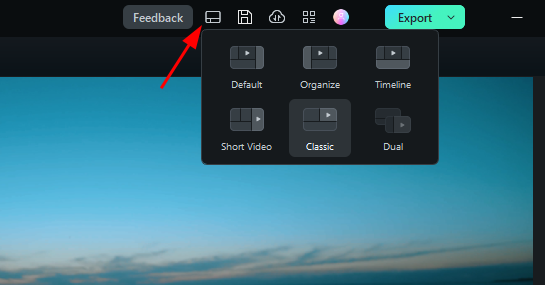
You can choose from five layouts to see which suits you the best.
In addition, the ‘Dual’ option pushes the media separately to the external monitor for the best possible experience.
Additionally, the ‘Classic’ view is for users still in love with the Filmora 11 setup.
Enhanced Keyframes
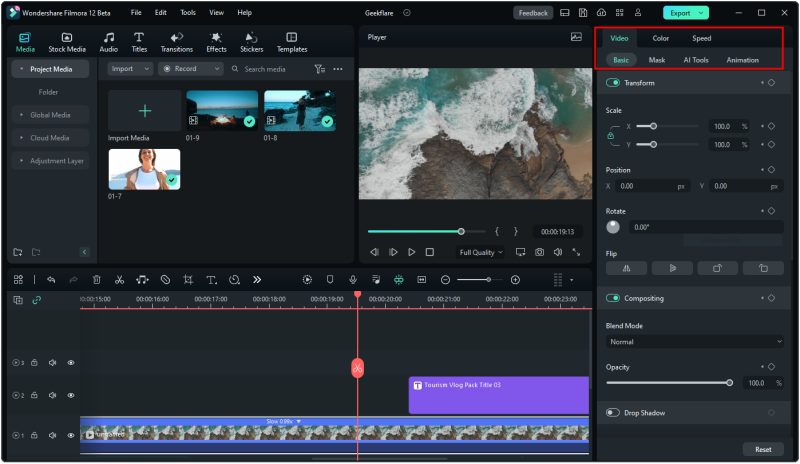
Keyframing is another point that adds to the simplicity and prowess of Wondershare Filmora 12.
This gives you tremendous control over the sequences for scaling, positioning, color correction, animations, masking, etc.
The enhancements depend on the type of element.
For instance, the text has the fewest options with position, scale, rotation, composting, etc. However, a video component has most of the audio filters in addition to chroma key, masking, auto enhance, color corrections, and speed, among others.
Moreover, the fluidity with these effects work is something to reckon with. Overall, this significantly helps you do more than merely connecting a few media elements.
Masking
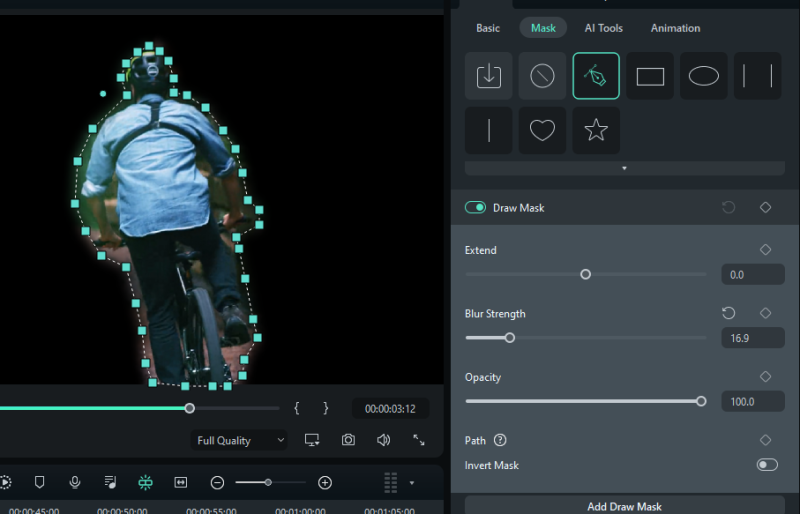
Masking is a nifty feature that lets you draw standard shapes or use the pen tool to create free-form outlines.
In addition to this, masking helps highlight the masked objects or everything else using the Invert Mask toggle.
Moreover, one can adjust the blur to make two video clips blend in smoothly.
Adjustment Layer
Using different objects to create an attractive video is something creators do routinely. However, no matter the quality of transitions we use, the unique color schemes of different elements tend to give them away.
The Adjustment Layer is Filmora’s fix to keep the magic intact without asking for much effort.
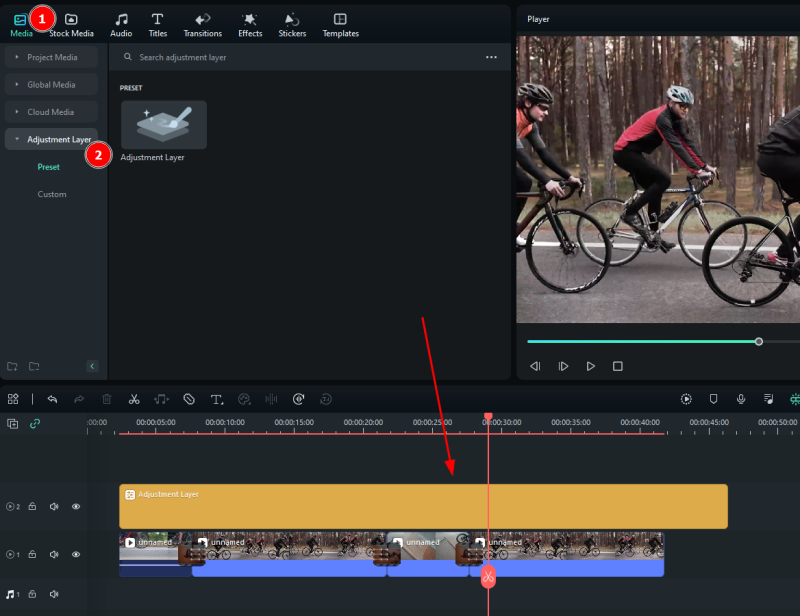
One can simply place it over the subject layers to apply uniform effects in one go. The tweaks applied to the adjustment layer affect all the layers beneath.
This helps you modify the complete project in one go without doing it with all layers separately.
AI Tools
Filmora has some handy AI features, making video creation easier and more efficient. These include Chroma Key, AI Portrait, Motion Tracking, Smart Cutout, AI Audio Denoise, etc.
While all of these are available in Filmora 12, Wondershare has already implemented some of them since earlier versions.
Chroma Key

This is useful for removing specific colors from videos and images.
Primarily, we can use this to replace solid color backgrounds with something more eye-catching. It is further supplemented by enhancements such as tolerance, edge thickness, edge feather, etc., to make it appear realistic.
Smart Cutout
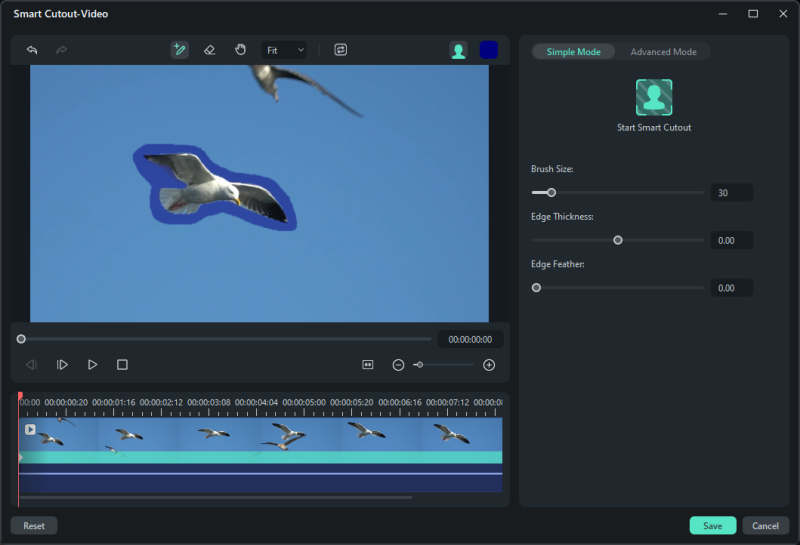
You can deploy Smart Cutout to censor a moving object or everything else other than the masked element.
In addition, the advanced mode allows you to track the object forward or backward or in both directions at once.
Besides, one can set the edge thickness and feathers for more productive cutouts.
Audio Denoise
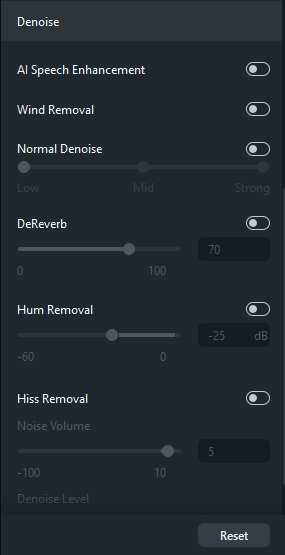
Denoising is another area where Filmora shines with its easy-to-work-with interface.
This gives a few options to make the audio more suitable for the video, including speech enhancement, wind removal, de-reverb, hum, and hiss removal.
Though a powerful audio editor will have similar options, the idea is to minimize external work for greater throughput.
Audio Stretch
This is yet another AI enhancement exclusive to audio tracks. Audio Stretch, as the name speaks, permits dragging the audio track to match the video duration.

Put simply, it can’t get better than this.
No need to cut-paste; just drag the audio track to your preferred length. Additionally, this works both ways, forward or backward, without any transitions, which makes it feel like a single uniform track.
3D Titles
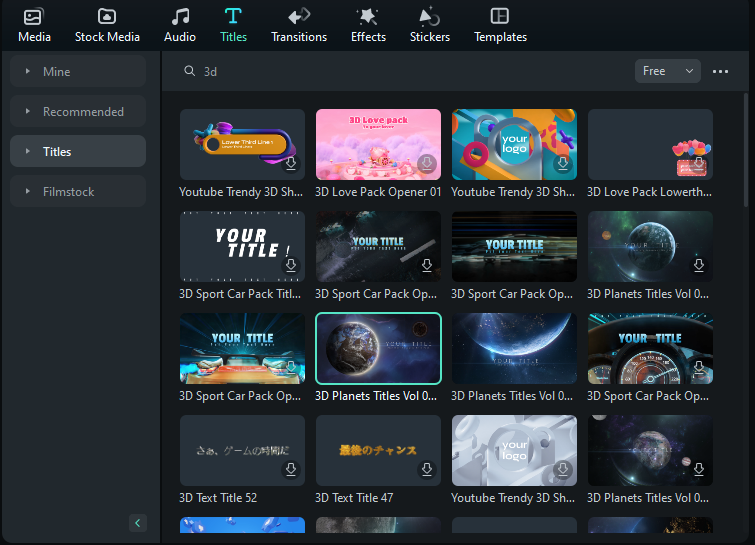
Filmora has a gigantic library of 3D title templates you can import and tweak to your wish.
The templates have various themes to fit most use cases. For instance, you have classic opening lines, subtitles, end credits, callouts, messages, and more.
And once you find the object of your choice, further modifications are a piece of cake with a few clicks and toggles.
Split Screen
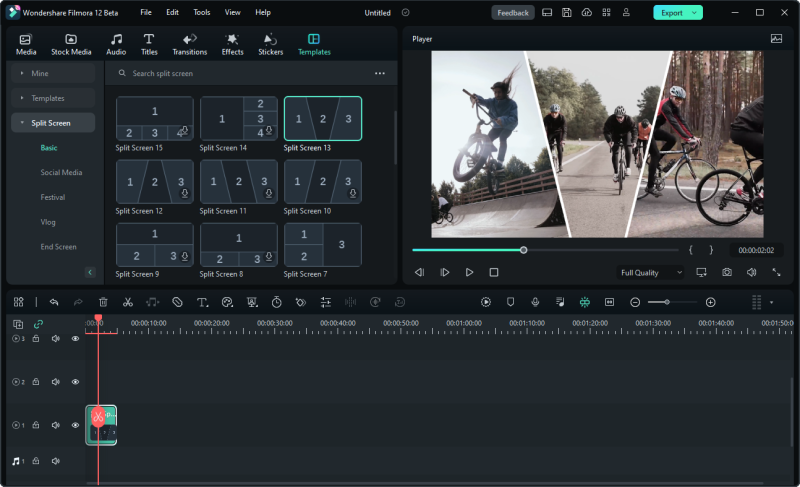
Filmora 12 comes with many presets for splitting the screen. First, you have many basic layouts to fit up to six videos and images on a single screen into various interesting shapes.
In addition, you get themed layouts for social media, festivals, end screens, etc.
Upon inserting, each element will have separate options for modification as per their media class. For instance, video objects have chroma keys, color corrections, animations, etc.
Lastly, Split Screen is an excellent feature helping you utilize different videos with unique enhancements for each.
LUT
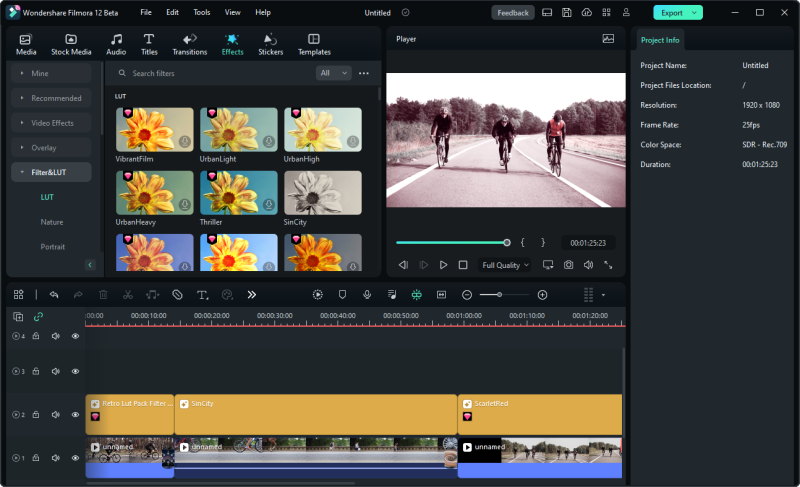
LUTs are a quick way to colorize or theme a media element. And thanks to Filmora, you have plenty of presets to try and choose from.
A layer below the LUT will have that specific effect, and you can use one or more in a project. This is extremely simple, and the only control you will have is the opacity of the effect.
Others
While there is no end to the goodies, a few more notable mentions include hundreds of royalty-free background audio and a never-ending effects library.
As a reminder, this article is just about the recent update, Filmora 12. So the listed effects and features are by no means exhaustive, and there is so much more you can only experience firsthand.
Wrapping Up
Video Creation is unavoidable for many influencers. They know the power of video over other forms of marketing and use it to their advantage.
However, video creation is not everyone’s first love because of the steep learning curve with most video editors.
Making it a whole lot easier, Wondershare Filmora 12 helps you get started in the first few minutes. In addition, the community is huge, with countless YouTube tutorials for every feature Filmora has to offer.
And the best part is you can get it started from as low as $49.99 per year and enjoy a cross-platform service on Windows, Mac, iPhones, iPad, and Android for only $69.99.
Download Filmora and see if it wows you!

