Build API-driven modern applications!
First, I’ll share leading JavaScript frameworks, then will discuss API-first design and its popularity.
1. Hapi

Hapi is a simple, secure, and open-source JavaScript framework. It is used to build powerful, scalable applications with minimal overhead. It was originally developed to handle Walmart’s Black Friday scale, but now Hapi continues to be the proven choice for enterprise-grade backend needs.
Companies like Beats Music, Vrbo, Conde Nast, AuthO, Brave, and many more are using and satisfied with Hapi.
Free support is always available on the GitHub.
2. Restify

Restify is optimized for building semantically correct RESTful web services ready for production use at scale. When it says semantically correct, it means staying true to the spec, which was one of the Restify project team’s foremost goals.
It optimizes for introspection and performance and is used in most of the largest Node.js deployments. One of the coolest features of Restify is that it automatically creates DTrace probes for you whenever you add a new route/handler. There are actually three separate clients shipped in Restify:
- JsonClient: sends and expects application/json
- StringClient: sends the URL-encoded request and expects text/plain
- HttpClient: thin wrapper over node’s HTTP/HTTPS libraries
The detailed development guide could be found here.
Restify is used by some of the industry’s most respected companies like Netflix, Joyent, Pinterest to power some of the largest deployments.
3. ExpressJS
ExpressJs is a project of the OpenJS Foundation.
Due to its robustness, many popular frameworks(such as Feathers, Kraken, Sails, Kites, NestJs, etc.) are based on Express. It is a minimal and flexible node.js based web application framework that provides a robust set of features for web and mobile applications.
Since it provides a layer on top of node.js, we can efficiently access the JavaScript functions. It is suitable for writing applications with server rendering because it supports many template engines (such as pug and handlebars). For API development, it contains intermediate handlers and many HTTP service/utility methods.
4. SailsJS

SailsJS is an MVC framework build under the Sails company headquartered in Austin, TX. It was developed by Mike McNeil to assist his team in building scalable Node.js projects for startup and enterprise customers. Since its release in 2012, Sails has become one of the most widely-used web application frameworks globally.
It is a lightweight that sits on top of Express. It is compatible with any front-end: Angular, React, iOS, Android. Sails claim to get integrated with any database through its powerful ORM called Waterline. It uses Express for handling HTTP requests and wraps socket.io for managing WebSockets.
5. Action Hero

Actionhero is a multi-transport API Server with integrated cluster capabilities and delayed tasks. The goal of Actionhero is to create an easy-to-use toolkit for making reusable & scalable APIs for HTTP, WebSockets, and more. It was built from the ground up to include all the features we expect from a modern API framework.
The type of workload Actionhero excels at involves producing and consuming APIs, storing and retrieving data from databases, modifying files, and similar jobs.
Actionhero has 5 key concepts that make up each application: Actions, Tasks, Initializers, Chat, and Servers.

6. LoopBack

LoopBack is a highly extensible, open-source Node.js and TypeScript framework based on Express. It allows us to quickly create APIs and microservices composed of backend systems such as databases and SOAP or REST services.
It is a new, improved programming model with Dependency Injection and new concepts such as Components, Mixins, Repositories, etc., which make this the most extensible. LoopBack allows us to create a GraphQL interface for any REST API using OpenAPI-to-GraphQL.
We can get started with Loopback in no time by just following its steps in getting started guide. Their documentation is categorized based on four quadrants, and those are,
- Learning-oriented: Tutorials provide hands-on lessons where users can learn the framework by doing.
- Problem-oriented: How-to Guides provide recipes to solve specific goals you may encounter while building a LoopBack project.
- Understanding-oriented: Concepts pages explain architecture concepts, wider view, and deeper knowledge about the framework.
- Information-oriented: Reference guides provide a technical description of the machinery and how to use it.
Companies like GoDaddy, Symantec, Sapient, Fundrails, ShoppinPal, and WhiteBoard are using LoopBack extensively.
7. FeathersJs

Feathers is a set of tools and an architecture pattern that make it easy to create scalable REST APIs and real-time applications. We can build prototypes in minutes and production-ready apps in days. Feathers can interact with any back-end technology, support over a dozen databases, and work with any front-end technology like React, VueJS, Angular, React Native, Android, or iOS.
To get started with the first Feathers application, follow the quick start guide. If you are stuck or have a question, you can get help on their different channels, including Slack, GitHub, Stack Overflow, Telegram, etc.
8. KoaJS
The team behind Express designs Koa. It aims to be a smaller, more expressive, and robust foundation for web applications and APIs. Koa does not bundle any middleware within its core, and it provides an elegant suite of methods that make writing servers fast and enjoyable.
By leveraging async functions, Koa allows us to ditch callbacks and greatly increase error-handling. Get it started in three commands as below.
$ nvm install 7
$ npm i koa
$ node my-koa-app.js
9. AdonisJS

AdonisJs is a Node.js MVC framework that is maintained and backed by a vibrant community. It offers a stable ecosystem to write server-sid applications so you can focus on business needs over finalizing which package to choose or not. It is like any other npm module with some code on top to work smoothly with AdonisJs applications.
There are no hard prerequisites for using AdonisJs, but having a conventional understanding of JavaScript, Async programming, and Node.js is very helpful. Make sure to read through the installation guide.
In case of any queries or bugs, one can communicate with the AdonisJs team through the below channels.
- Github: Share bugs or create feature requests.
- Discord: Join the Discord server to chat instantly with others in the community.
- Twitter: Stay in touch with the progress made each day and be informed about awesome projects provided by the community.
10. TotalJS

Total.js platform is a collection of libraries, packages, UI components, practices, and complete products written in JavaScript. The basis of the platform is a server-side framework called Total.js framework and a client-side library called jComponent.
Both parts were written from scratch.
In most cases, we don’t need to use any dependencies with the Total.js platform, because it contains everything that we need for development.
The entire Total.js platform – products, libraries, modules, packages, and UI components are open-source under MIT license.
11. Moleculer

Moleculer is a fast, modern, and powerful microservices framework for Node.js. It provides many features for building and managing your microservices, such as:
- Promise-based solution (async/await compatible)
- request-reply concept
- support the event-driven architecture with balancing
- built-in service registry & dynamic service discovery
- load-balanced requests & events (round-robin, random, CPU-usage, latency, sharding)
- fault-tolerance features (Circuit Breaker, Bulkhead, Retry, Timeout, Fallback)
- built-in caching solution (Memory, MemoryLRU, Redis)
- pluggable loggers (Console, File, Pino, Bunyan, Winston, Debug, Datadog, Log4js)
- transporters (TCP, NATS, MQTT, Redis, NATS Streaming, Kafka, AMQP 0.9, AMQP 1.0)
- serializers (JSON, Avro, MsgPack, Protocol Buffer, Thrift)
- master-less architecture, all nodes are equal
- built-in metrics feature with reporters (Console, CSV, Datadog, Event, Prometheus, StatsD)
- tracing feature with exporters (Console, Datadog, Event, Jaeger, Zipkin)
12. Fastify
Start your journey with Fastify.
Fastify is highly focused on providing the best developer experience with the least overhead and a powerful plugin architecture. Hapi and Express inspire it, and it is one of the fastest web frameworks in the industry.
Start your journey with Fastify.
npm install fastifyIt provides high performance, and depending on the code complexity; it can serve up to 30 thousand requests per second. It is fully extensible via its hooks, plugins, and decorators.
Even if it is not mandatory, Fastify recommends to use JSON Schema to validate your routes and serialize your outputs, internally Fastify compiles the schema in a highly performant function.
13. Sencha Ext JS
Sencha Ext JS is a comprehensive premium JavaScript framework that helps you create cross-platform mobile and web applications along with data-intensive applications for modern devices.
It includes 140+ tested and pre-integrated high-performing UI components such as grids, D3 adapters, lists, panels, toolbars, windows, pivot grid, trees, menus, forms, HTML calendar, and more.
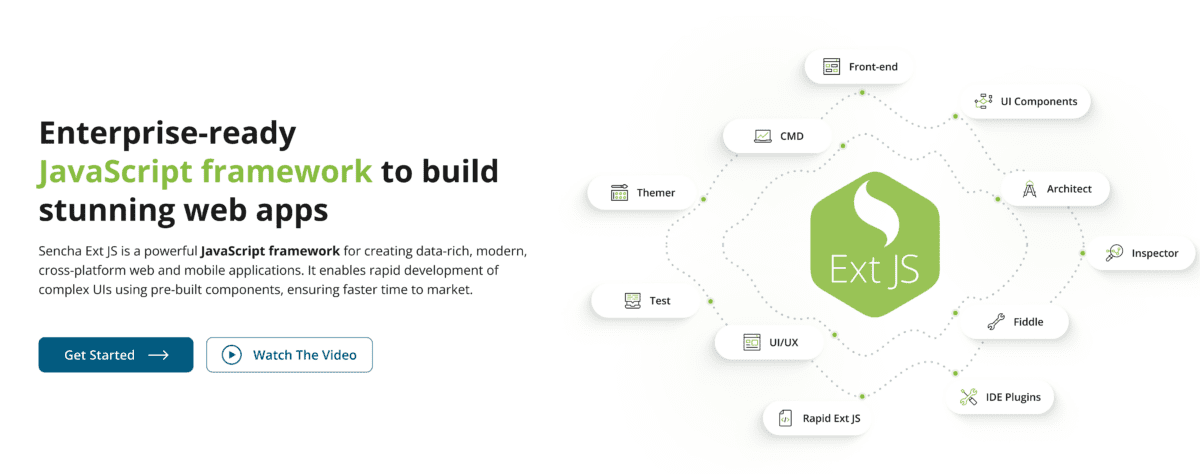
Accelerate web application development with the framework, tools, and components built to help you work seamlessly. In addition, use tools like Stencils, Themer, Sencha Cmd, Sencha Fiddle, IDE, code editor plugin, Stencils, and Sencha Architect to enhance the design process.
Sencha Test helps engineers and developers to improve the apps’ quality, leverage functional and unit testing for Ext JS apps, and create robust tests. Furthermore, Inspector is a debugging tool that lets you access the classes, objects, components, and more.
The data package is protocol agnostic that can consume data from the back-end sources. It allows client-side data collections using functional models and includes management capabilities to minimize round trips and allow client-side server operations.
More JavaScript frameworks for you to consider…
I would also like to share the following JS frameworks to build UIs & frontend.
↳ 14. Ember.js – best for building UIs.
↳ 15. Vue.js – full-featured framework.
↳ 16. Backbone.js – best to represent data as models.
↳ 17. Mithril – client-side JS framework.
↳ 18. Svelte – best to build frontend.
↳ 19. Meteor – best to build real-time apps.
↳ 20. Aurelia – component-based architecture to build UIs.
What is an API-first approach?
We all have heard the term called API first design or just API’s. Actually, the term API first design became popular after the industry started mentioning the term cloud-native application. Over a period of time from the development of a monolithic application, programmers started breaking down these applications into microservices.

All the interactions with these microservices from Web, Android, or iOS devices need to happen through APIs. Therefore, design for these APIs plays a major role in providing data to these interfaces. This means microservices have only one medium to communicate that is nothing but APIs.
Thus, API first design principle comes here into the picture. We need to consider designing our API first in mind before even writing the implementation for our microservices/backend services.
Remember: APIs are business drivers, so develop it at the beginning of the development of a system.
In the API-first design approach, an API is considered as a First-class citizen. Summarizing the above statements will give us the below three key points, which can be taken as a principle of API first approach.
- API is the first user interface of our application.
- API comes first and then the application.
- API is described (and maybe even self-descriptive)
There are plenty of companies using API first approaches, such as Twilio, NETFLIX, Stripe, Algolia, SendGrid, Etsy, Adobe, Amazon, and many more.
Amazon was among the first company which instructed its employees to use this approach. This approach’s importance could be understood with an incidence when Jeff Bezos(CEO of Amazon) issued a mandate called Bezos Mandate (sometime back around 2002), with a warning anyone who doesn’t follow this process will be fired.
Benefits of API-first approach
Plenty!
The following are some of them.
- Reusable/composable enterprise
- Allows parallel development
- Reduces overall cost over the lifetime of the project.
- Reduces risk of failures
- Faster growth
- Freedom from constraints
Now let’s explore one of the powerful languages of the web, which helps us implement the above-discussed approach.
JavaScript: A language of the web

JavaScript is one of the most important languages of today and tomorrow.
JavaScript is a high-level, interpreted, client-side scripting language. It is used to make web pages more interactive. It lets us implement complex and beautiful designs. JavaScript is an object-based scripting language that supports encapsulation, polymorphism, and to some extent, inheritance as well.
Also, it does not require to be compiled, unlike C, C++, and Java.
JavaScript can execute in the browser and on the server and any device with a javascript engine.
This is good to mention that JavaScript has nothing to do with Java. Then the question is, why is it called JavaScript? Actually, when JavaScript was initially released, it was called Mocha; it was later renamed to live script and then to JavaScript when Netscape and SUN did a license agreement.
JavaScript is used in developing almost every type of web product and application, such as smartwatches, games, websites, mobile, and web applications. Some of the most popular websites, like Google, Facebook, Netflix, Amazon make use of JavaScript to build their products.
Is it limited to the client-side?
JavaScript was initially designed to run in a browser as a client-side programming language. But now it has been evolved a lot, and it is more than what it used to be. Moreover, JavaScript is not only the client-side language but also JavaScript-based frameworks are being used to perform server-side programming as well.
An example of such a framework is NodeJs.

This is not the end of the capabilities of JavaScript. Besides being used as a client-side and server-side, it can also be used to design an application with a single code base and run onto a mobile(Android, iOS) and web.
An example of such a framework is ReactJS.
Popularity of JavaScript
JavaScript is arguably one of the most important languages today.
The rise of the web has taken JavaScript places it was never conceived to be. Currently, we have more than 100 programming languages, and every year new languages are being introduced. Among these, a few powerful languages bring quick changes in the market, and JavaScript is definitely one.
It has always been in the list of popular programming languages. According to StackOverflow, JavaScript is the most popular and commonly used programming language.

Do you know?
Nearly 70% of professional developers who responded to the 2020 Stack Overflow survey coded in JavaScript.
Conclusion
Building API can be challenging, but with the right framework, life is much easier. Explore the above-listed framework for your next API and Microservices and pick the best-suited one. Once you build, don’t forget to monitor the API endpoints.