Security is essential for any website to provide security, build the trust of visitors, and for better ranking.
It’s necessary for the transactional or membership-based site to encrypt the sensitive data from a client to a server.
Improve your Website Security with SSL/TLS Certificate.
HTTPS would also boost the search engine ranking, so you may consider having this for your blog as well.
If you are looking to have a certificate implemented on your website without spending $$$ then here are a few Certificate Authority houses (SSL providers) to help you with that.
The following acronyms are used below.
- SSL – Secure Socket Layer
- TLS – Transport Layer Security
- CDN – Content Delivery Network
- DV – Domain Validated
- ACME – Automated Certificate Management Environment
If you are looking for shared hosting that provides a free SSL certificate, you may try SiteGround. If you are wondering why SiteGround then, the following are some of the features.
- SiteGround operates on Google Cloud to create a powerful and technically superior hosting service.
- The latest version of PHP
- Unmatched customer support available 24/7 via chat, phone, tickets. Waiting time is up to 10 minutes, if at all.
- An innovative approach to performance and security
- Hosting plans come with tons of free and useful features
- Free SSL
- Free Cloudflare CDN
- Free and quick site migration from other hosts
- Free automated daily backup and restore
Now, let’s take a look at the following to get a certificate.
ZeroSSL
You can get your SSL certificate in just a few minutes with ZeroSSL. You start by entering the required details, go through the quick verification process, and BOOM, there’s your SSL certificate ready.

The generated SSL certificate is 100% free to use and lasts for 90 days, after which you can renew again and again at no cost.
Don’t want to renew the certificate manually?
No problem, you can use ZeroSSL Certbot to automate the renewal. Cool, isn’t it?
ZeroSSL is a certificate authority, so certs are issued by them. You can manage all your certs with their easy-to-use dashboard. You get up to 3 certificates for FREE. However, if you need more, you can go for a paid plan which offers unlimited certificates with many other premium features.
- Wildcard & multi-domain certificate
- REST API access
- Technical support
They also offer a custom solution, so talk to them if you have a business requirement to issue certificates for your clients.
Let’s Encrypt
Let’s Encrypt is a collaborative project with Linux Foundation and a new certificate authority sponsored by Mozilla, Akamai, SiteGround, Cisco, Facebook, etc., which offers an SSL/TLS Certificate free.
This is great to save costs to get it implemented in a non-production environment.
It’s automated, which means you don’t have to spend time creating CSR and send it to the CA authority to get it signed. It all happens in the background on your web servers.
Let’s Encrypt has issued more than one billion certificates so far. Check out the guides to implement Let’s Encrypt in Apache HTTP or Nginx.
SSL For Free
SSL For Free uses Let’s Encrypt ACME server by using domain validation to provide you a certificate. It’s 100% free, and certs are issued within minutes.

SSL
SSL.com offers free SSL at zero cost for 90 days. This is a good fit if you are looking to play around to understand how SSL works or some short-term projects.
Get your free SSL cert issued in minutes with the highest strength and bit encryption. All the main browsers recognize SSL.com issued certificates.
Cloudflare
Cloudflare is CDN & Security Company. They make your website faster and secure—Cloudflare power many popular sites, including Reddit, yelp, Mozilla, StackOverflow, etc.

Recently, Cloudflare announced universal SSL is free for all users. That’s right, even if you are in the free plan. If you are using Cloud Flare and SSL is not yet activated, then here is how you can do it quickly.
- Login into Cloudflare
- Select the website you want to enable SSL
- Click on the SSL/TLS at the right sidebar navigation
- Ensure it’s configured as “Flexible” and status shows as “ACTIVE CERTIFICATE.”
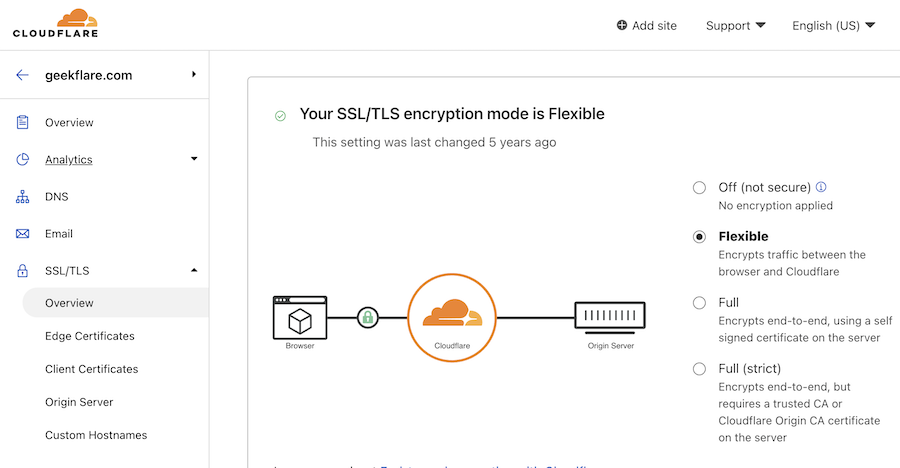
It may take a few seconds to go live. You can verify by accessing your website with HTTPS.
Cloudflare’s FREE SSL certificate is also offered by many hosting providers who integrate tightly with Cloudflare to offer CDN and web security. One such example is Kinsta for premium WordPress hosting.
I hope the above helps you in getting free SSL for your website/blog. But if you are looking to buy a premium certificate for enterprise business, you can check out the SSL Store.