Firebase is an application development platform launched in 2012 and acquired by Google two years later. In its beginnings, Firebase was thought of just as a database for real-time applications, but Google saw its potential and decided to add additional services to it.
Currently, Firebase is a BaaS (backend as a service) system with 18 services to facilitate the creation of web and mobile applications. Among the companies using Firebase’s BaaS services are Accenture, Alibaba Travels, Stack, Twitch, and Instacart, along with more than 2,300 others.
Benefits of using Firebase
The first of the services Firebase offered was its real-time database, and it remains one of its biggest draws. Firebase Real-time databases are hosted in the cloud, storing data in JSON format and synchronizing in real-time with every client connected to them. Whether using the iOS SDK, Android SDK, or JavaScript SDK, all applications connected to a Firebase Realtime database share one instance of the database, always kept up to date with the latest data.
Cloud Firestore is another interesting Firebase service. It is a NoSQL document database designed to facilitate data storage, synchronization, and querying for mobile and web apps on a global scale. The creation of hierarchies to store related data and expressive queries to retrieve data allow the full potential of Cloud Firestore to be realized. In turn, queries scale based on the size of the results rather than the data set size. This allows applications to scale from the beginning without waiting until the moment in which needs exceed capacity.
In addition to the aforementioned database services, Firebase also offers hosting services, file storage, functions (AWS Lambda-style), among many other things.
Creating an API
APIs are a way to provide services for your own or third-party apps to use. Firebase allows you to provide custom services that, in turn, make use of Firebase’s own services without the hassle of setting up a backend for those services. You could, for example, offer access to a Firebase real-time database for third-party applications to query information collected by industrial sensors.
The first step in creating an API in Firebase is to access the Firebase console and add a project by clicking “Add project” and giving the new project a name. Google will give you the option to enable Google Analytics for your new project. It is recommended to accept this recommendation, as you will get benefits such as A/B testing and a wide variety of statistical reports from your API.
Once you have created your project, you will be able to select the Firebase services that your API will use. To illustrate this task, we will see how to use the Firebase Realtime database service.
Setting up a real-time database in Firebase
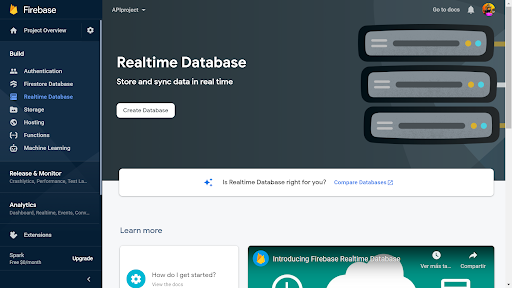
In the navigation bar on the left, inside the Develop section, click on Realtime Database. A “Create Database” button will appear on the right. Click on it to create your first database in Firebase.

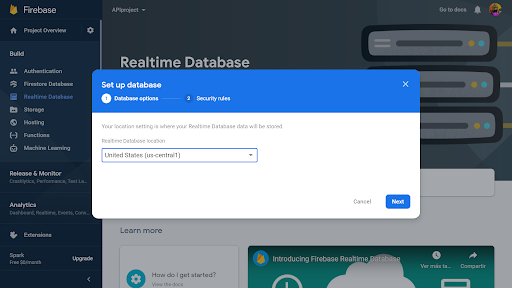
Next, you will have to choose between several geographic location options for your new database. Select the one that is closest to your users. This is an important aspect to minimize the latency of your API, particularly in real-time apps.

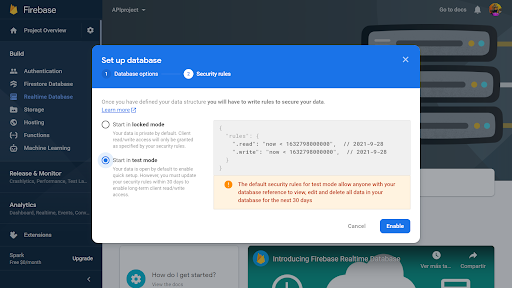
The next step is to configure the basic security rules for your database. You can opt for locked mode and then assign access permissions as needed, or opt for test mode, which enables all reads and writes.

You can start with the test mode option not to complicate security settings at the beginning. You can always create rules later to set the security configuration with greater granularity.
As soon as you finish configuring your database, the corresponding API is also enabled in your personal console’s APIs and Services section in Google Cloud Platform.
Programming the Firebase API
At this point, you already have the basic elements of your project configured in the Firebase console. The next step is to write your API code. To do that, you will need to initialize the Firebase hosting and functions on your local computer. You can install firebase-tools using npm:
npm install -g firebase-toolsThen you can log into firebase and initialize your project with the following commands:
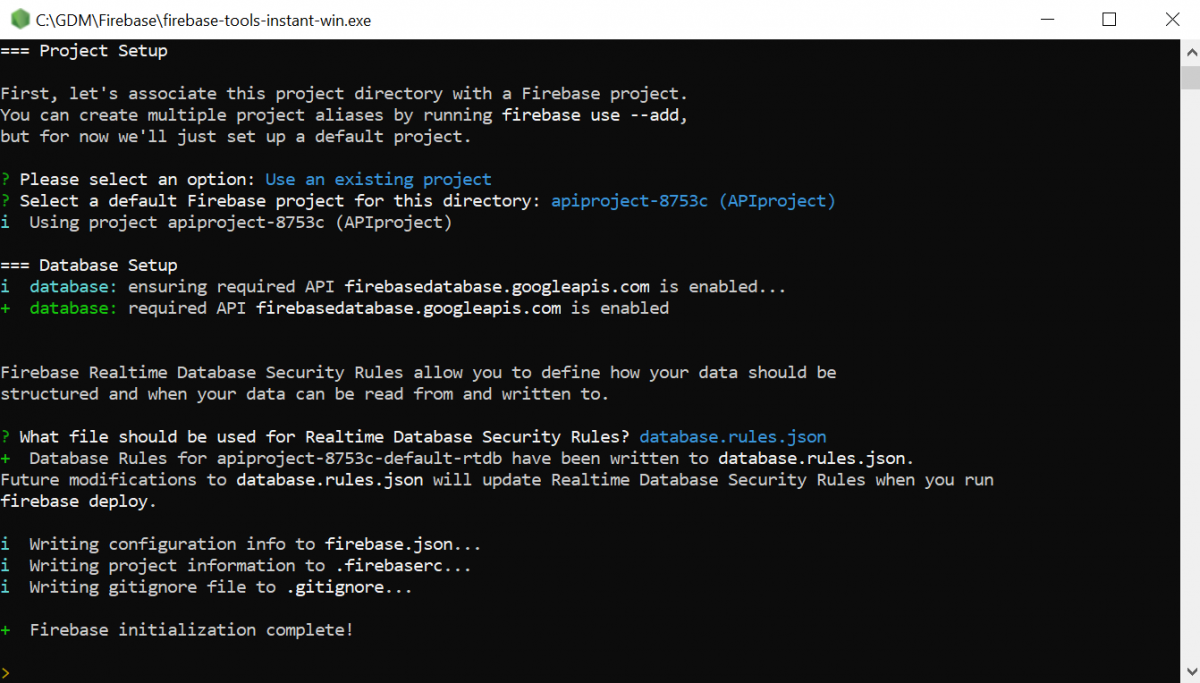
firebase login firebase initA welcome screen will be displayed in which Firebase informs you of the folder in which your project will be initialized, and a menu of options will appear.

In that menu, select Functions and Hosting (the Hosting option will allow you to have a custom URL for the API you will develop). Then choose from the list the Firebase app you created earlier, after which you must select the language to use. To develop a web API, you can opt for JavaScript.

If you will use package dependencies, install them with npm inside the functions folder. Then you can start writing the code for your functions. Remember to include the firebase-functions and firebase-admin packages, along with any other packages you need:
import * as functions from 'firebase-functions';
import * as admin from 'firebase-admin';
To use the real-time database, you must specify its URL when initializing your JavaScript SDK. The URL is located in the Realtime Database section of the Firebase console. You can recognize it by its format:
https://<database-name>.<region>.firebasedatabase.appYou can use the following snippet to initialize your SDK, replacing the data that corresponds to your project’s configuration object:
var config = {
  apiKey: "apiKey",
  authDomain: "projectId.firebaseapp.com",
  databaseURL: "https://databaseName.firebaseio.com",
  storageBucket: "bucket.appspot.com"
};
firebase.initializeApp(config);
var database = firebase.database();
Once you have written the code of your API function, it is time to deploy. But before doing so, you will have to make some changes in firebase.json, adding the following lines, modified according to your project configuration:
"rewrites": [
     {
       "source": "/api/v1/**",
       "function": "webApi"
     }
]
The next step is deployment. The first time you must do a complete deployment, executing the command:
firebase deployIn subsequent deploys, you will be able to deploy only the functions, using the –only functions parameter.
After executing the deploy command, the Firebase CLI displays the URL of the HTTP endpoints of your functions in the terminal, which you can use to invoke your APIs from a web application. The URL contains your project ID and a region for the HTTP function. For example, the following URL can be used to call an item query function by passing it itemid=1 as a parameter:
https://us-central1-apiproject-8753c.cloudfunctions.net/itemQuery?itemid=1To execute the function, open the URL with the corresponding parameters in a browser.
Note that deploying to the production environment requires a subscription to the Firebase Blaze plan, which is pay-as-you-go, as you can read on the Firebase pricing page. It is a post-billing service, which means that you are billed for your usage at the end of each month.
If you do not have a Blaze subscription, the deploy command will not display your API URL. Instead, you will see a message informing you that you must subscribe to the Blaze plan if you want to deploy to the runtime environment. In this case, you can still use Firebase Local Emulation Suite to build and test applications on your local machine instead of deploying them to the Firebase production environment. Local testing is useful to avoid unnecessary costs during application development, as each test run may generate charges on your account.
Local Testing and Prototyping
The Local Emulator Suite tool offers an integrated user interface that makes prototyping easy and useful for testing your apps on your local machine.
With the Emulator Suite user interface, you can test your database designs, your Cloud Functions workflows, analyze backend services’ performance, and evaluate changes in security rules, among other tasks. It is basically a secure sandbox to test your API functionality before sending it to a production environment.
To emulate your functions or test your application locally, run firebase emulators:start. You must have Java installed to be able to use Firestore Emulator. If you don’t have it, you can install it from here.
When you invoke Firestore Emulator, the command will return a URL that will allow you to open the Emulator Suite user interface in your browser. By default, this URL will be localhost:4000, but it may vary on each machine.
You will also get a full URL for your HTTP function. This URL will look similar to:
http://localhost:5001/apiproject-8753c/us-central1/itemQueryonly it will have the name of your project, the name of your function, and it might also have a different port number on your local machine.
To test the function, copy the URL returned by the emulator, adding any necessary parameters (e.g. ?itemid=1) and enter it in a new tab of your browser. The results of the API execution will appear in the Emulator Suite UI.
In the Logs tab, you will see new logs indicating that the itemQuery() function was executed. If your function generates new data in your Firestore database, you will see it in the Firestore tab.
Gaining more exposure for your API
If you want the APIs you develop to become popular, Firebase can help you with that too. Not only because it allows you to build your application faster, taking a lot of the work out of getting backend services up and running, but also by helping you with your product positioning. How is that possible? Simply because apps associated with Firebase rank better in search rankings than other applications.
Also, take into account Firebase’s app indexing API. This tool improves the search rankings of app links and helps users find the desired content. It also places the Install button after your app’s homepage button so that interested users are just a click away from becoming users of your app.
In conclusion, Firebase not only offers you backend services that dramatically speed up the development of your API but once it’s up and running and exposed to the world, it also helps you promote it – and make money from it.

