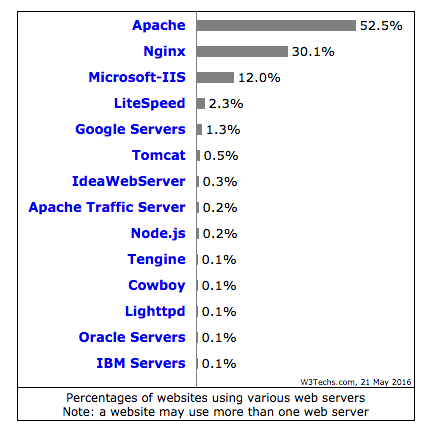
Nginx web server is used on more than 30% of website worldwide and growing.
Considering the increase in online web threats, one the challenge for web engineer is to well aware of hardening and securing Nginx.
Nginx is well-known for its performance and lightweight web server/proxy and used on many busiest sites.
- Pinterest.com
- Reddit.com
- Wordpress.com
- Stackoverflow.com
- Mail.ru
If you are hosting your web applications on Nginx and concerned about security then one of the first thing you would like to implement is Web Application Firewall (WAF).
Mod Security is an Open Source WAF by Trustwave SpiderLabs and was made available for Nginx in 2012.
In this guide, I’ll explain how to download, install and configure Mod Security with Nginx.
If you are new to Nginx then I would recommend taking this fundamental course.
Download Nginx and ModSecurity
You can either download the nginx directly on your server or on your local PC then transfer it.
- Download the latest version from below link
http://nginx.org/en/download.html
- If you are directly downloading on server then can use wget as below
wget http://nginx.org/download/nginx-1.9.15.tar.gz
- Extract them by using gunzip command
gunzip -c nginx-1.9.15.tar.gz | tar xvf –
- You will see the new folder created
drwxr-xr-x 8 1001 1001 4096 Apr 19 12:02 nginx-1.9.1
- You can use below commands from server directly
wget https://www.modsecurity.org/tarball/2.9.1/modsecurity-2.9.1.tar.gz
gunzip -c modsecurity-2.9.1.tar.gz | tar xvf –
Let’s get them installed
Install Nginx with Mod Security
It’s important to compile Nginx and mod security source code.
- Login into a server and ensure you have root permission.
Note: if you are doing on a brand new server then you may need to install following libraries.
yum install gcc make automake autoconf libtool pcre pcre-devel libxml2 libxml2-devel curl curl-devel httpd-devel
First, let’s compile mod security. Go to modsecurity-2.9.1 folder and use below commands.
./configure --enable-standalone-module
make
Next, install Nginx with mod security
./configure --add-module=../modsecurity-2.9.1/nginx/modsecurity
make
make install
This concludes Nginx is installed with Mod Security and it’s time to configure it.
Configure Mod Security with Nginx
Copy modsecurity.conf-recommended & unicode.mapping file from extracted folder of above-downloaded ModSecurity source code to nginx conf folder. You may also use the find command.
find / -name modsecurity.conf-recommended
find / -name unicode.mapping
[root@GeekFlare-Lab conf]# cp /opt/nginx/binary/modsecurity-2.9.1/modsecurity.conf-recommended /usr/local/nginx/conf/
[root@GeekFlare-Lab conf]# cp /opt/nginx/binary/modsecurity-2.9.1/ unicode.mapping /usr/local/nginx/conf/
[root@GeekFlare-Lab conf]#
Let’s rename modsecurity.conf-recommended to modsecurity.conf
mv modsecurity.conf-recommended modsecurity.conf
- Take a backup of nginx.conf file
- Open nginx.conf file and add following under “location /” directive
ModSecurityEnabled on;
ModSecurityConfig modsecurity.conf;
So it should appear like this
location / {
ModSecurityEnabled on;
ModSecurityConfig modsecurity.conf;
}
Now, Mod Security is integrated with Nginx. Restart the Nginx to ensure it’s coming up without any error.
Let’s verify…
There are two possible methods to confirm Nginx is compiled with Mod Security.
First…
List the compiled module by using –V with nginx executable file.
[root@GeekFlare-Lab sbin]# ./nginx -V
nginx version: nginx/1.9.15
built by gcc 4.4.7 20120313 (Red Hat 4.4.7-16) (GCC)
configure arguments: --add-module=../modsecurity-2.9.1/nginx/modsecurity
[root@GeekFlare-Lab sbin]#
Second…
Go to logs folder and view the error file, you should see following
2016/05/21 21:54:51 [notice] 25352#0: ModSecurity for nginx (STABLE)/2.9.1 (http://www.modsecurity.org/) configured.
2016/05/21 21:54:51 [notice] 25352#0: ModSecurity: APR compiled version="1.3.9"; loaded version="1.3.9"
2016/05/21 21:54:51 [notice] 25352#0: ModSecurity: PCRE compiled version="7.8 "; loaded version="7.8 2008-09-05"
2016/05/21 21:54:51 [notice] 25352#0: ModSecurity: LIBXML compiled version="2.7.6"
This concludes you have successfully configured ModSecurity with Nginx.
By default configuration is in detect mode only that means it will not execute any action and protect your web applications.
In my next article, I’ve explained how to configure OWASP rule set and enable Mod Security to protect from web security vulnerabilities.