How to get telnet working on Windows and Linux?
telnet is not available by default on a higher version of CentOS, RHEL and macOS. But that doesn’t mean you can’t get it installed.
telnet command not found – fixed
When you run telnet, you will notice the following error.
[root@instance-1 ~]# telnet
-bash: telnet: command not found
[root@instance-1 ~]#
To fix this, you need to, install telnet and it’s easy.
Installing telnet on CentOS/RHEL
- Log in to the server as
root - Run the below command to install
yum -y install telnet- You can also use DNF if using CentOS 8.
dnf -y install telnet- It’ll download the package and install and show you the complete confirmation below.
Downloading packages:
telnet-0.17-64.el7.x86_64.rpm                                                                                                              |  64 kB  00:00:00
Running transaction check
Running transaction test
Transaction test succeeded
Running transaction
  Installing : 1:telnet-0.17-64.el7.x86_64                                                                                                                    1/1
  Verifying  : 1:telnet-0.17-64.el7.x86_64                                                                                                                    1/1

Installed:
  telnet.x86_64 1:0.17-64.el7

Complete!- Now, you can run
telnet
[root@instance-1 ~]# telnet
telnet>
Have fun!
Installing telnet on macOS
To install telnet on macOS, you need to have/install Homebrew.
- Launch terminal and run the below command to install Homebrew (skip if you already have)
/usr/bin/ruby -e "$(curl -fsSL https://raw.githubusercontent.com/Homebrew/install/master/install)"- It will take a few seconds and once done; you will see the success message.
Cloning into '/usr/local/Homebrew/Library/Taps/homebrew/homebrew-core'...
remote: Enumerating objects: 4947, done.
remote: Counting objects: 100% (4947/4947), done.
remote: Compressing objects: 100% (4748/4748), done.
remote: Total 4947 (delta 49), reused 337 (delta 7), pack-reused 0
Receiving objects: 100% (4947/4947), 3.99 MiB | 3.17 MiB/s, done.
Resolving deltas: 100% (49/49), done.
Tapped 2 commands and 4731 formulae (4,989 files, 12.4MB).
Already up-to-date.
==> Installation successful!- Great, it’s time to install telnet using
brewcommand
brew install telnet- It will download and install the necessary package. Once done, rerun the telnet.
Chandans-iMac:~ chandan$ telnet
telnet>
It was easy. Isn’t it?
telnet is not recognized – Fixed
Let’s find out how to fix the telnet not recognized error when you execute on a Windows desktop and server.
Telnet is one of the popular commands to check network connectivity, and for some reason, the higher Windows OS version doesn’t have it installed by default. That results in showing an error when you run telnet on the command prompt.
C:\Users>telnet
'telnet' is not recognized as an internal or external command,
operable program or batch file.

C:\Users>
It’s easy to fix.
You have to install telnet to get this working.
Installing Telnet on Windows 10 & 11
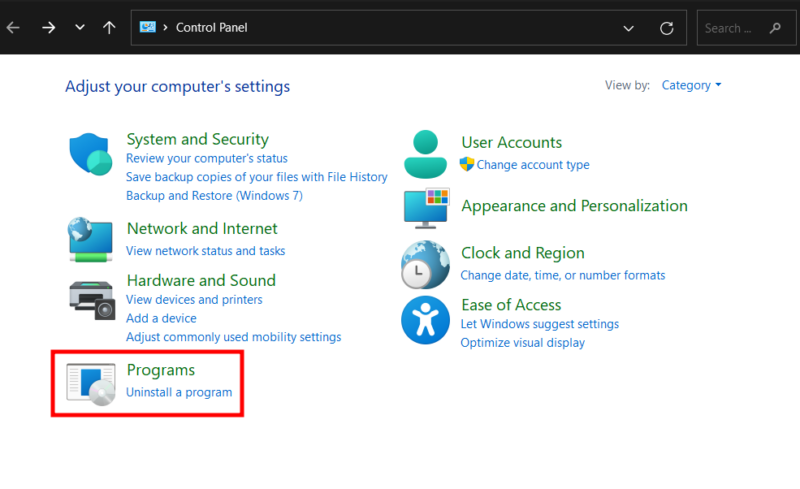
Using Control Panel
- Open the Control Panel from the taskbar search.
- Click Programs.
- Enter into Turn Windows features on or off.
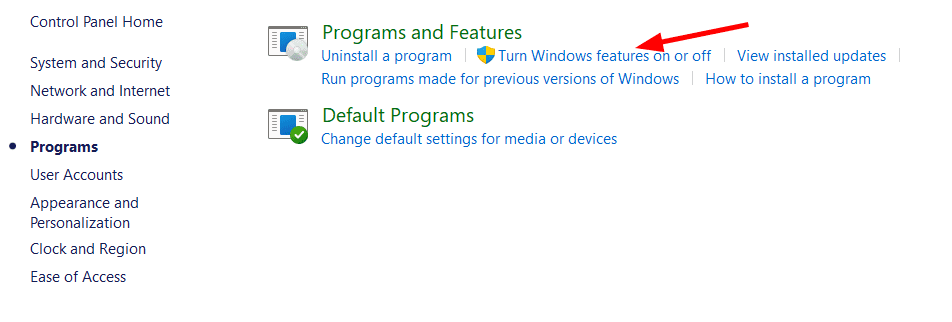
- Scroll down to check Telnet Client, and click OK at the bottom.

It will install the necessary package and make telnet available for you.
Using Command Prompt
- Type cmd in the taskbar search and open Command Prompt as an administrator.

- Type
dism /online /Enable-Feature /FeatureName:TelnetClient, and press enter.

- Likewise, you can use
dism /Online /Disable-Feature /FeatureName:TelnetClientto disable telnet.
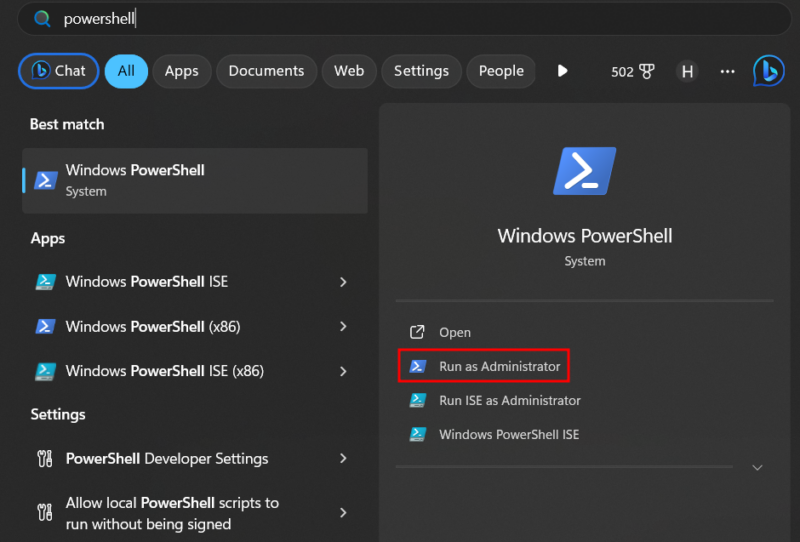
Using Powershell
- Type powershell in the taskbar search and open it as an administrator.
- Type
Enable-WindowsOptionalFeature -Online -FeatureName TelnetClientand press enter.
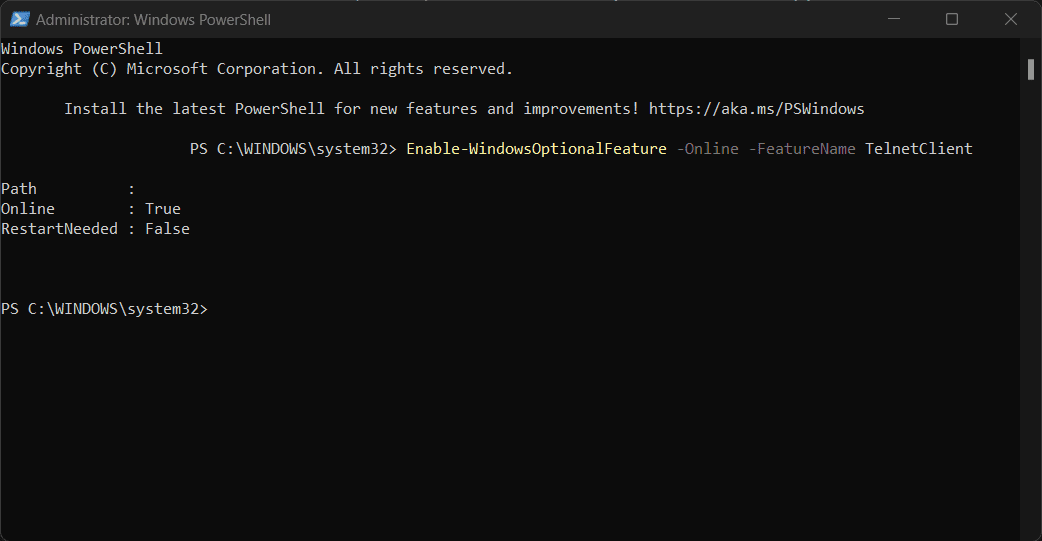
- This will give a success message shortly.
- To undo, paste
Disable-WindowsOptionalFeature -Online -FeatureName TelnetClientand press enter.
Installing Telnet on Windows Server
If you are running the server edition, then you can install it by following the steps.
- Go to start and launch for “Server Manager.”
- It will open a server manager dashboard where you have to click on

- It will prompt “Add Roles and Features Wizard.”

- Let the default settings be there and click Next on Before You Begin, Installation Type, Server Selection, Server Roles
- On Features selection, select “Telnet Client” and Next

- Click on Install on the Confirmation window to begin the installation
It will take a few seconds, and you will get a confirmation of installation success.

- Click close and launch Command Prompt to rerun the telnet.

There you go, have fun!