


Website monitoring often focuses on checking if a website is online and responding to requests. A website can still be accessible even when its layout, content, or design has changed. A deployment could remove an important section, change a call to action, update a pricing page, or introduce a visual issue.
Website monitoring with the Screenshot API adds a visual element to the monitoring process. You can capture screenshots of selected pages at different times and maintain a record of how each page appeared during every capture.
In this article, I’ll build a Node.js workflow using the Screenshot API to monitor multiple website pages. The workflow captures screenshots, stores them with timestamps, and creates a visual history for reviewing changes over time.
What Is Website Screenshot Monitoring?
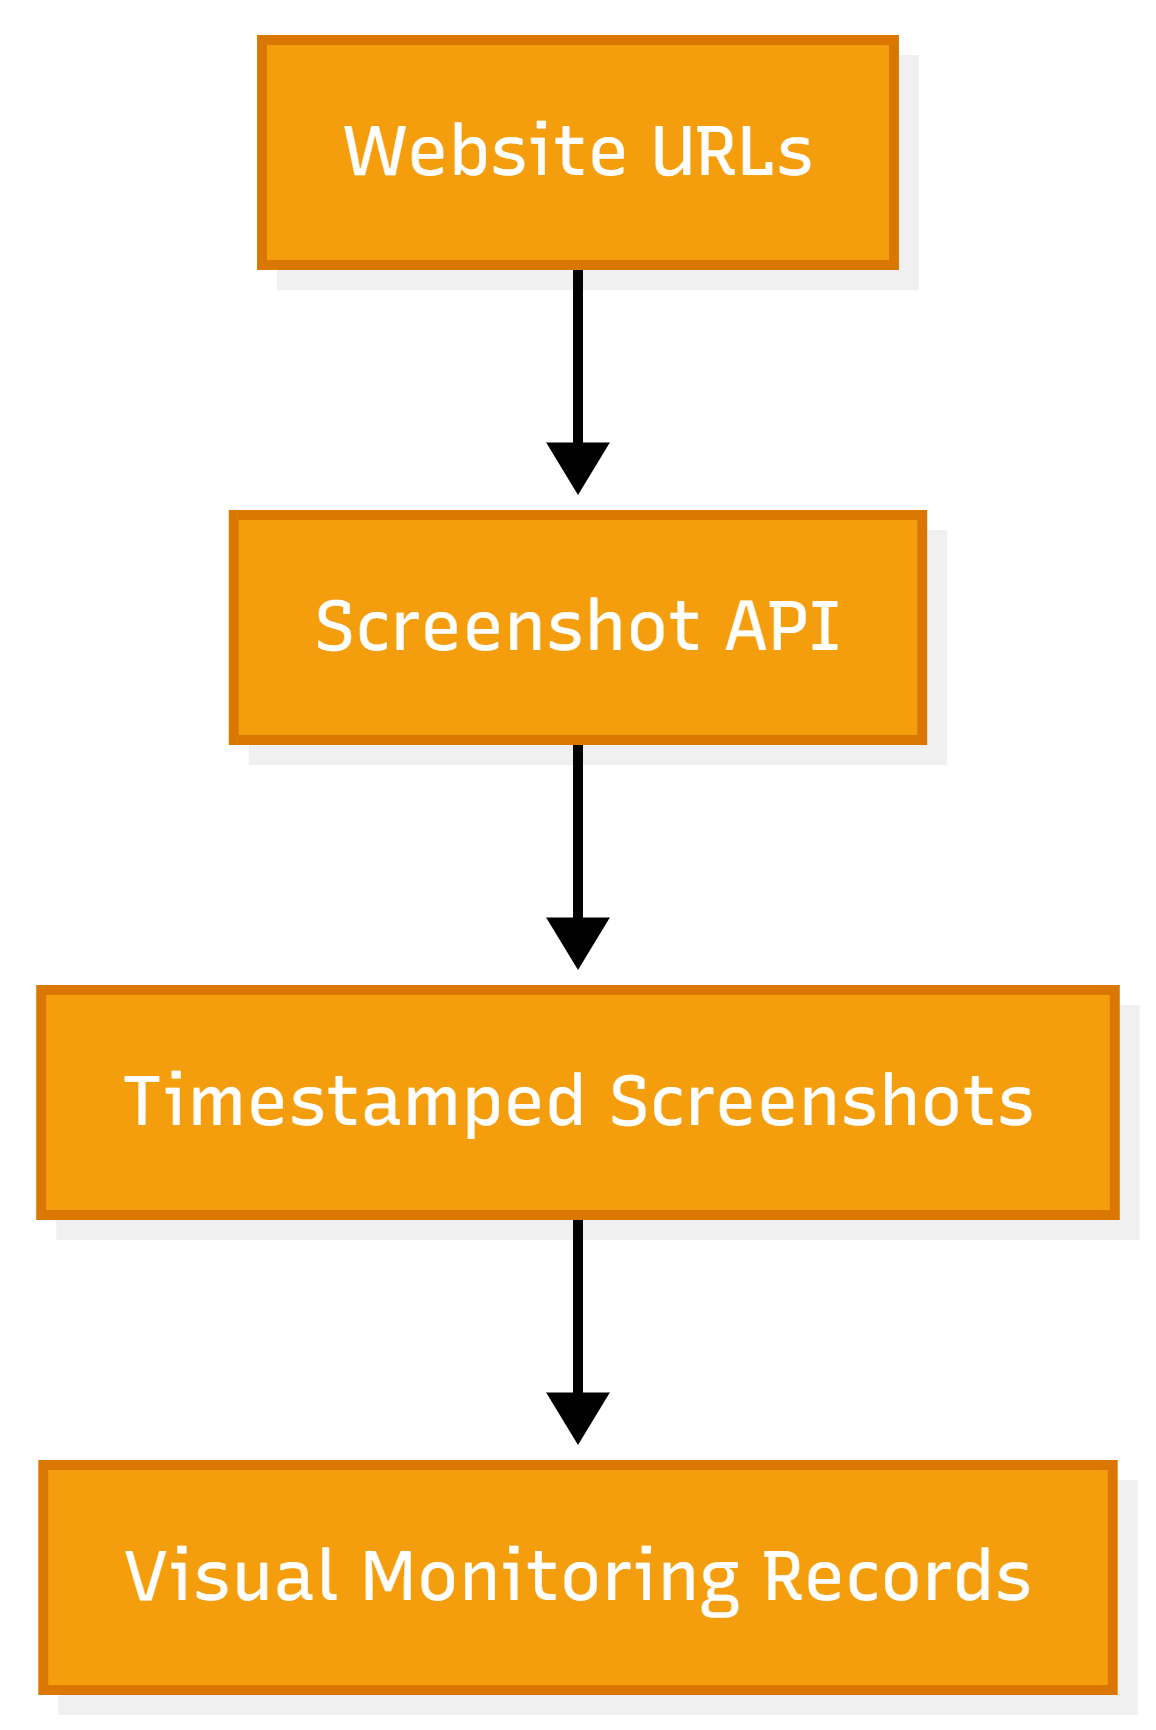
Website screenshot monitoring involves capturing screenshots of selected web pages at different points in time. Each screenshot provides a visual record of the page during that capture.
This approach can be useful when you want to track important pages such as homepages, pricing pages, product pages, or landing pages. You can review screenshots from different dates to identify changes in page layouts, content, calls to action, or other visible elements.
A basic website screenshot monitoring workflow follows this process:
Why Use Screenshots for Website Monitoring?
Website monitoring tools can report technical issues such as downtime or slow response times. These checks do not show how a page appears to visitors. A page may load successfully even when an important element is missing or the layout has changed unexpectedly.
Screenshot monitoring creates a visual record that you can review over time. It can be useful for:
- Monitoring website deployments: Capture a page after a deployment and review the result for unexpected visual changes.
- Tracking important pages: Monitor homepages, pricing pages, product pages, and landing pages.
- Recording website changes: Store screenshots from different dates to see how a page has changed.
- Reviewing visual issues: Compare screenshots when users report a layout or content problem.
- Monitoring competitor pages: Capture selected competitor pages periodically and review visible updates.
Build a Website Screenshot Monitoring Workflow
In this section, we’ll build a Node.js application that captures screenshots of multiple website pages. Each time you run the script, it records a new screenshot for every URL. You can then review screenshots from different capture times to identify visible changes.
Prerequisites
Before you begin, make sure you have:
- Geekflare API key: Create a Geekflare account and get your API key from the dashboard.
- Node.js: Install Node.js on your system.
Step 1: Set Up the Project
Create a project folder and install the Geekflare Node.js SDK:
npm install @geekflare/api-nodeCreate an index.js file. Add the following code:
import { GeekflareClient } from "@geekflare/api-node";

const client = new GeekflareClient({
  apiKey: "<api-key>",
});

const websites = [
  {
    name: "geekflare-screenshot",
    url: "https://geekflare.com/screenshot/",
  },
  {
    name: "github",
    url: "https://github.com/",
  },
  {
    name: "stackoverflow",
    url: "https://stackoverflow.com/",
  },
];

const screenshots = [];

for (const website of websites) {
  const result = await client.screenshot({
    url: website.url,
    device: "desktop",
    type: "png",
    fullPage: true,
    blockAds: true,
    hideCookie: true,
    skipCaptcha: true,
    addTimestamp: true,
    pageHeight: 2000,
    viewportWidth: 1280,
    viewportHeight: 800,
    theme: "auto",
    removeBackground: false,
    highlightLinks: false,
    delay: 2,
    disableAnimations: true,
    quality: 90,
    scaleFactor: 1,
    captureBeyondViewport: true,
    fallbackToFullPage: false,
    inline: false,
  });

  screenshots.push({
    name: website.name,
    url: website.url,
    capturedAt: new Date().toISOString(),
    screenshot: result,
  });

  console.log(`Screenshot captured for ${website.name}`);
}

console.log(JSON.stringify(screenshots, null, 2));
Replace <api-key> with your Geekflare API key.
The websites array contains the pages you want to monitor. You can add, remove, or update URLs based on your requirements.
The for loop processes each website one at a time. It sends the URL to the Screenshot API and stores the result in the screenshots array. Each record also contains a capturedAt field that records the time of the capture.
Geekflare Screenshot API Parameters
The Geekflare Screenshot API supports several parameters that control how a page is captured. You need not use every parameter in your application. Select the ones that fit the pages you want to monitor.
| Parameter | Type Accepted | Description |
|---|---|---|
url | String | The URL of the page to capture. |
device | String | Sets the device type, such as desktop or mobile. |
proxyCountry | String | Specifies the country used to route the screenshot request. |
type | String | Sets the screenshot format, such as png, jpeg, or webp. |
fullPage | Boolean | Captures the complete page instead of only the visible viewport. |
blockAds | Boolean | Blocks advertisements before the screenshot is captured. |
hideCookie | Boolean | Hides cookie banners that may cover page content. |
skipCaptcha | Boolean | Attempts to handle CAPTCHA pages during the request. |
addTimestamp | Boolean | Adds a timestamp to the screenshot. |
pageHeight | Number | Sets the height for a partial page capture. |
viewportWidth | Number | Sets the browser viewport width. |
viewportHeight | Number | Sets the browser viewport height. |
theme | String | Sets the rendering theme to light, dark, or auto. |
removeBackground | Boolean | Removes the page background from the screenshot. |
highlightLinks | Boolean | Highlights links visible on the page. |
delay | Number | Sets the wait time before capture in seconds. |
disableAnimations | Boolean | Disables page animations before the screenshot is captured. |
quality | Number | Sets image quality for supported formats. |
scaleFactor | Number | Sets the scale used for the screenshot. |
captureBeyondViewport | Boolean | Captures content outside the visible viewport. |
selector | String | Captures a specific element based on a CSS selector. |
fallbackToFullPage | Boolean | Captures the full page if the specified selector cannot be found. |
inline | Boolean | Returns the image data directly in the API response. |
For this example, fullPage is set to true to capture the complete page. blockAds and hideCookie are enabled to remove elements that may affect the screenshot. disableAnimations is also enabled to reduce differences caused by animated page elements.
The viewportWidth and viewportHeight values define the browser dimensions used during the capture. You can change these values if you want to monitor how a page appears on a different screen size.
The delay value is set to 2, which waits two seconds before the screenshot is captured. This gives the page time to load its visible content.
Step 2: Run the Monitoring Script
Save the index.js file and run the following command from your project directory:
node index.jsThe script processes every URL in the websites array. You should see output similar to:

After all requests are completed, the script prints the monitoring records as JSON.
Step 3: Analyze the Outcome
Each website produces a separate record in the screenshots array. The record contains the website name, URL, capture time, and the response returned by the Screenshot API.
The output follows a structure similar to this:
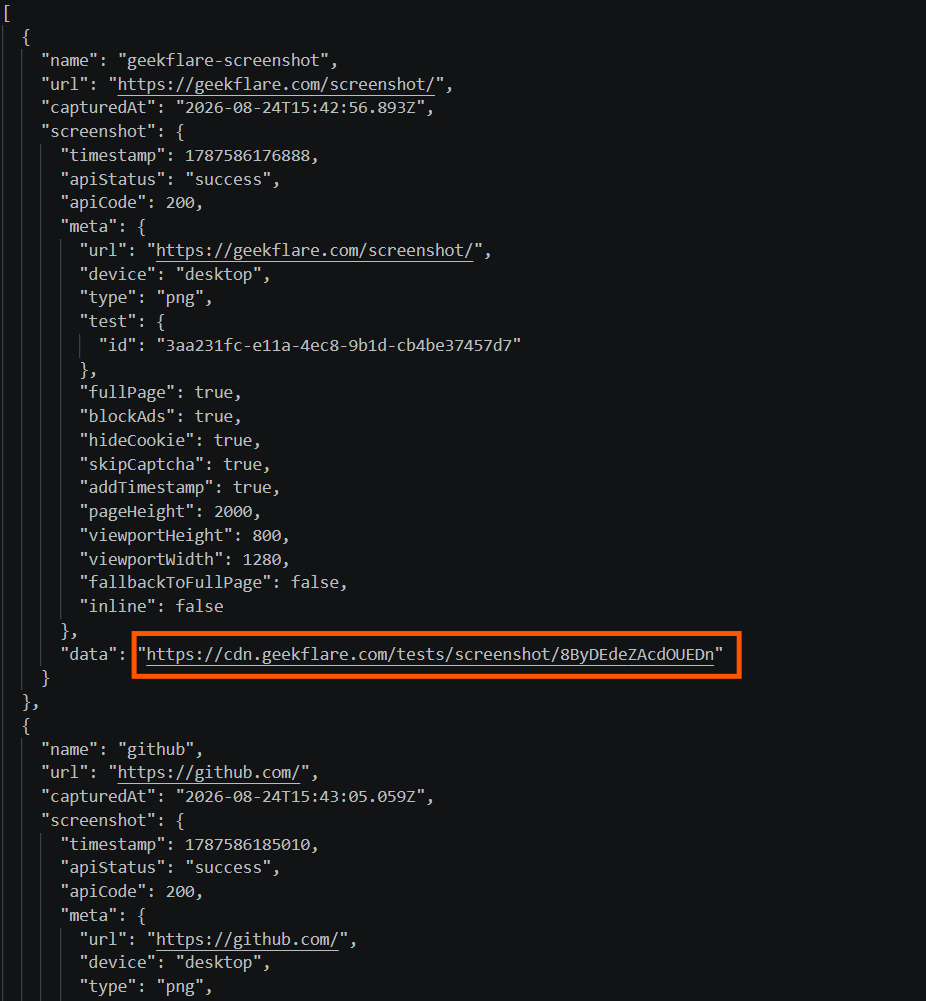
The API response contains the screenshot output. You can use the returned screenshot data to access and review the captured page.
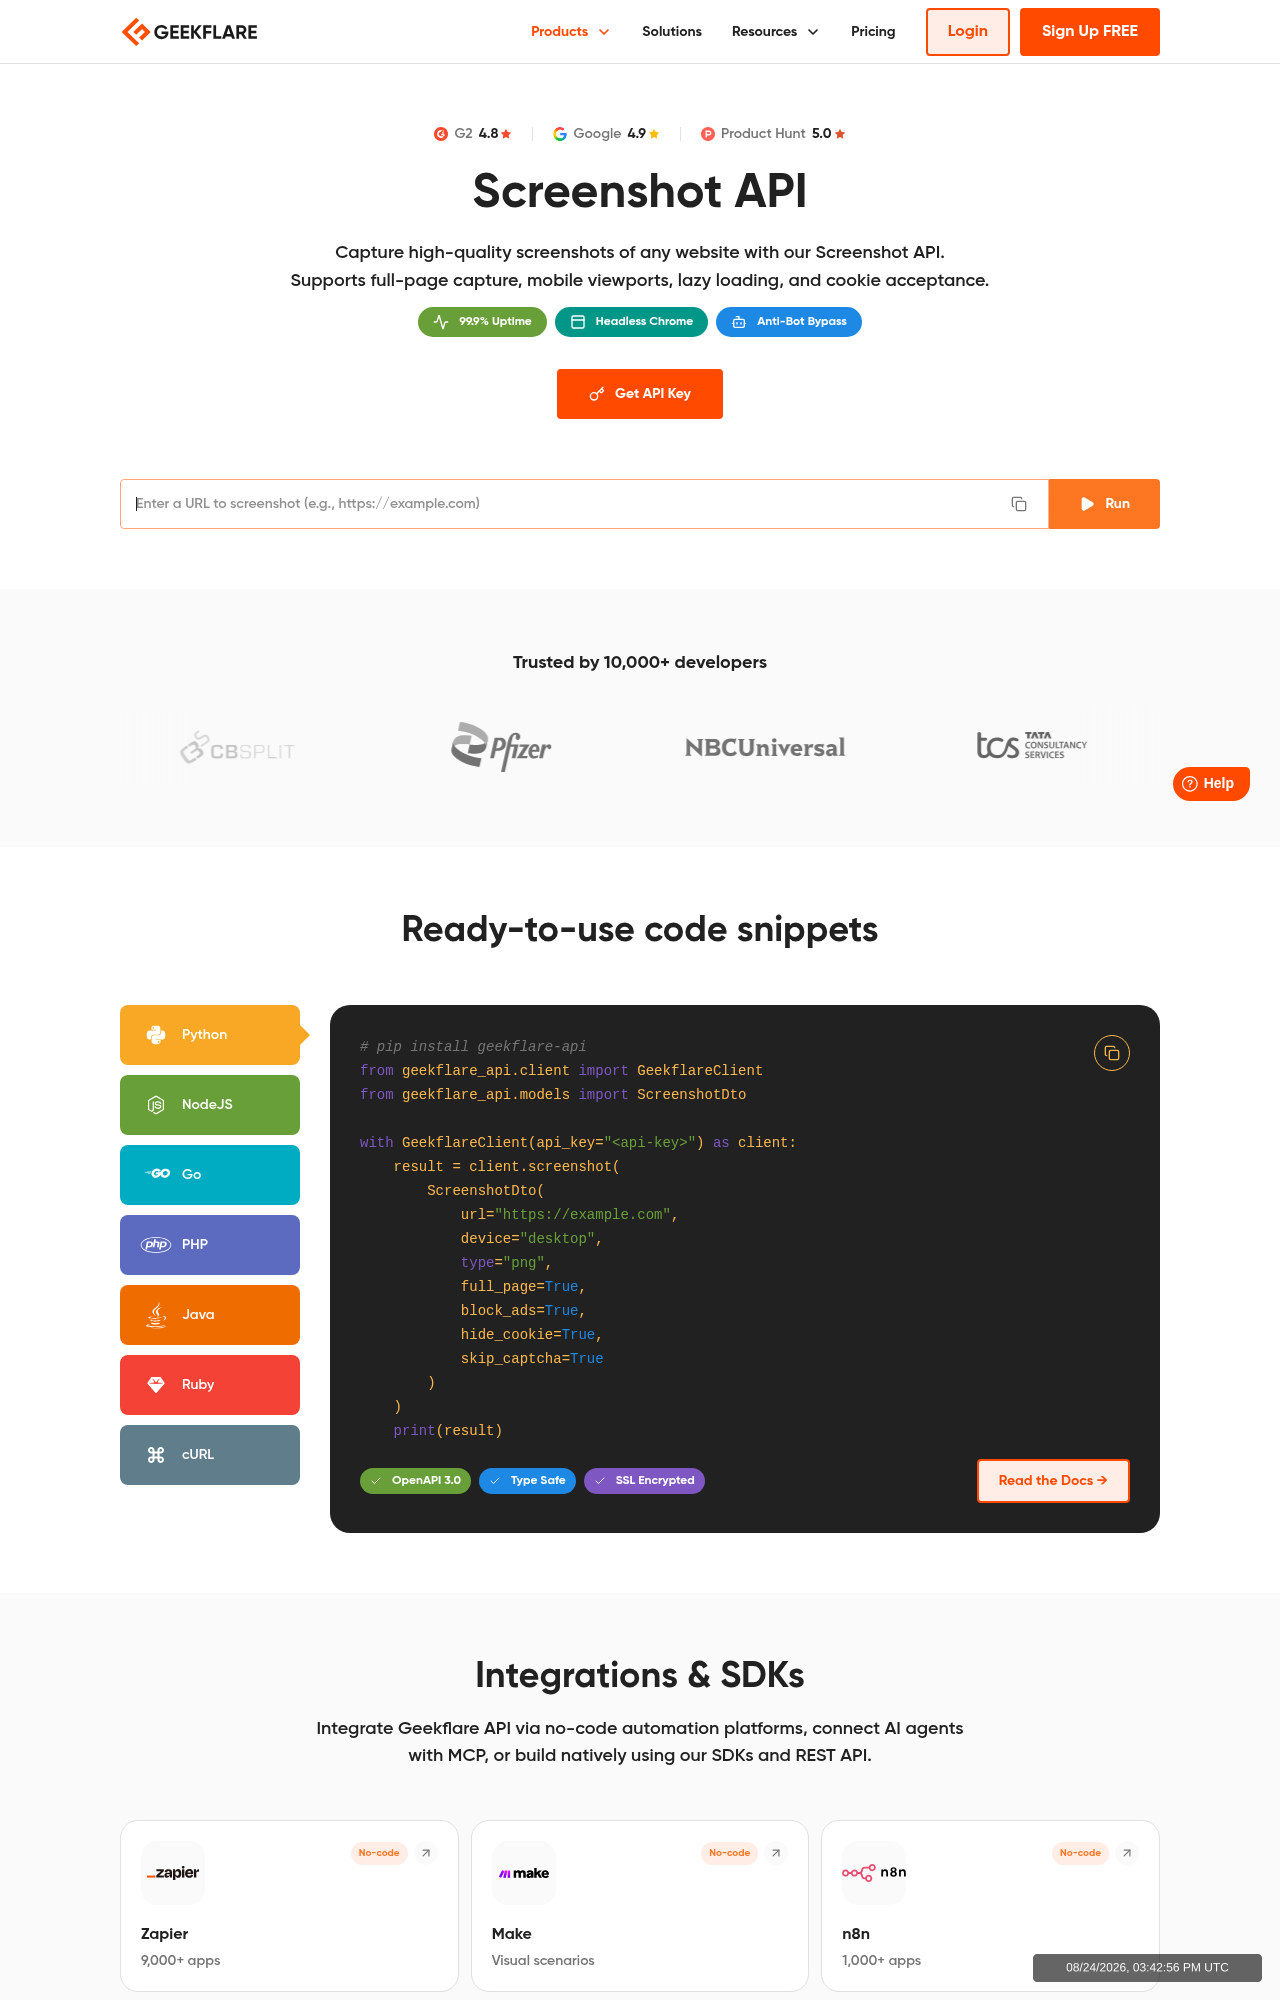
Run the script again later to create another capture of the same websites. The new records will have different timestamps. You can review screenshots from different runs to identify changes such as:
- Layout updates
- New or removed sections
- Content changes
- Missing calls to action
- Unexpected visual issues after a deployment
This creates the foundation for a website screenshot monitoring workflow. The same script can be run repeatedly to maintain a visual history of the pages you want to monitor.
Try the Screenshot API in Geekflare Playground
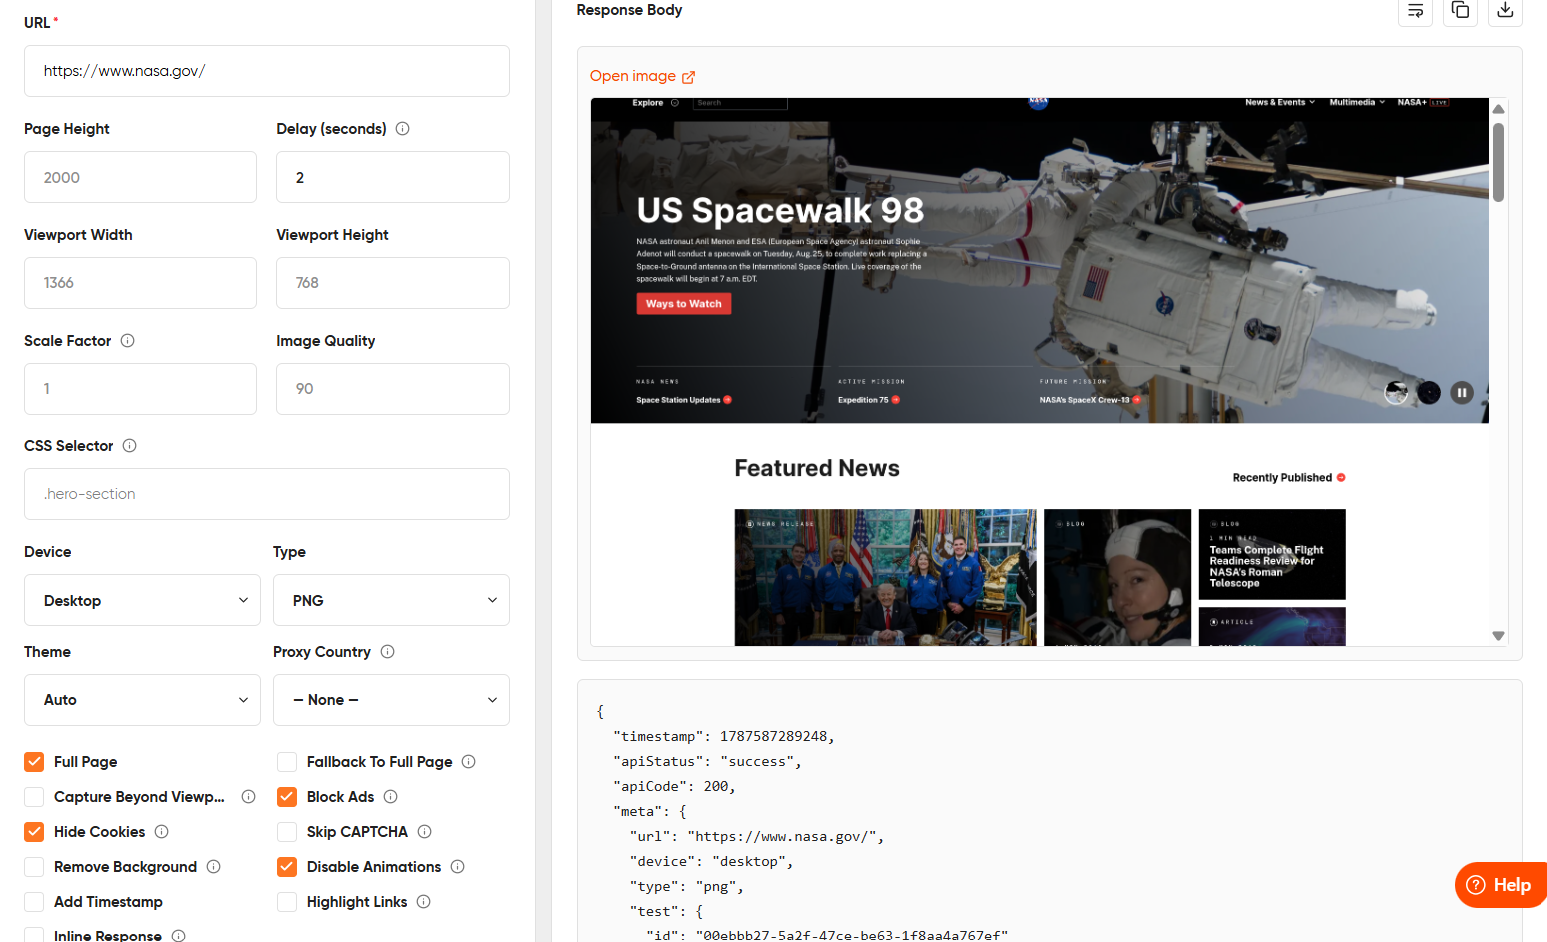
Geekflare also offers a no-code option through Geekflare Playground. You can use it to test and execute Geekflare APIs directly without writing code. The Playground lets you send one request at a time, select parameters, and review the API response.
Start by logging in to your Geekflare account and opening Playground. Select the Screenshot API and enter the URL you want to capture.
For this example, use:
https://www.nasa.gov/The Playground displays the available parameters for the Screenshot API. You can select the parameters you need and enter their values. You need not configure every available parameter.
For example, you can use:
| Parameter | Sample Value |
|---|---|
url | https://www.nasa.gov/ |
device | desktop |
fullPage | ✅ |
blockAds | ✅ |
hideCookie | ✅ |
delay | 2 |
disableAnimations | ✅ |
You can also select the image type as PNG, JPEG, or WebP and choose the theme as Auto, Light, or Dark.
After setting the required parameters, click Send Request to execute the API call. The response displays the screenshot generated for that request.
You can also copy the code snippet for the configured request. Geekflare Playground provides snippets in Python, cURL, PHP, and Node.js, which you can use in your application.
Conclusion
A screenshot monitoring workflow gives you a simple way to track how important website pages appear over time. You can capture multiple URLs in one run, adjust the Screenshot API parameters for each page, and use the results as a visual record for future comparison.
You can also test individual requests through Geekflare Playground before adding them to your Node.js workflow. From tracking design updates to reviewing pages after deployments, the same approach can be adapted to different website monitoring needs.
Frequently Asked Questions
Can I capture only a specific part of a webpage using the Screenshot API?
Yes. You can use the Geekflare Screenshot API’s selector parameter to capture a specific element on a webpage. This can be useful when you only want to monitor areas such as a pricing section, dashboard, or product details.
Which image formats does the Geekflare Screenshot API support?
You can choose PNG, JPEG, or WebP based on your requirements.
Can I test the Screenshot API without writing code?
Yes. Geekflare offers a no-code option through Playground, where you can configure parameters, execute a request, and review the response.
How can I keep screenshots consistent across multiple runs?
Use the same screenshot settings for every capture. The Geekflare Screenshot API provides options such as disableAnimations, hideCookie, and blockAds that can reduce unwanted differences between screenshots.
Can I capture screenshots for mobile devices?
Yes. The Geekflare Screenshot API supports mobile and desktop device options. You can also adjust the viewport width and height based on the screen size you want to monitor.