


A website can look correct during development but show visual issues after a deployment, design update, or code change. A small change to a layout or page element can affect the user experience, making regular visual checks an important part of Quality Assurance (QA).
These checks become easier to repeat with screenshot testing. QA teams can capture a webpage at a fixed URL and screen size, then compare the result with an expected screenshot to spot visual differences.
A Screenshot API can automate these captures using settings such as the page URL, viewport size, and full-page capture. Teams can use the same settings across test runs, creating consistent screenshots for comparison.
In this guide, I’ll use a Screenshot API to build a practical screenshot testing workflow. You’ll see how to capture webpages programmatically and use the results for visual checks, responsive testing, and web QA.
Why Use Screenshot Testing for Web QA?
Screenshot testing adds a visual check to regular QA. Functional tests can confirm that a page works correctly, but they may miss a misplaced element, broken layout, missing image, or unexpected style change.
A screenshot records the page as it appears at a specific point in time. Comparing it with an earlier capture can reveal visual differences after a code change or design update. The same approach can cover desktop, tablet, and mobile screen sizes.
Screenshot testing can also help developers and QA engineers review specific pages during development. A captured page provides a clear visual reference for checking whether the rendered result matches the expected design.
What Can Screenshot Testing Check?
Screenshot testing can cover several visual checks on a webpage:
- Layout Changes: Detect changes to the position, size, or alignment of page elements.
- Responsive Layouts: Capture the same page at different viewport sizes to check its appearance across devices.
- Missing Elements: Spot missing images, buttons, sections, or other visible content.
- Style Changes: Check changes to fonts, colors, spacing, borders, and other visual details.
- Page Rendering: Verify that key pages render as expected after a code or design update.
Build an Automated Screenshot Testing System
This workflow captures a webpage, sends the screenshot to an AI model for analysis, and returns a report of the visual issues it finds.
The Geekflare Screenshot API provides several options for webpage capture. It can capture full pages by scrolling through the content, emulate desktop, mobile, or custom viewports, and handle sites with anti-bot protection through rotating proxies and fingerprinting protection.
It also supports timestamps, ad blocking, cookie-banner removal, custom page dimensions, background removal, and element highlighting. These options let you control the capture based on the requirements of the screenshot test.
Geekflare provides SDKs for integrating its APIs into applications. For this example, we’ll use the Python SDK to call the Screenshot API and retrieve the captured image.
For the analysis step, we’ll use the Claude API-based model that can analyze images and identify visible issues in the captured webpage.
The complete workflow is:

Prerequisites
Before building the Python script, prepare the following:
- Python 3.9 or later installed on your system.
- Create a Geekflare account if you do not have one. Open the Geekflare dashboard and copy your API key.
- An Anthropic API key to access the Claude API.
- The Geekflare Python SDK installed with
pip. - A webpage URL that you want to test.
Install the Geekflare SDK with:
pip install geekflare-apiFor this example, we’ll use the Apple iPhone webpage as the target URL: https://www.apple.com/iphone/. The script will capture this page and send the resulting screenshot to Claude for analysis.
Implement the Screenshot Testing Workflow
Create a .env file in the same project directory as screenshot_testing_qa.py and add your API keys:
GEEKFLARE_API_KEY="your_geekflare_api_key"
ANTHROPIC_API_KEY="your_anthropic_api_key"
Replace the placeholder values with the API keys obtained from Geekflare and Anthropic.
Create a Python file named screenshot_testing_qa.py.
You can get the whole script here.
Add the following imports and load the API keys from the .env file:
import base64
import os
import sys

from dotenv import load_dotenv
from geekflare_api.client import GeekflareClient
from geekflare_api.models import ScreenshotDto
from anthropic import Anthropic

sys.stdout.reconfigure(encoding="utf-8")

load_dotenv()

geekflare_api_key = os.getenv("GEEKFLARE_API_KEY")
anthropic_api_key = os.getenv("ANTHROPIC_API_KEY")
Set the Apple iPhone webpage as the target URL and define paths for the screenshot and QA report:
url = "https://www.apple.com/iphone/"
SCREENSHOT_PATH = "screenshot.png"
REPORT_PATH = "qa_report.md"
Use the Geekflare Python SDK to capture the webpage. The page_height parameter limits the capture to 5,000 pixels, keeping the image below Claude’s 8,000-pixel-per-dimension limit. The inline option returns the screenshot as Base64 data, so the same image can go directly to Claude for analysis.
with GeekflareClient(api_key=geekflare_api_key) as client:
    result = client.screenshot(
        ScreenshotDto(
            url=url,
            type="png",
            full_page=True,
            viewport_width=1280,
            page_height=5000,
            delay=5,
            inline=True,
        )
    )

image_data = result["inline"]["base64"]

with open(SCREENSHOT_PATH, "wb") as f:
    f.write(base64.b64decode(image_data))
Create the Claude client and send the captured screenshot for visual QA. The prompt asks Claude to identify visible problems and clearly report its findings.
claude = Anthropic(api_key=anthropic_api_key)

message = claude.messages.create(
    model="claude-opus-5",
    max_tokens=1500,
    messages=[
        {
            "role": "user",
            "content": [
                {
                    "type": "image",
                    "source": {
                        "type": "base64",
                        "media_type": "image/png",
                        "data": image_data,
                    },
                },
                {
                    "type": "text",
                    "text": """Analyze this webpage screenshot for visual QA.

Identify visible issues such as broken layouts, misplaced or overlapping
elements, missing content, incorrect spacing, image problems, navigation
issues, or other visual problems that could affect the user experience.

List each finding clearly. If you do not find any obvious visual issues,
state that.""",
                },
            ],
        }
    ],
)
Extract Claude’s response and save it as a Markdown file. The report is also printed in the terminal, giving you both a saved result and an immediate view of the findings.
report = next(block.text for block in message.content if block.type == "text")

with open(REPORT_PATH, "w", encoding="utf-8") as f:
    f.write(report)

print(report)
Run the Script and Review the Result
Run the Python script from the terminal:
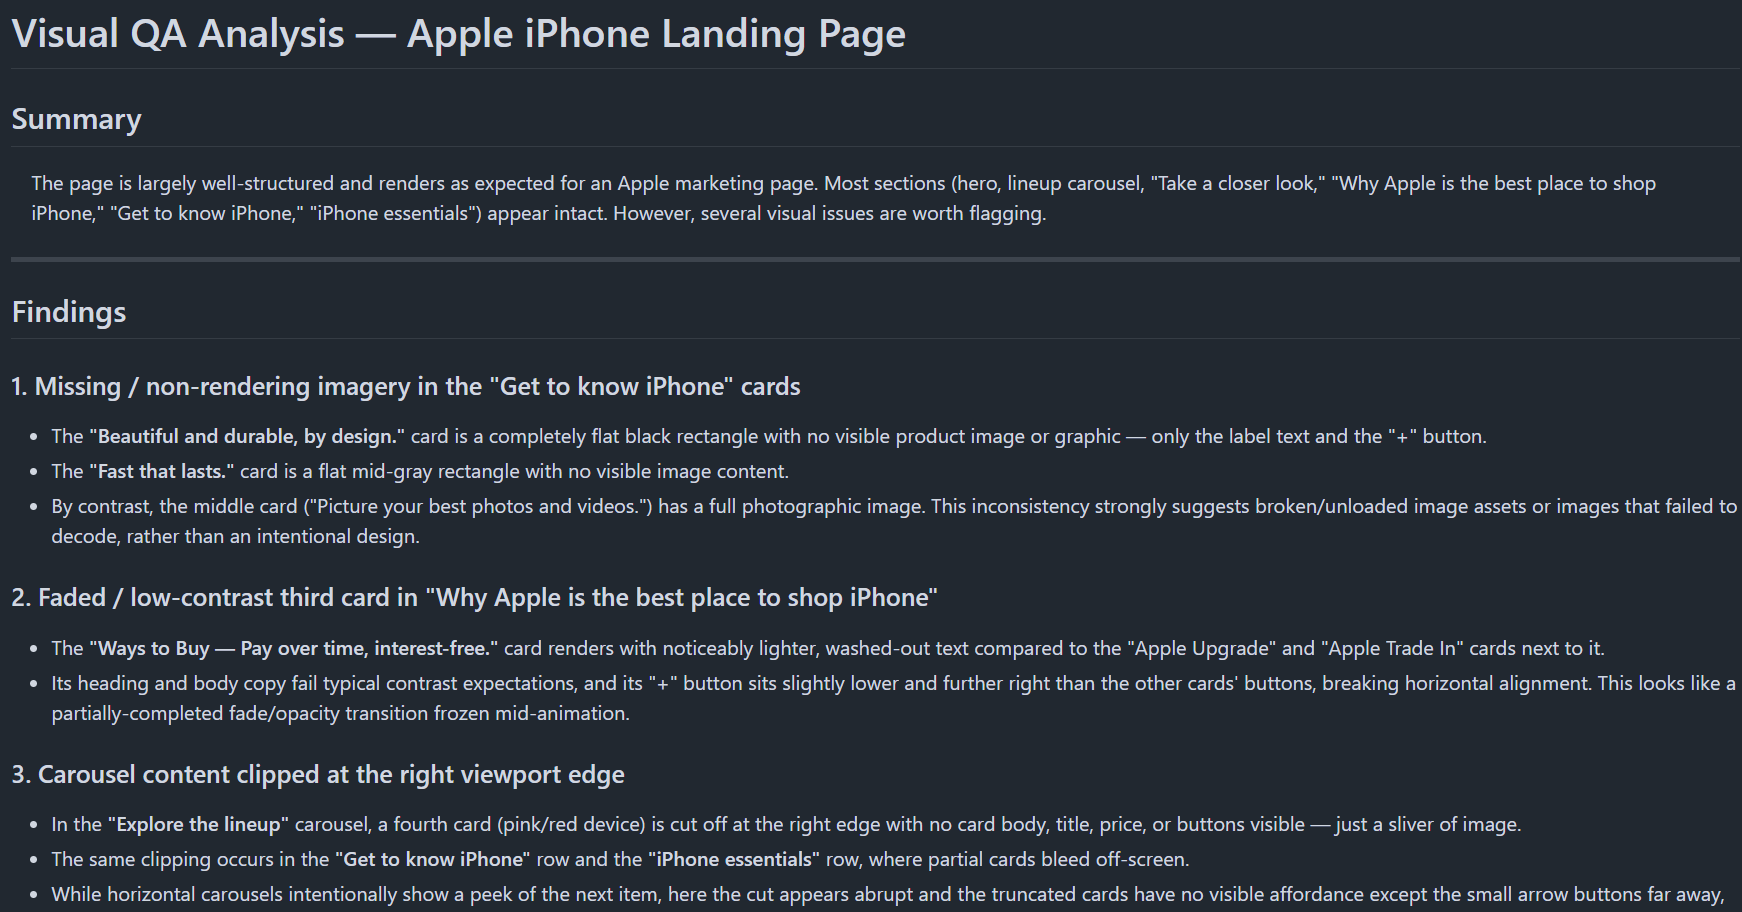
python screenshot_testing_qa.pyClaude analyzes the captured webpage and returns a detailed visual QA report, flagging issues such as missing imagery, inconsistent card styling, clipped carousel content, and alignment or contrast problems.
Use Geekflare MCP With Claude
You can also run screenshot testing directly through Claude by connecting the Geekflare MCP server. Once connected, give Claude the webpage URL and the capture requirements in a single prompt.
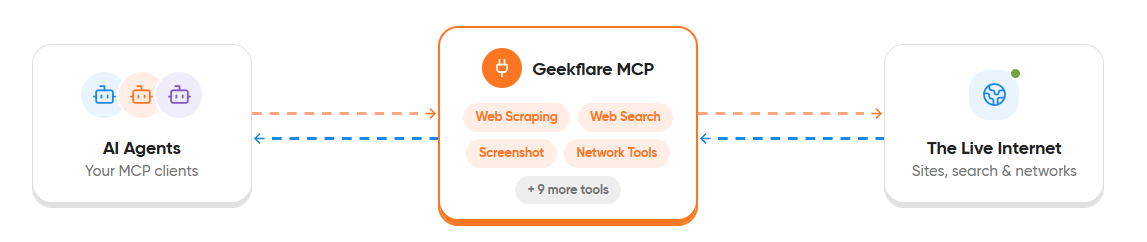
Learn how to connect the Geekflare MCP server to Claude, before continuing with the prompt.
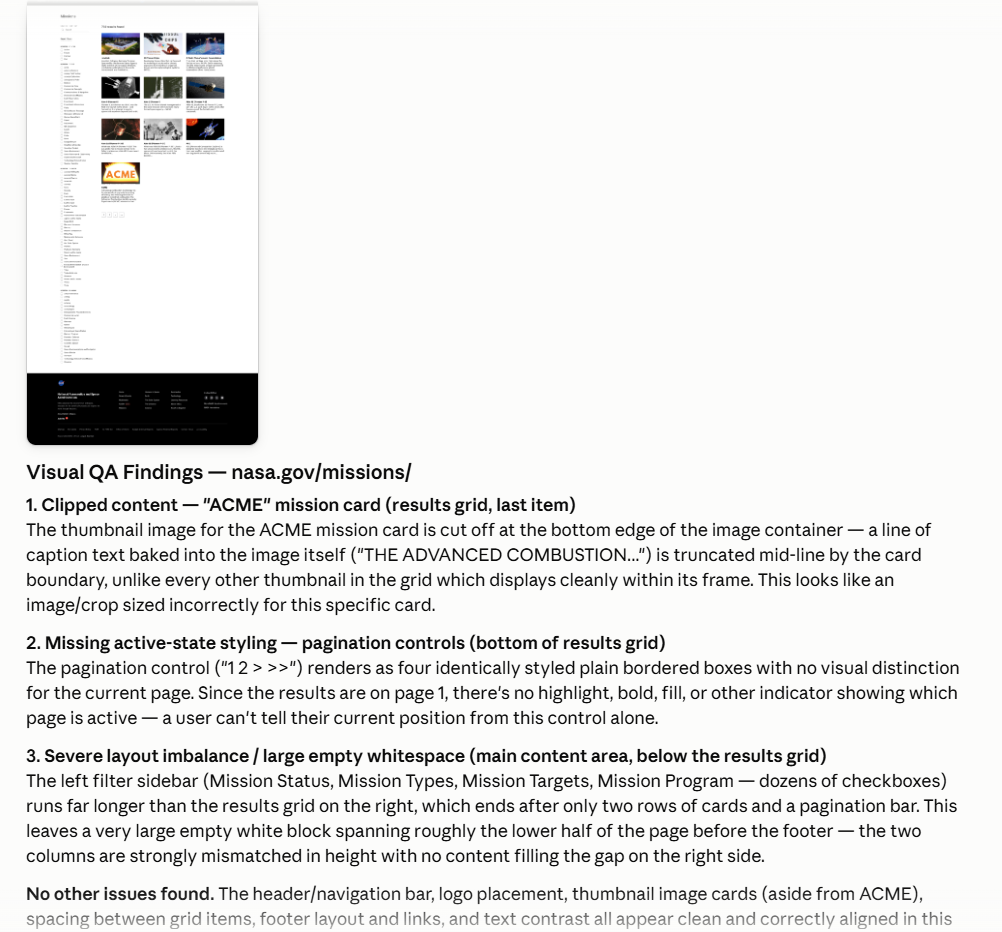
For this example, use https://www.nasa.gov/missions/. Request a full-page capture with a 5-second delay to give the page time to load before capture.
Use this prompt:
Use the Geekflare Screenshot tool to capture the full page of
https://www.nasa.gov/missions/. Set a 5-second delay before taking the screenshot.Examine the captured page for visual QA issues such as broken or misaligned layouts, missing images, overlapping elements, incorrect spacing, clipped content, contrast problems, navigation issues, and other visible UI defects.
List each finding clearly and mention the affected section. Only report issues supported by the screenshot. If you find no obvious visual issues, state that clearly.
Here is the response:
Conclusion
Screenshot testing adds a practical visual check to web QA, helping identify layout, rendering, spacing, and content issues from an actual page capture. The Geekflare Screenshot API handles the webpage capture and provides control over page dimensions, viewport size, delay, and other capture settings.
Adding Claude to the workflow lets you analyze the captured image and receive a report of potential visual issues. You can build the workflow in Python using the Geekflare SDK or connect Geekflare MCP to Claude for a simpler and prompt-based approach.
Frequently Asked Questions
What is screenshot testing?
Screenshot testing checks a webpage visually by comparing or reviewing captured images to find layout, rendering, spacing, and other UI issues.
Can screenshot testing detect layout issues?
Yes. It can help identify misaligned elements, overlapping content, clipped sections, missing images, spacing problems, and other visible defects.
Can I use Screenshot API with Python?
Yes. Geekflare provides a Python SDK that lets you integrate the Screenshot API into a Python application.