


SERP scraping is becoming increasingly popular in the SEO industry and the AI agent era, but what is it specifically?
Follow this guide and find it out! You will learn how to build a SERP scraper in Python and automatically extract search result data from Google.
What is SERP?
SERP, short for Search Engine Results Page, is the page displayed by search engines like Google when a user enters a query. It typically includes a list of links to web pages and snippets of text to describe their content.
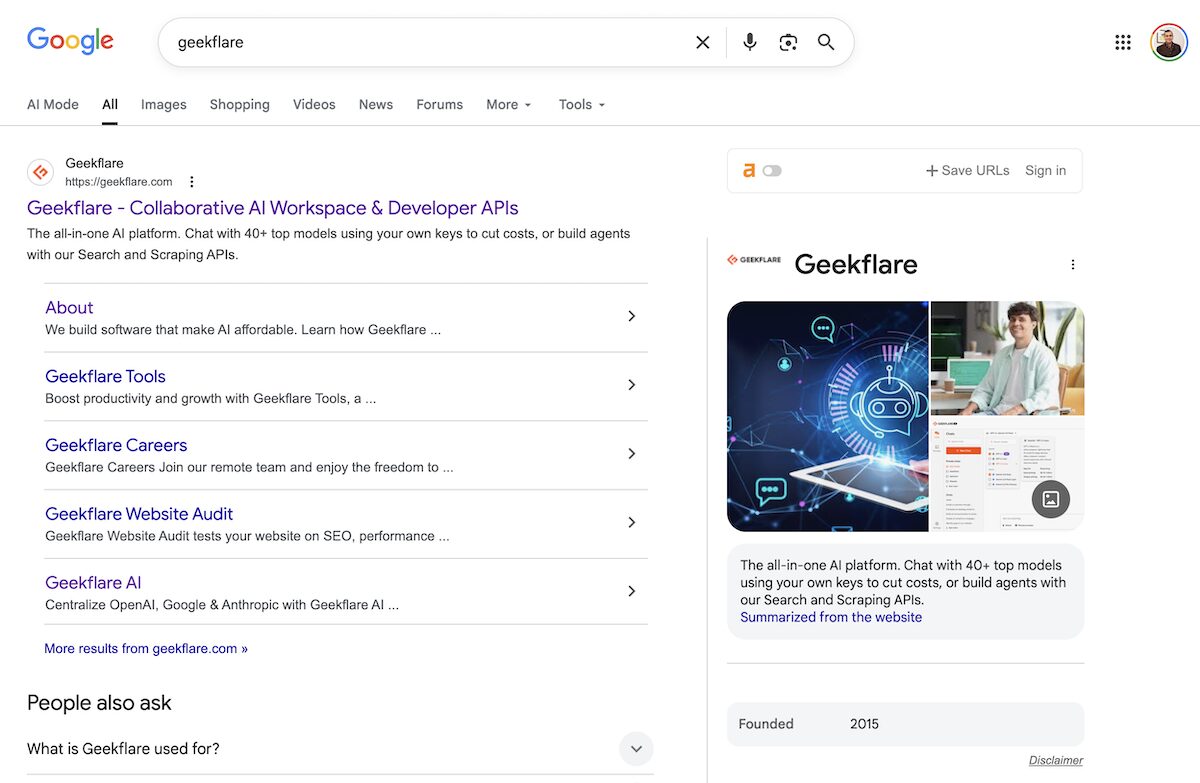
SERP is the primary way users discover information online. For this reason, companies aim to appear on the first page, if not in the first position, of search pages to get higher visibility and more organic traffic. Getting SERP data is crucial for SEO (search engine optimization), especially when it comes to studying what your competitors’s pages are and how they approach a particular keyword.
Let’s learn how to retrieve that data!
How to Build a Google SERP Scraper: Step-by-Step Tutorial
Follow this guided section and learn how to build a Google SERP scraping script in Python.
Step 1: Project setup
First, make sure you have Python 3 installed on your machine. Otherwise, download the installer, launch it, and follow the wizard. A Python IDE will also be useful. We recommend PyCharm Community Edition or Visual Studio Code with the Python extension.
Next, initialize a Python project with a virtual environment using the commands below:
mkdir serp-scraper
cd youtube-scraper
python -m venv env
The serp-scraper directory created above represents the project folder of your Python script.
To activate the environment, execute this command in Linux or macOS:
./env/bin/activateOn Windows, on the other hand, run:
env/Scripts/activateOpen the project folder in your IDE and create a scraper.py file. This is a blank file, but it will soon contain the SERP scraping logic.
Awesome, you now have a Python environment for your SERP scraper!
Step 2: Install the scraping libraries
Google is a platform that requires user interaction to work correctly. Forging a proper Google search URL is not easy, and the best way to deal with the search engine is in the browser. As a result, scraping SERP data requires a tool that can render web pages in a controllable browser, just like Selenium!
In an activated Python virtual environment, run the command below to add the Selenium package to your project’s dependencies:
pip install seleniumThis instruction may take a while, so be patient.
To get started with Selenium in scraper.py, add the following lines to it:
from selenium import webdriver
from selenium.webdriver.chrome.service import Service
from selenium.webdriver.chrome.options import Options

# to control a Chrome window in headless mode
options = Options()
options.add_argument('--headless=new') # comment it for testing

# initialize a web driver instance with the
# specified options
driver = webdriver.Chrome(
    service=Service(),
    options=options
)

# connect to the target page
driver.get("https://google.com/")

# scraping logic...

# close the browser and free up the resources
driver.quit()
This script creates a Chrome WebDriver instance, the object that enables you to programmatically control a Chrome window. The --headless=new option configures Chrome to run in headless mode. For debugging purposes, it is best to comment out that line so that you can follow live what the automated script does.
Step 3: Connect to Google
Use get() function exposed by the driver object to connect to the target page:
driver.get("https://google.com/")This instructs the controlled browser to open the page identified by the given URL in the main tab.
This is what your SERP scraper looks like so far:
from selenium import webdriver
from selenium.webdriver.chrome.service import Service
from selenium.webdriver.chrome.options import Options

# to control a Chrome window in headless mode
options = Options()
options.add_argument('--headless=new') # comment it for testing

# initialize a web driver instance with the
# specified options
driver = webdriver.Chrome(
    service=Service(),
    options=options
)

# connect to the target page
driver.get("https://google.com/")

# scraping logic...

# close the browser and free up the resources
driver.quit()
If you execute the script in headed mode, you will see the following browser window for a split second before the quit() instruction closes it:
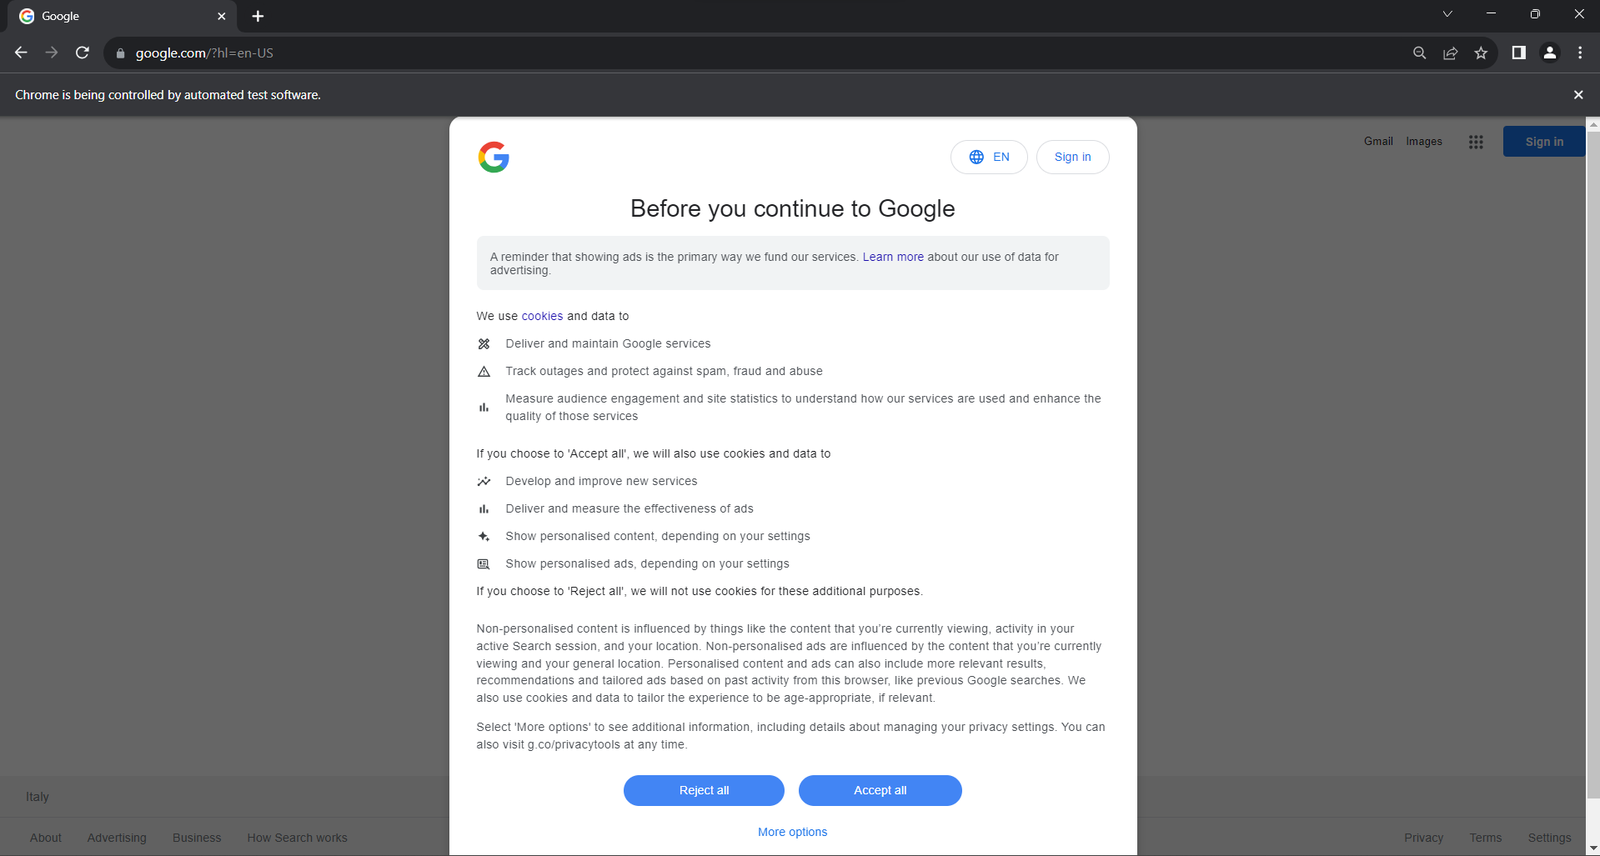
The “Chrome is being controlled by automated test software.” message ensures that Selenium is controlling Chrome as desired.
If the script is run from a server or machine in the EU (European Union), Google will show the cookie policy dialog for GDPR reasons. If this is your case, follow the next step. Otherwise, you can skip to step 5.
Step 4: Deal with the GDPR cookie dialog
The following GDPR cookie dialog may or may not appear depending on the location of your IP.
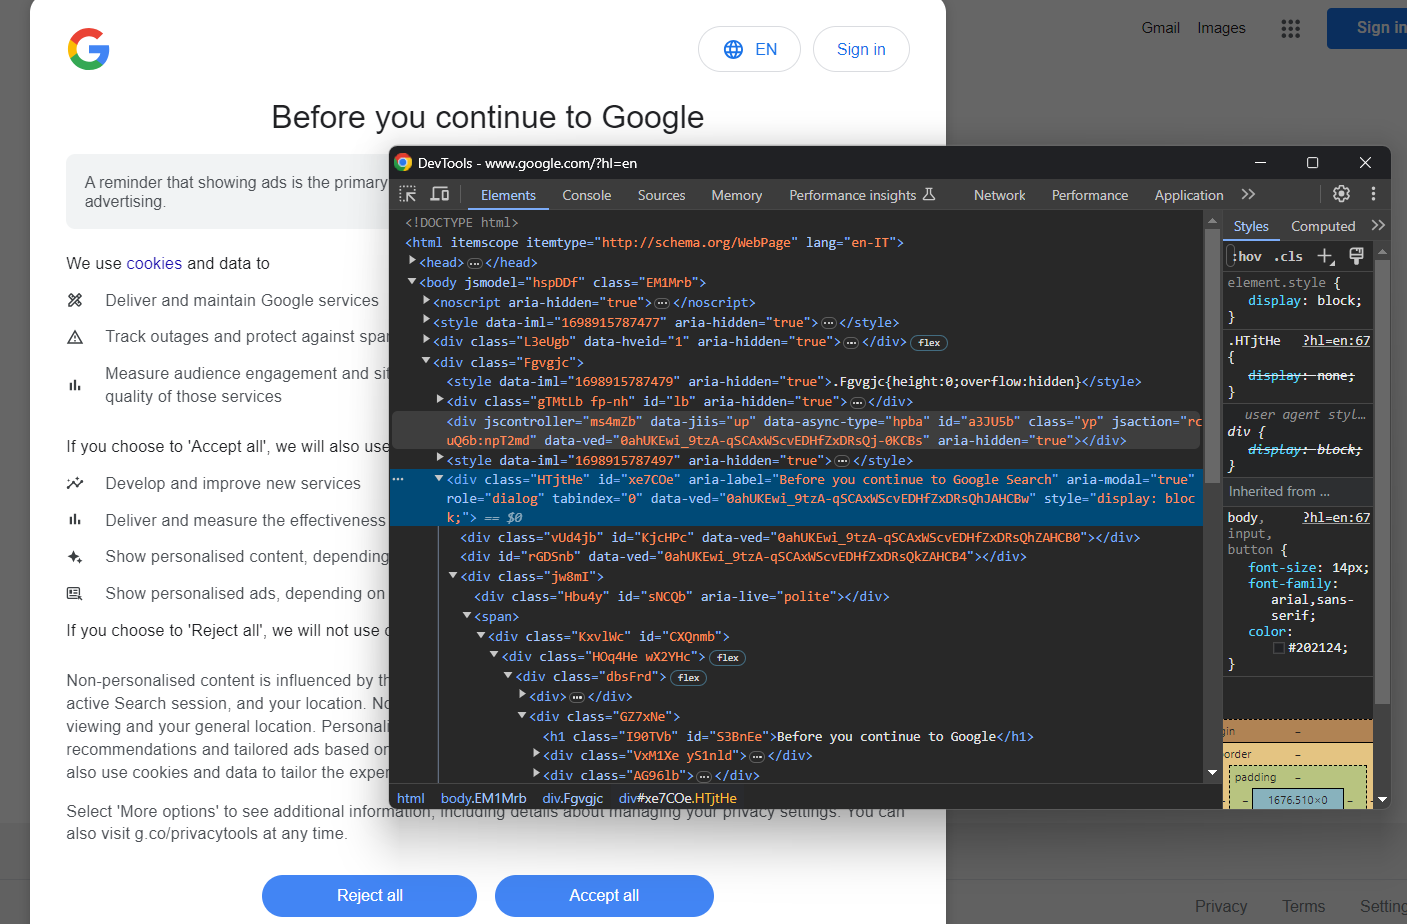
By inspecting it, you will notice that you can locate the dialog HTML element with
cookie_dialog = driver.find_element(By.CSS_SELECTOR, "[role='dialog']")find_element() is a Selenium method that allows you to select HTML elements on the page through different strategies. In this case, a CSS selector strategy was used.
Do not forget to import By as follows:
from selenium.webdriver.common.by import By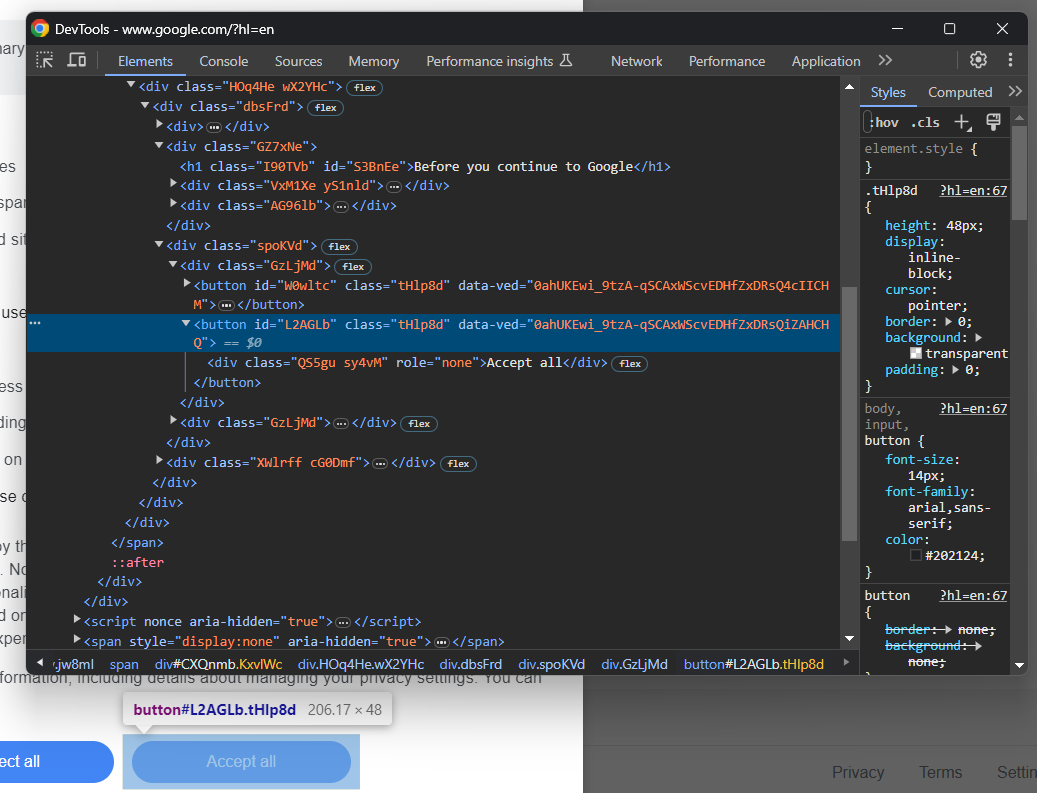
Its CSS class seems randomly generated, so you need to target its content via an XPath expression:
accept_button = cookie_dialog.find_element(By.XPATH, ".//button[contains(., 'Accept')]")This instruction will locate the first button in the dialog whose text contains the “Accept” string.
Put it all together, and you can deal with the optional Google cookie dialog as follows:
try:
    # select the dialog and accept the cookie policy
    cookie_dialog = driver.find_element(By.CSS_SELECTOR, "[role='dialog']")
    accept_button = cookie_dialog.find_element(By.XPATH, ".//button[contains(., 'Accept')]")
    if accept_button is not None:
        accept_button.click()
except NoSuchElementException:
    print("Cookie dialog not present")
The click() instruction clicks the “Accept all” button and closes the cookie policy dialog. If the dialog box is not present, a NoSuchElementException will be thrown instead, and the script will catch it and continue.
Import the exception:
from selenium.common import NoSuchElementExceptionWell done! You are ready to start scraping some SERP data!
Step 5: Fill out the search form
Focus now on the search form:
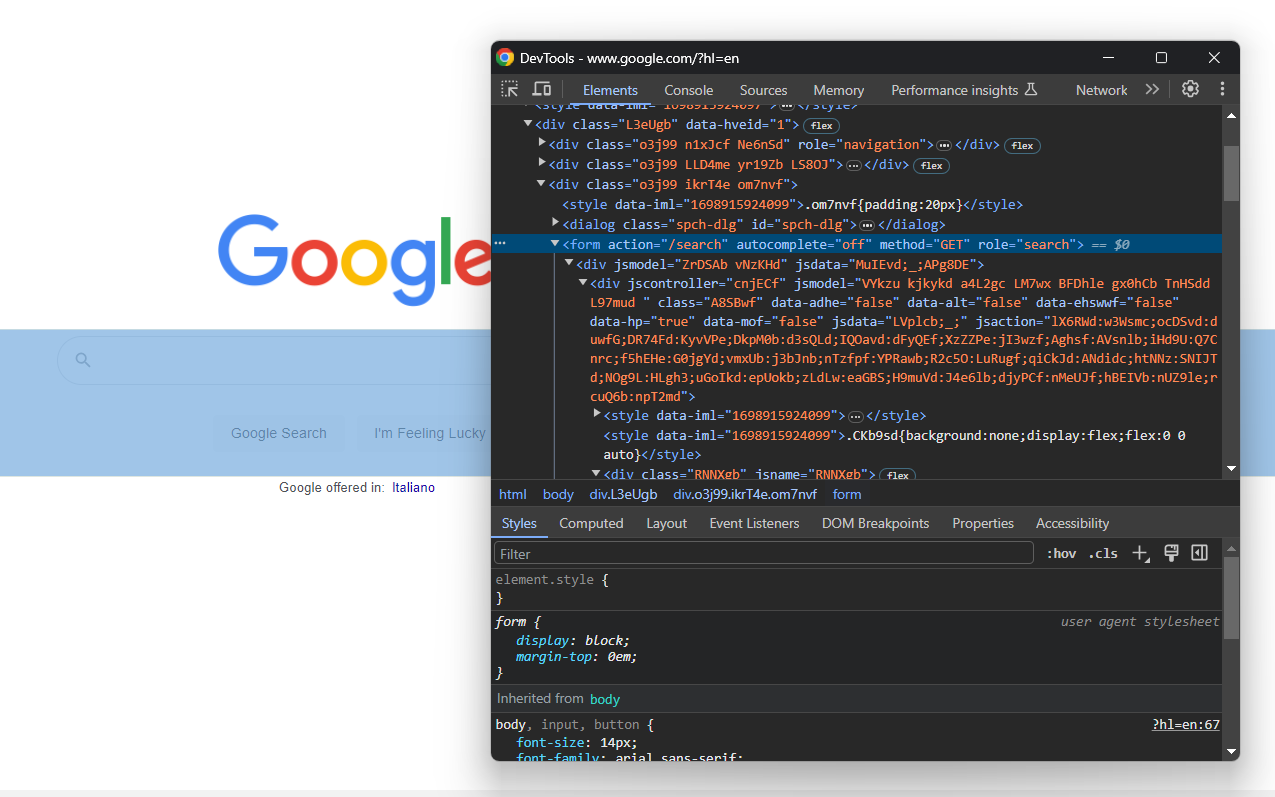
search_form = driver.find_element(By.CSS_SELECTOR, "form[action='/search']")Digging into its HTML code, you will find the search textarea:
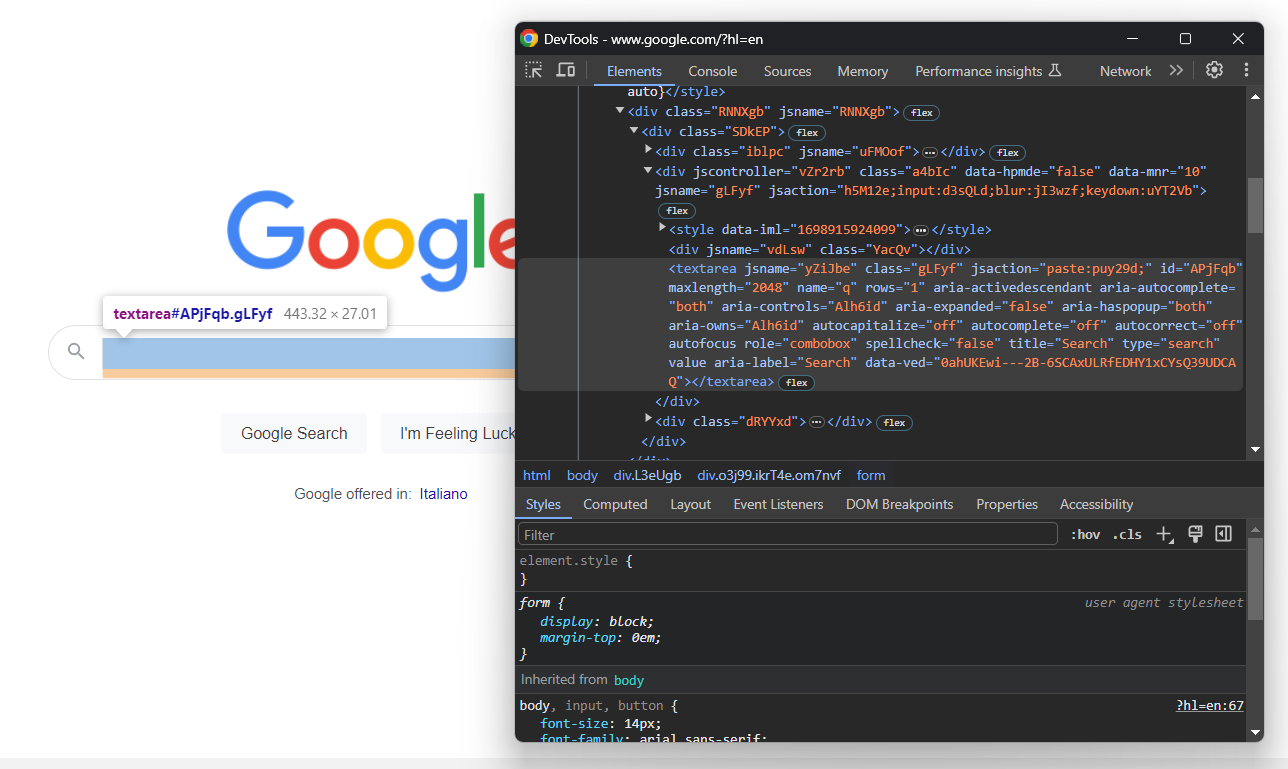
Again, the CSS class is randomly generated. So, locate it through its attributes, use the send_keys() button to type in the target SERP keyword:
search_textarea = search_form.find_element(By.CSS_SELECTOR, "textarea[aria-label='Search']")
kw = "best python library"
search_textarea.send_keys(kw)
In this example, the keyword is “best python library,” but you can search for any query you want.
Submit the form to trigger a page change:
search_form.submit()Way to go! The Google page in the controlled browser will now be redirected to the search engine results page as desired.
Step 6: Select the SERP elements
Inspect the Google SERP:
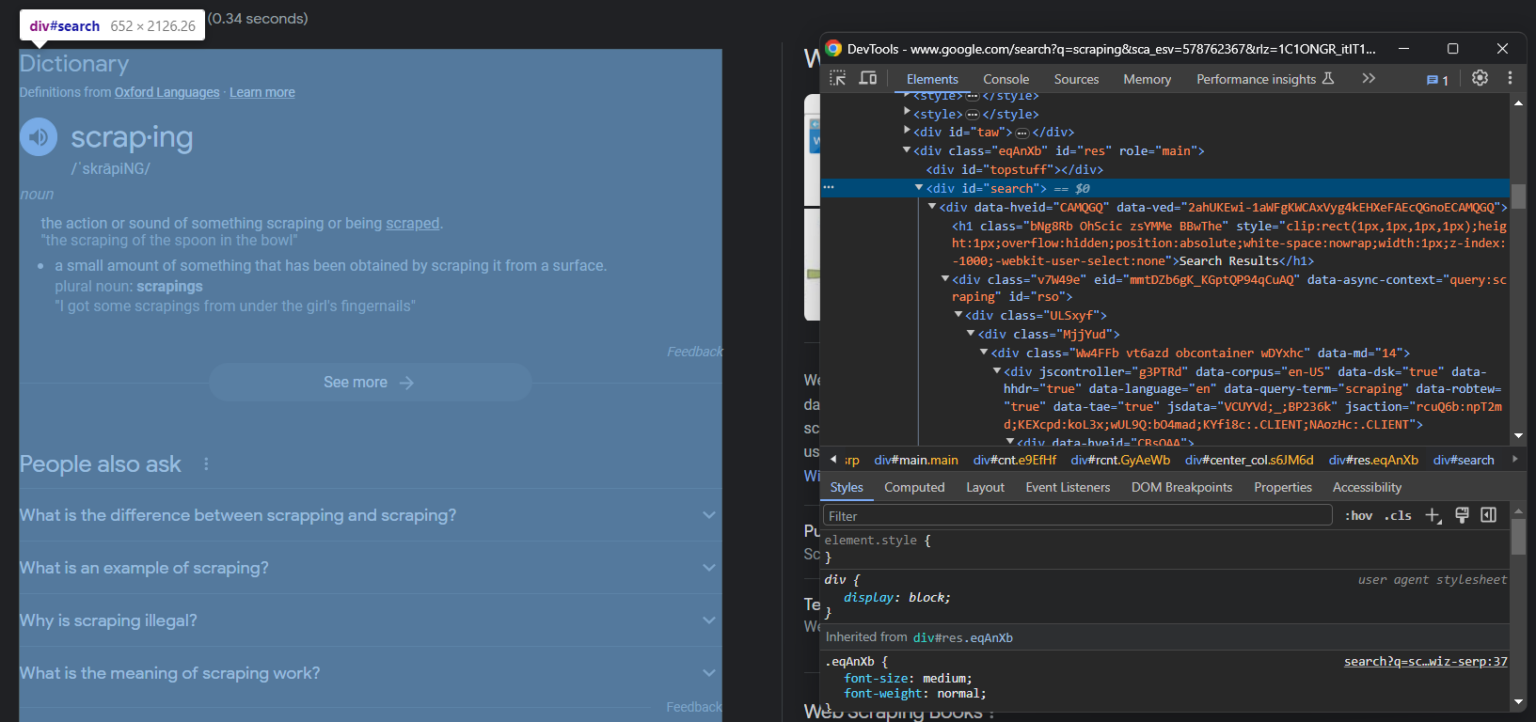
Note that the main container is a #search <div>. To make sure the page has been loaded, wait for this element to be on the page:
search_div = WebDriverWait(driver, 5).until(EC.presence_of_element_located((By.CSS_SELECTOR, '#search'))) WebDriverWait() is a special class offered by Selenium to wait for a specific event to occur on the page. In this case, the script will wait up to 5 seconds for the #search HTML element to be present. This is a good way to let the page load.
Add the required imports:
from selenium.webdriver.support.wait import WebDriverWait
from selenium.webdriver.support import expected_conditions as EC
Now that you are on the desired page, inspect the SERP elements:
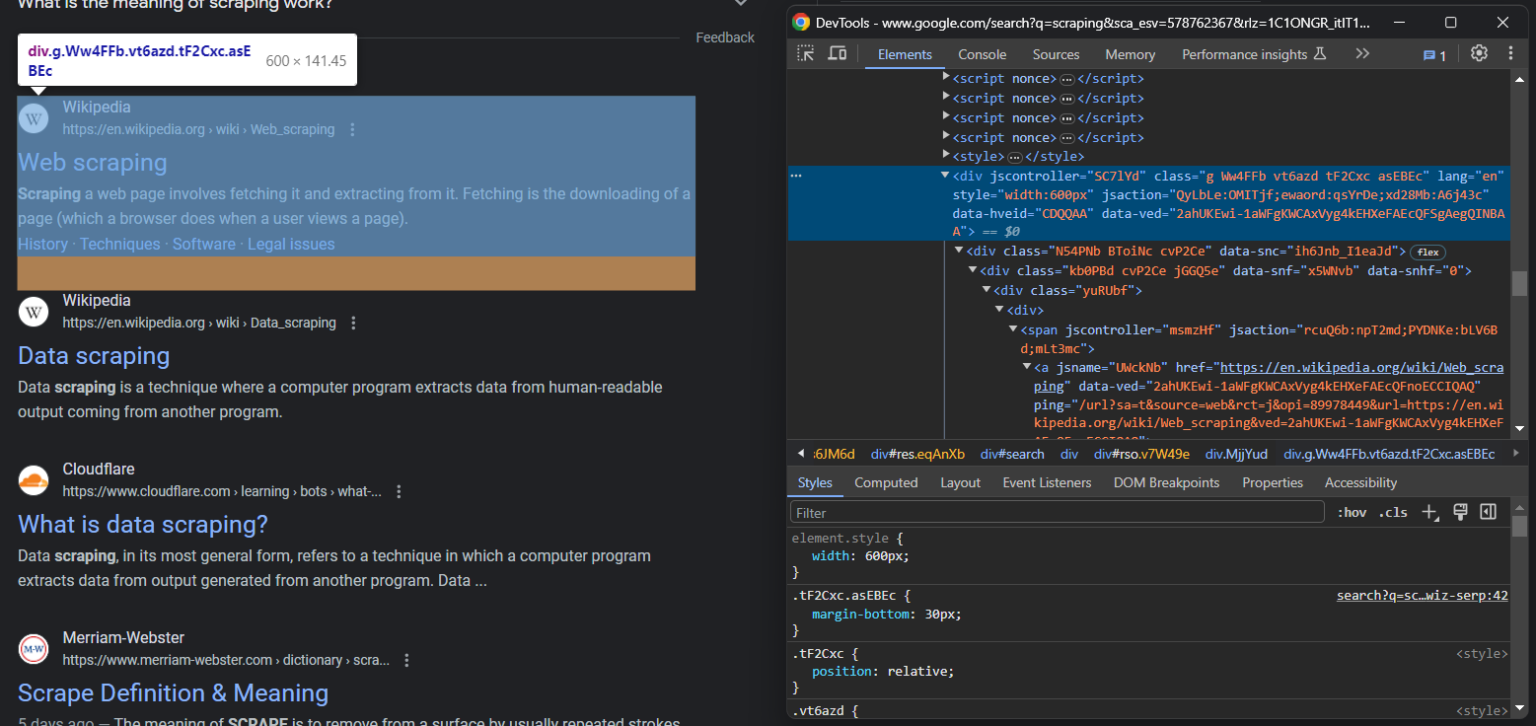
Selecting them all is not easy, but you can achieve that thanks to their unusual HTML attributes:
serp_divs = search_div.find_elements(By.CSS_SELECTOR, "div[jscontroller][jsaction][data-hveid][data-ved]")This instruction identifies all <div> that have the jscontroller, jsaction, data-hveid, and data-ved attributes.
Wow! You are one step away from scraping SERP data in Python.
Step 7: Scrape SERP data
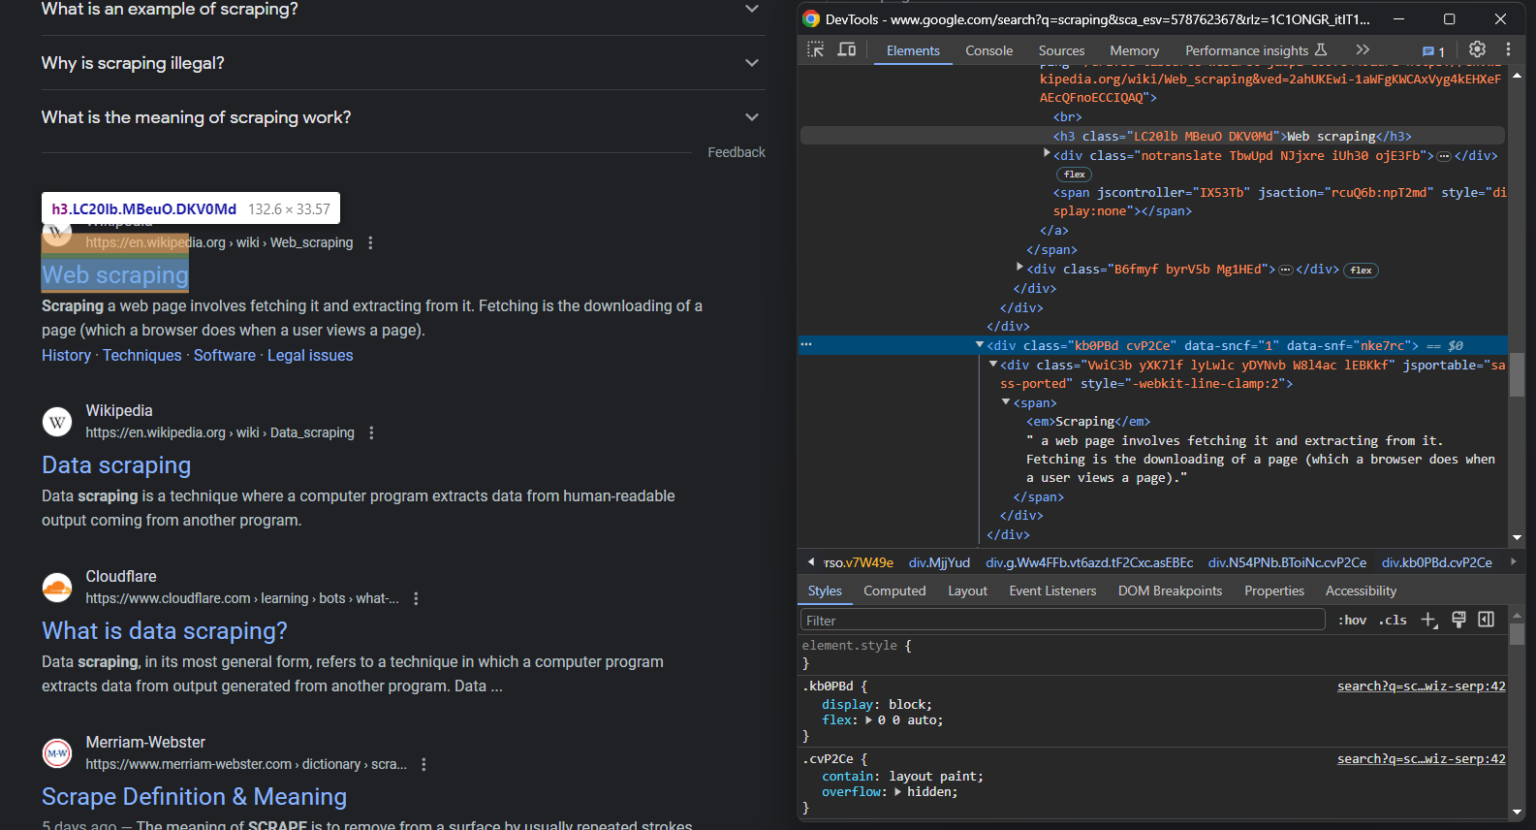
If you look closely at the previous image and this one, you will notice that a SERP element has:
- A title in an
<h3> - A URL in a
<a>element that is the parent of<h3> - A description in the
[data-sncf='1'] <div>
Since a single search page involves several results, initialize an array to scrape them:
serp_elements = []You will also need a rank variable to keep track of their rank position:
rank = 1Collect them all with the following data extraction logic:
for serp_div in serp_divs:
    # to ignore not useful SERP elements
    try:
        serp_title_h3 = serp_div.find_element(By.CSS_SELECTOR, "h3")
        serp_title_a = serp_title_h3.find_element(By.XPATH, './..')
        serp_description_div = serp_div.find_element(By.CSS_SELECTOR, "[data-sncf='1']")
    except NoSuchElementException:
        continue

    # data extraction logic
    url = serp_title_a.get_attribute("href")
    title = serp_title_h3.get_attribute("innerText")
    description = serp_description_div.get_attribute("innerText")

    # populate a new SERP data element and
    # add it to the list
    serp_element = {
        'rank': rank,
        'url': url,
        'title': title,
        'description': description
    }
    serp_elements.append(serp_element)
    rank += 1
Google tends to fill the search results page with many SERP-like elements, and you should filter them out with the try ... catch statement. Note that Selenium does not provide an easy way to access the parent of an element, so the following XPath expression was used:
serp_title_a = serp_title_h3.find_element(By.XPATH, './..')This returns the parent HTML element of the <h3> node.
At the end of the for loop, serp_elements will store all SERP data of interest. You can verify that with a print statement:
print(serp_elements)That will produce:
[
  {'rank': 1, 'url': 'https://hackr.io/blog/best-python-libraries', 'title': '24 Best Python Libraries You Should Check in 2023 - Hackr.io', 'description': 'Oct 10, 2023 — Top 24 Python Libraries: TensorFlow. Scikit-Learn, Numpy, Keras, PyTorch, LightGBM, Requests, SciPy, and more.'},
  # omitted for brevity...
  {'rank': 8, 'url': 'https://learnpython.com/blog/popular-python-libraries/', 'title': 'The Most Popular Python Libraries | LearnPython.com', 'description': "Sep 13, 2022 — 1. pandas. The pandas package is a data analysis and manipulation library. Considering Python's dominance in the data science ecosystem, pandas\xa0..."}
]
Fantastic!
Step 8: Export the scraped data to CSV
You now have the scraped SERP data in a Python array, which is not the best format to share it with other team members. Get ready to export it to a CSV file.
First, import the csv package from the Python standard library:
import csvThen, use it to populate an output CSV file with your SERP data:
csv_file = "serp_results.csv"
header = ['rank', 'url', 'title', 'description']
with open(csv_file, 'w', newline='', encoding='utf-8') as csvfile:
    writer = csv.DictWriter(csvfile, fieldnames=header)
    writer.writeheader()
    writer.writerows(serp_elements)
Finally! Your SERP scraping script is ready.
Step 9: Put it all together
Here is the final code of scraper.py:
from selenium import webdriver
from selenium.webdriver.chrome.service import Service
from selenium.common import NoSuchElementException
from selenium.webdriver.chrome.options import Options
from selenium.webdriver.common.by import By
from selenium.webdriver.support.wait import WebDriverWait
from selenium.webdriver.support import expected_conditions as EC
import csv

# to control a Chrome window in headless mode
options = Options()
options.add_argument('--headless=new') # comment it for testing

# initialize a web driver instance with the
# specified options
driver = webdriver.Chrome(
    service=Service(),
    options=options
)

# connect to the target page
driver.get("https://google.com/")

# deal with the GDPR cookie dialog, if present
try:
    # select the dialog and accept the cookie policy
    cookie_dialog = driver.find_element(By.CSS_SELECTOR, "[role='dialog']")
    accept_button = cookie_dialog.find_element(By.XPATH, ".//button[contains(., 'Accept')]")
    if accept_button is not None:
        accept_button.click()
except NoSuchElementException:
    print("Cookie dialog not present")

# submit the search form with the keyword
# to scrape SERP data for
search_form = driver.find_element(By.CSS_SELECTOR, "form[action='/search']")
search_textarea = search_form.find_element(By.CSS_SELECTOR, "textarea[aria-label='Search']")
kw = "best python library"
search_textarea.send_keys(kw)
search_form.submit()

# wait for the new page to load
search_div = WebDriverWait(driver, 5).until(EC.presence_of_element_located((By.CSS_SELECTOR, '#search')))

# select the SERP elements
serp_divs = search_div.find_elements(By.CSS_SELECTOR, "div[jscontroller][jsaction][data-hveid][data-ved]")

# to store the SERP data to scrape
serp_elements = []
# to keep track of the rank position
rank = 1

# iterate over each SERP element
# and scrape data from it
for serp_div in serp_divs:
    # to ignore not useful SERP elements
    try:
        serp_title_h3 = serp_div.find_element(By.CSS_SELECTOR, "h3")
        serp_title_a = serp_title_h3.find_element(By.XPATH, './..')
        serp_description_div = serp_div.find_element(By.CSS_SELECTOR, "[data-sncf='1']")
    except NoSuchElementException:
        continue

    # data extraction logic
    url = serp_title_a.get_attribute("href")
    title = serp_title_h3.get_attribute("innerText")
    description = serp_description_div.get_attribute("innerText")

    # populate a new SERP data element and
    # add it to the list
    serp_element = {
        'rank': rank,
        'url': url,
        'title': title,
        'description': description
    }
    serp_elements.append(serp_element)
    rank += 1

# close the browser and free up the resources
driver.quit()

# export the scrape data to CSV
csv_file = "serp_results.csv"
header = ['rank', 'url', 'title', 'description']
with open(csv_file, 'w', newline='', encoding='utf-8') as csvfile:
    writer = csv.DictWriter(csvfile, fieldnames=header)
    writer.writeheader()
    writer.writerows(serp_elements)
In less than 100 lines of code, you can build a simple Google SERP Python scraper!
Verify that it works. Open the terminal in the project’s folder and launch the command below to run it:
python scraper.pyWait for the scraper to complete, and a serp_results.csv file will appear in the root directory of the project. Open it, and you will see:

Congrats! You just performed SERP scraping. 😀
Scraping Other Google SERP Features
Organic results are only one part of the page. Shopping carousels, event listings, local packs, and “People also search for” boxes sit in separate containers with their own attributes. The method from Step 6 still applies: find a repeated, unusual attribute on the container, then use find_elements() to grab every instance.
Example: scraping the local pack
Search for something with local intent, like “coffee shop near me”, and wait for the map pack to load the same way you waited for #search in Step 6:
local_pack = WebDriverWait(driver, 5).until(
    EC.presence_of_element_located((By.CSS_SELECTOR, "div[data-local-attribute]"))
)
listings = local_pack.find_elements(By.CSS_SELECTOR, "div[role='article']")
for listing in listings:
    print(listing.text)
Google renames its internal classes often, so the exact attribute you target will differ by query type and by the day you scrape. Inspect the live page before writing the selector.
Other SERP features, at a glance
| Feature | What it contains | Where to look |
|---|---|---|
| Shopping results | Product cards with price, image, merchant | Container wrapping repeated product cards, usually flagged with a shopping-specific data attribute |
| Events | Event name, date, venue | Card list under the “Events” label, date and venue as separate child elements |
| Top stories / News | Headline, source, timestamp | Horizontal carousel, each card links to the article |
| People also search for | Related query chips | Chip list near the bottom of a result or the full SERP |
| Product results | Single product panel with price and rating | Panel triggered by a product-specific query, not a full grid |
| Top carousel / Top sights | Image cards for places or topics | Horizontal scrollable image row |
| “Refine by” filter | A row of category buttons under the search box that narrows the query | Horizontal chip row directly below the search box or a specific result block |
| “Broaden search” suggestions | Related, less specific queries Google offers when your search is narrow | Small suggestion box usually appears when the result count is low |
| Specs / comparison panel | Side-by-side spec table Google shows for certain product searches | Panel with a table-like grid only appears on product-comparison-style queries |
Same rule for all of them: inspect first, then select by attribute, not by class name.
Scraping Non-Google Search Engines
The Selenium approach in this tutorial works on any search engine. Only the URL and the selectors change.
| Engine | Search URL pattern | Notes |
|---|---|---|
| Bing | bing.com/search?q= | Fewer anti-bot defenses than Google |
| Yandex | yandex.com/search/?text= | Aggressive bot detection, expect CAPTCHAs quickly |
| Baidu | baidu.com/s?wd= | Often blocks non-Chinese IP ranges outright |
| Naver | search.naver.com/search.naver?query= | Layout differs heavily from Google, plan for a separate parser |
| Yahoo | search.yahoo.com/search?p= | Results are Bing-sourced in most regions |
| DuckDuckGo | duckduckgo.com/html/?q= | The /html/ endpoint returns server-rendered results without JavaScript, easier to parse than the main site |
| YouTube | youtube.com/results?search_query= | Different beast entirely, results are video cards, not links, expect a different selector approach altogether |
A couple of terms worth knowing if you’ve seen them. Bing and Baidu’s Answer Box is their version of Google’s featured snippet. DuckDuckGo’s Knowledge Graph panel is the same idea as Google’s Knowledge Panel, an info box for a recognized entity.
The same rule applies to both: inspect the live page, target by attribute, and expect the markup to differ from Google’s. Budget time for selector maintenance regardless of which one you pick.
Challenges in SERP Scraping and How to Solve Them
Retrieving SERP data comes with several challenges that must be considered:
- Google anti-bot technologies: Google knows how valuable its data is. Also, it wants to protect the user experience from bots. Here is why, after a few automated requests from the same IP, it will show a CAPTCHA or block you. This is just one of the many anti-bot measures that Google adopts to prevent automated software like your scraper from accessing its pages. Getting around those solutions is not easy, which can easily undermine the entire scraping process.
- Complexity in the architecture: Google changes its algorithm frequently, and millions of pages are added/updated every day. As a result, SERPs change very often, which means that you might need to run your scraper on a consistent basis. This involves setting up a scheduler and a heartbeat system to check that everything is working as expected.
- Achieving efficiency is tricky and costly: Scraping a single SERP is easy, but if you want to scale the process to multiple pages, you need to run several scripts in parallel for great performance. Controlling many instances of Chrome is not straightforward. Plus, it requires a lot of resources and involves high infrastructure costs.
Geekflare Search API simplifies this part of the process by offering a scalable, headless browser infrastructure with built-in session management, request proxying, and stealth plugins to reduce detection rates.
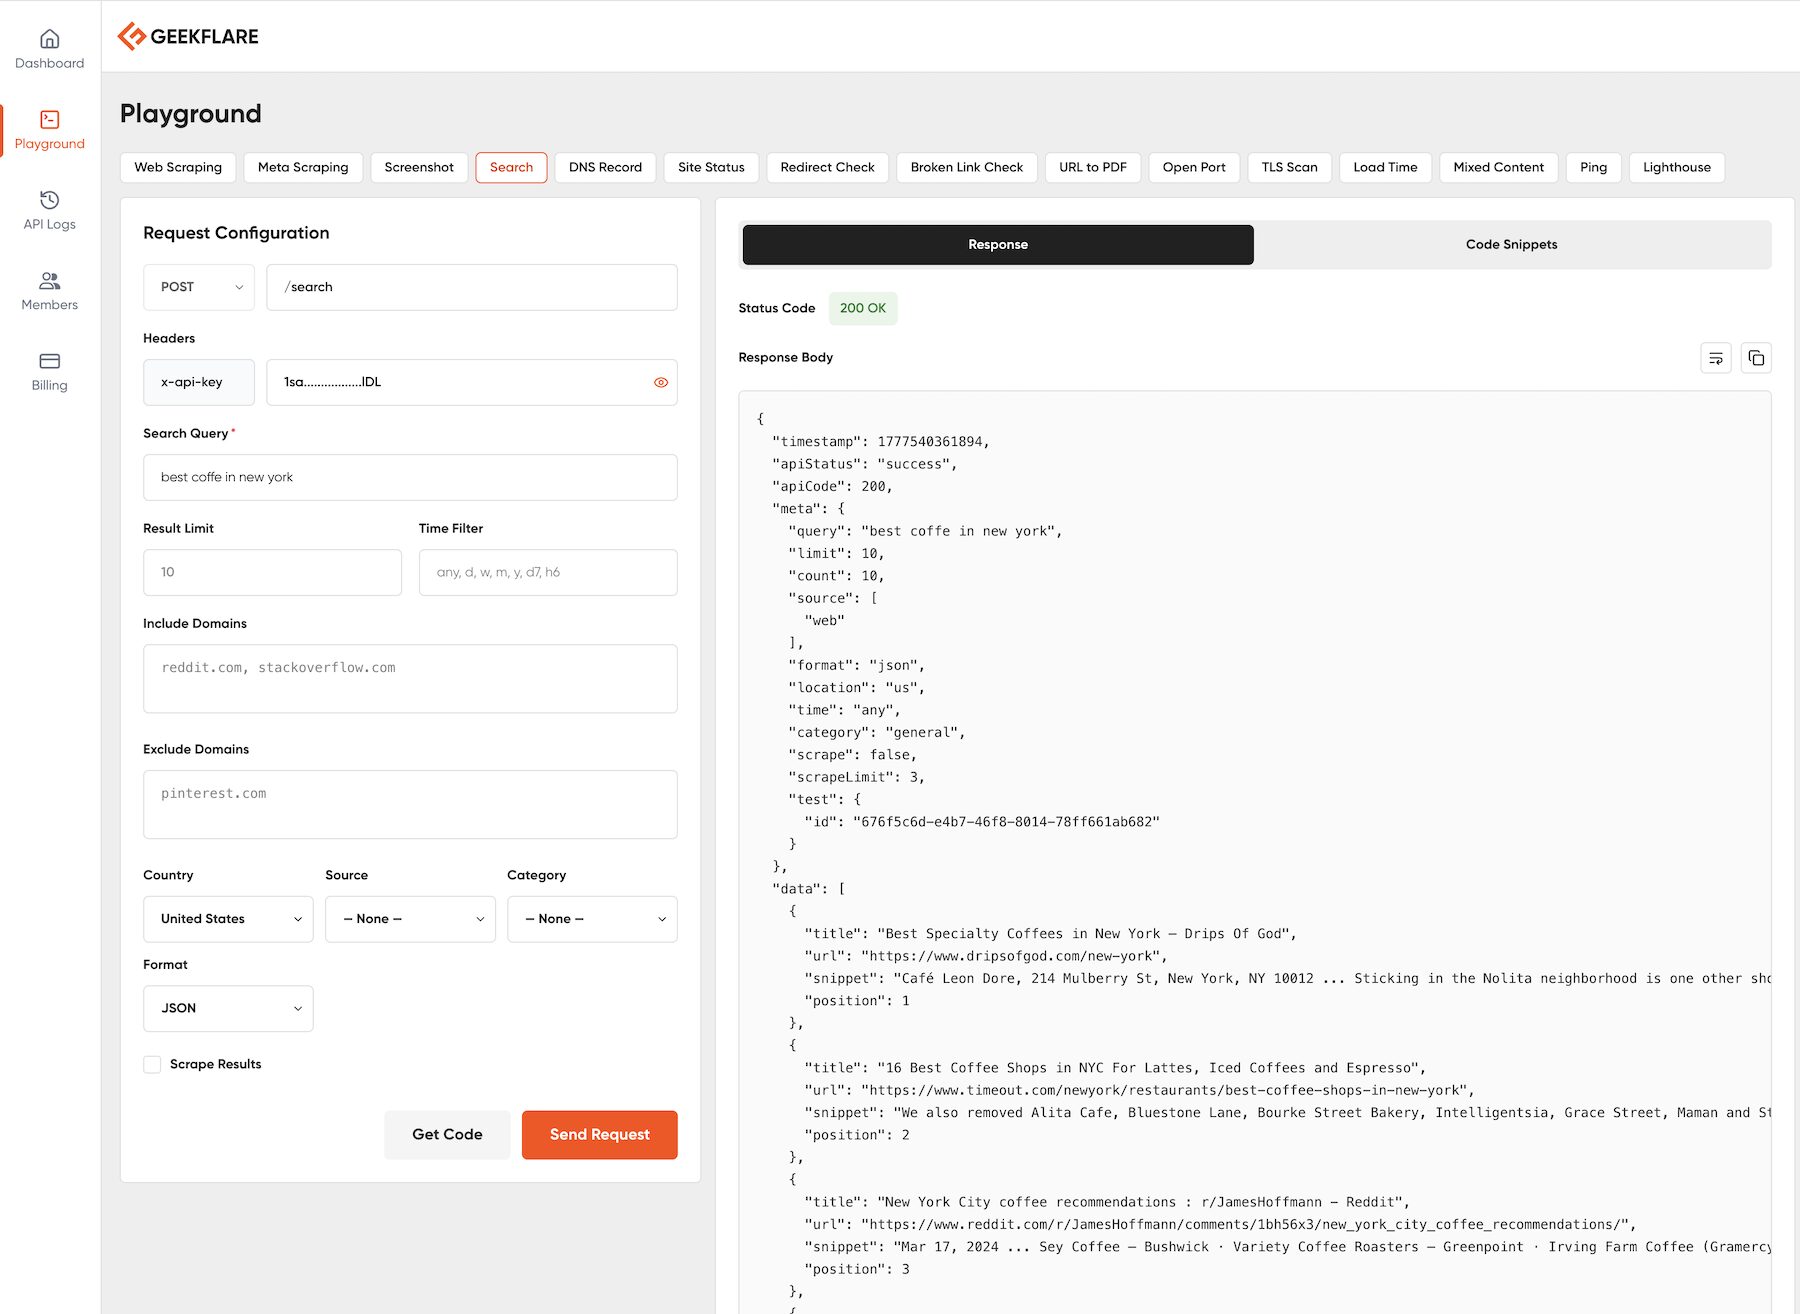
Another solution? Bright Data’s SERP API.
If you are not familiar with that technology, SERP API is nothing more than a set of endpoints that come with anti-bot capabilities and provide real-time SERP data from all major search engines. Make a simple API call and get your SERP data in JSON or HTML format!
Conclusion
In this tutorial, we saw what the SERP is, why it is so important, and how to retrieve useful data from it. In detail, you learned the steps required to build a SERP scraper in Python. You also learned about the challenges and limitations involved in SERP scraping and how Geekflare API overcomes them all!
Good to know
Is there a free way to scrape Google search results?
Yes, the method in this guide is free. You pay in engineering time instead: proxy rotation, CAPTCHA handling, and fixing selectors when Google changes its markup. The Geekflare Search API has a free tier if you’d rather skip that maintenance.
Can I scrape Google Shopping or Events results with this same script?
Yes. The setup, connection, and search steps stay identical. Only the element selectors in Step 6 change, since Shopping and Events use different containers than organic results.
Does this method work on Bing, Yandex, Baidu, or Naver?
The Selenium approach works on all of them. The selectors don’t carry over, since each engine has its own markup. Treat each one as a separate scraper.
Will Google block my IP for scraping?
Eventually, yes, if you send more than a handful of requests from the same IP. Rotate proxies, add delays between requests, and expect to solve CAPTCHAs at scale. This is the main reason most teams move to an API after the first few hundred queries.
What’s the fastest way to get SERP data without maintaining a scraper?
Use the Geekflare Search API. It returns structured SERP data, handles proxies and bot detection on its end, and skips browser automation entirely.